18th Birthday Cake holds more than frosting and candles—it carries a story. Hi, I’m Amanda, and welcome to BeamRecipes, where food is my way of sharing love and comfort. From childhood afternoons baking beside my mom to late-night kitchen experiments, cooking has always been my language of connection. Here, I share recipes that are approachable, joyful, and rooted in real life—like this special cake that celebrates one of life’s biggest milestones. BeamRecipes isn’t about perfection; it’s about creating memories, one recipe at a time. Let’s bake together, celebrate together, and make every meal a moment worth remembering.
Why This Cake Works
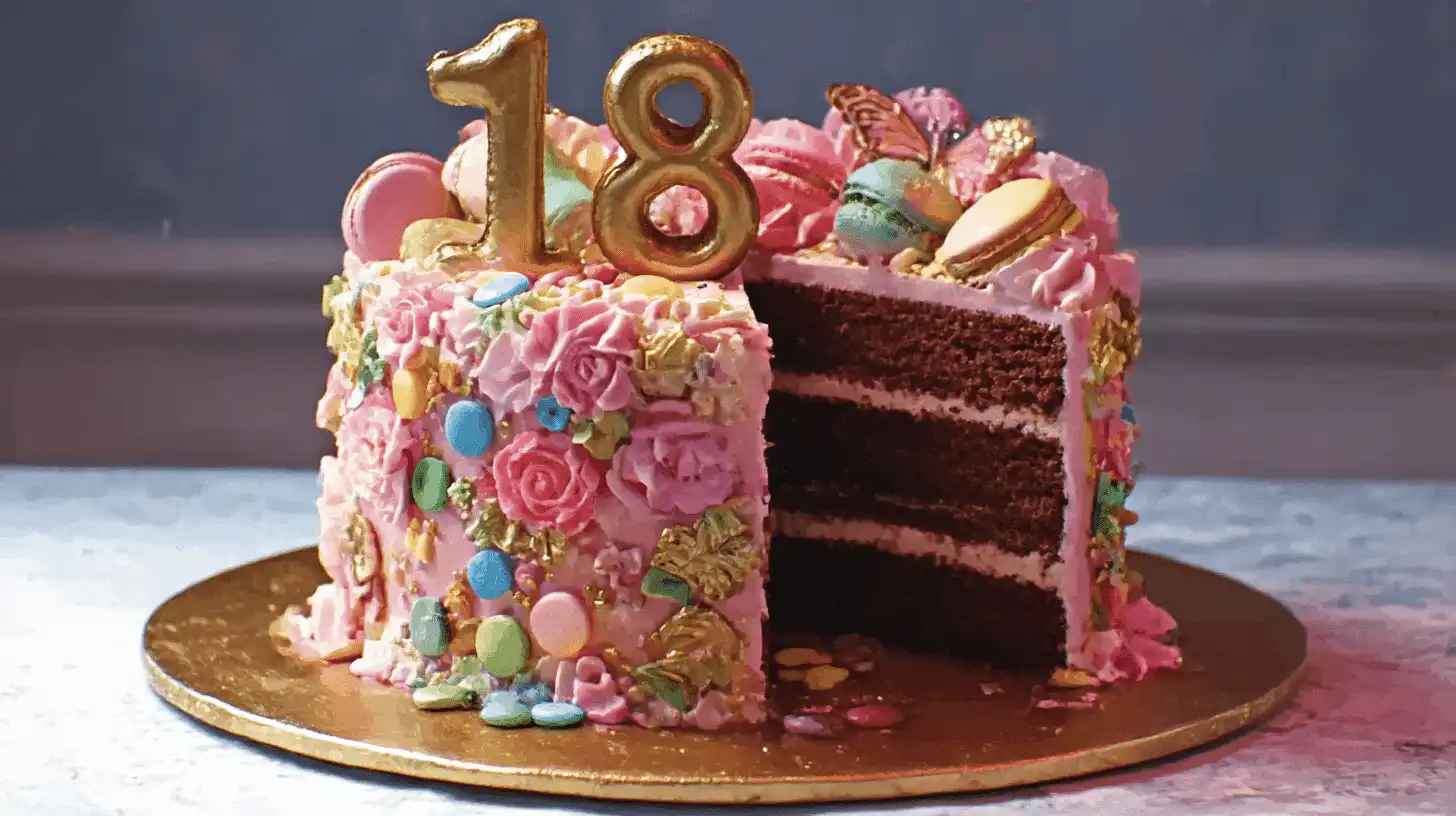
A Cake That Tells a Story
An 18th birthday cake isn’t just about sugar and flour—it’s a centerpiece of celebration. This recipe balances beauty with practicality, so you don’t need professional training to create something meaningful.
Made for Sharing
The cake is rich and satisfying, perfect for serving a crowd of friends and family gathered to celebrate such a milestone.
Flexible Design
You can dress this cake up with fondant, fresh flowers, or edible glitter—or keep it simple with buttercream and sprinkles.
Tested and Reliable
The steps are clear, straightforward, and forgiving enough that even if you’re new to baking, you’ll still end up with a cake worth celebrating.
Ingredients
Base Cake Layers
- 3 cups all-purpose flour
- 2 ½ tsp baking powder
- 1 tsp baking soda
- ½ tsp salt
- 1 cup unsalted butter, softened
- 2 cups granulated sugar
- 4 large eggs, room temperature
- 1 tbsp vanilla extract
- 1 ½ cups whole milk
Frosting and Filling
- 1 ½ cups unsalted butter, softened
- 5 cups powdered sugar
- 2 tsp vanilla extract
- 3–4 tbsp heavy cream
- Optional: strawberry jam, lemon curd, or chocolate ganache for layers
Decoration Options
- Fresh berries, edible flowers, or gold sprinkles
- “18” cake topper or sparkler candles
Instructions
Step 1: Preheat and Prepare Pans
Preheat your oven to 350°F and line two or three round cake pans with parchment paper. Grease lightly to prevent sticking.
Step 2: Mix the Dry Ingredients
Whisk together flour, baking powder, baking soda, and salt in a medium bowl. Set aside.
Step 3: Cream Butter and Sugar
In a large mixing bowl, beat butter and sugar until light and fluffy. This step creates a tender crumb.
Step 4: Add Eggs and Vanilla
Beat in the eggs one at a time, followed by vanilla extract. The batter should look smooth and glossy.
Step 5: Combine Wet and Dry
Alternate adding the dry mixture and milk, mixing just until combined. Don’t overmix to keep the cake soft.
Step 6: Bake the Layers
Divide the batter evenly into pans. Bake for 25–30 minutes until a toothpick inserted comes out clean. Cool completely before frosting.
Step 7: Make the Frosting
Whip butter until creamy, then gradually add powdered sugar. Beat in vanilla and enough cream to reach a spreadable consistency.
Step 8: Assemble the Cake
Place the first layer on a stand, spread frosting or jam, add the second layer, and repeat. Frost the outside with smooth or rustic swirls.
Step 9: Decorate for 18
Finish with your choice of toppings—berries, sprinkles, or a glittering topper that marks the milestone.
Why This Recipe Works
Balanced Texture
The butter gives richness while the milk keeps it soft and moist, creating a cake that feels indulgent without being heavy. Every bite has that tender crumb you expect from a bakery-style celebration cake.
Sturdy Enough for Layers
Turning 18 is a big milestone, and this cake needs to stand tall for the occasion. The recipe is designed to give structure, so you can confidently stack two or three layers without leaning or crumbling.
Classic Vanilla Base
The base is a clean canvas. Whether you add chocolate, fruit, or caramel, it complements any filling and frosting without overwhelming the flavors.
Buttercream Versatility
This buttercream whips up silky and smooth, making it ideal for spreading or piping. You can tint it with gel food colors, swirl in flavors, or keep it simple and creamy white.
Celebration-Ready Design
From small dinners to big parties, this cake adapts. Add sprinkles for fun, fresh flowers for elegance, or glittering toppers for that Instagram-worthy finish.
Variations
Chocolate Lover’s Version
Replace one cup of flour with unsweetened cocoa powder and add a splash of hot coffee to the batter for deeper chocolate notes. Fill with ganache for pure indulgence.
Berry-Filled Layers
A layer of strawberry jam or raspberry compote adds freshness and tang, balancing the sweetness of the frosting.
Elegant Naked Cake
Frost lightly so the layers peek through, then decorate with edible flowers, herbs, or seasonal fruit for a chic, rustic look.
Funfetti Surprise
Fold in ½ cup of rainbow sprinkles into the batter before baking. When sliced, every piece reveals a joyful burst of color—perfect for an 18th birthday celebration.
Single-Tier Showstopper
If you’re hosting a smaller gathering, bake just two thicker layers and lavish them with decorations. It feels special without being overwhelming.
Common Mistakes to Avoid
Overmixing the Batter
Once the flour goes in, mix gently. Overmixing activates the gluten and makes the cake dense instead of soft.
Frosting a Warm Cake
Patience is key. Even slightly warm layers will melt the buttercream, making it messy and hard to save.
Skipping Parchment Paper
Grease alone won’t protect your cake. Parchment paper ensures clean removal and perfectly round layers.
Rushing the Assembly
Stacking and frosting take time. A few extra minutes spent smoothing, filling, and decorating can make the difference between a cake that looks rushed and one that looks worthy of an 18th birthday table.
FAQs
Can I bake the layers ahead of time?
Yes. Cool them fully, wrap in plastic, and freeze for up to a month. Let them thaw overnight in the fridge before decorating.
What’s the best way to transport the cake?
Refrigerate it for at least an hour before moving. A chilled cake travels sturdier, and frosting holds its shape better.
Can I use store-bought frosting?
Of course, though homemade buttercream has a smoother finish and richer taste. If you’re short on time, whip store-bought frosting with a little heavy cream to make it fluffier.
Do I need a cake stand?
Not at all. A large flat plate, a cutting board, or even a sturdy baking sheet works. A stand just makes the cake feel more festive when serving.
How many people does this serve?
A standard three-layer version serves 16–20 slices, perfect for a party crowd.
notes Final Encouragement
Making an 18th birthday cake isn’t about getting bakery-perfect lines—it’s about creating something heartfelt. The swirls of frosting, the candles, the little imperfections—they all tell the story of the love that went into it. When the candles are lit and everyone sings, the cake becomes more than dessert. It becomes a marker of time, a memory captured in sweetness. So take a breath, enjoy the process, and know that every slice you serve carries a piece of your care.

18th Birthday Cake
Equipment
- Round Cake Pans
- Parchment Paper
- Mixing Bowls
- Electric Mixer
- Cake Stand
Ingredients
Base Cake Layers
- 3 cups all-purpose flour
- 2 1/2 tsp baking powder
- 1 tsp baking soda
- 1/2 tsp salt
- 1 cup unsalted butter softened
- 2 cups granulated sugar
- 4 large eggs room temperature
- 1 tbsp vanilla extract
- 1 1/2 cups whole milk
Frosting and Filling
- 1 1/2 cups unsalted butter softened
- 5 cups powdered sugar
- 2 tsp vanilla extract
- 3-4 tbsp heavy cream as needed for consistency
- strawberry jam, lemon curd, or chocolate ganache optional for layers
Decoration Options
- fresh berries, edible flowers, or gold sprinkles
- “18” cake topper or sparkler candles
Instructions
- Preheat your oven to 350°F and line two or three round cake pans with parchment paper. Grease lightly to prevent sticking.
- Whisk together flour, baking powder, baking soda, and salt in a medium bowl. Set aside.
- In a large mixing bowl, beat butter and sugar until light and fluffy.
- Beat in the eggs one at a time, followed by vanilla extract. The batter should look smooth and glossy.
- Alternate adding the dry mixture and milk, mixing just until combined. Do not overmix.
- Divide the batter evenly into pans. Bake for 25–30 minutes until a toothpick comes out clean. Cool completely before frosting.
- Whip butter until creamy, then gradually add powdered sugar. Beat in vanilla and enough cream to reach a spreadable consistency.
- Assemble the cake: layer cake, frosting or jam, then repeat. Frost the outside smoothly or with rustic swirls.
- Decorate with berries, sprinkles, or an “18” topper for the milestone celebration.


