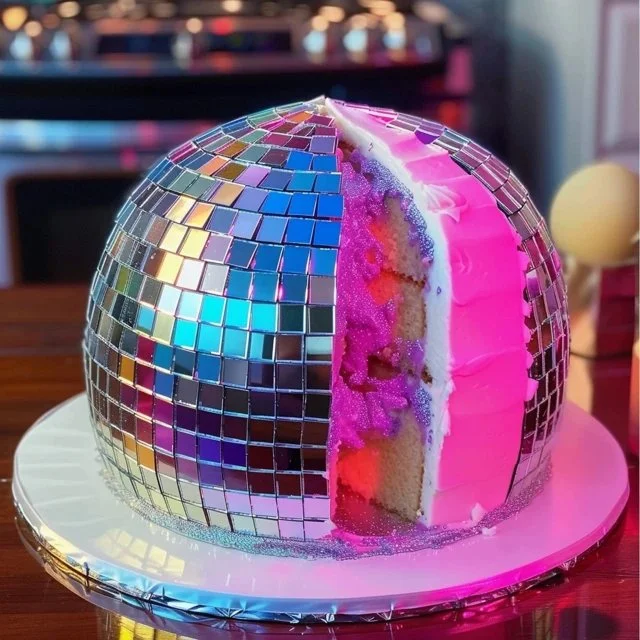
Creating a festive cake can instantly lift the mood at any gathering. This Mirror Ball Cake offers a simple yet striking design that captures the spirit of celebration. It’s a delightful option for birthdays and other joyful occasions. The process allows for creativity and personalization, while also providing comforting flavors that everyone appreciates. With straightforward steps and accessible ingredients, this cake is approachable for both experienced bakers and those new to the kitchen. Let’s dive into making this fun centerpiece for your next occasion.
Why You’ll Love This Mirror Ball Cake
This recipe stands out because of its ease and reliability, making it perfect for various celebrations. The combination of buttery richness from the cake and the sweet buttercream icing creates a comforting flavor balance that everyone enjoys. The Mirror Ball Cake is not just about looks; it serves as a practical, everyday dessert that brings people together, making it a valuable addition to your recipe collection.
Kitchen Tools You’ll Need
- Mixing bowls
- Electric mixer
- 9-inch cake pans
- Offset spatula
- Cake stand or serving platter
- Toothpicks or skewers
Ingredients
- 1 box cake mix plus eggs, oil, and water per package instructions (base structure and moisture)
- 2 cups buttercream icing for filling and coating (texture and sweetness)
- Piñata filling (candies, sprinkles, or chocolates) (surprise element)
- Mini round chocolates or candies for mirror effect (decorative texture)
- Edible silver spray or luster dust for shine (visual appeal)
- Toothpicks or skewers to stabilize halves if needed (support)

How to Make Mirror Ball Cake
Step 1. Start by preparing the cake according to the instructions on the box. Mix together the cake mix with the required eggs, oil, and water until combined. This mixture will create a moist cake with a tender crumb once baked. Pour the batter evenly into the prepared baking pans and smooth the tops before placing them in the oven.
Step 2. As the cakes bake, keep an eye on them for doneness. A toothpick inserted into the center should come out clean, indicating that the cakes are fully baked and ready to cool. Allow the cakes to cool in the pans for a few minutes, then carefully transfer them to a wire rack to cool completely. This step ensures that the cakes hold their texture and don’t become soggy.
Step 3. Once the cakes are completely cool, level off the tops if necessary using a serrated knife. This will help create a flat surface for stacking, making it easier to fill and frost. Set one layer of the cake on your serving platter or cake stand, ensuring it’s secure and stable for layering.
Step 4. Spread a generous layer of buttercream icing on top of the first cake layer. This icing not only adds rich flavor but also helps to keep the piñata filling in place. You can be generous with the filling; it’s meant to surprise and delight those who cut into the cake.
Step 5. Carefully place the second layer of cake on top of the filled layer. The stacking process should be gentle to avoid any shifting. Once stacked, apply a thin layer of buttercream icing over the entire cake to create a crumb coat. This first layer of frosting seals in crumbs, making it easier to achieve a smooth finish with the outer layer.
Step 6. Refrigerate the cake for about 30 minutes to set the crumb coat. Chilling the cake will firm up the buttercream, making it easier to frost evenly. After chilling, remove it from the fridge and apply a thicker layer of buttercream icing to the top and sides of the cake. This should create a smooth surface.
Step 7. Next, generously sprinkle the piñata filling over the top of the cake, allowing some to spill over the sides for added effect. This visually appealing touch hints at the surprise center, making the cake inviting. You might want to gently press some of the candies into the frosting for stability.
Step 8. For the mirror effect, carefully place mini round chocolates or candies around the cake. Position them in a way that resembles a reflective surface, which is playful and eye-catching. You can use toothpicks or skewers to secure the candies if necessary, ensuring they adhere well.
Step 9. Finally, add a touch of elegance by using edible silver spray or luster dust to cover the cake. Lightly mist the surface, ensuring an even shine; this will enhance the visual appeal and give it that dazzling mirror ball effect. Allow it to set and take a moment to enjoy your creation.

Serving Suggestions
The Mirror Ball Cake is versatile and can be enjoyed at various times, whether for a birthday breakfast treat or as a sweet snack throughout the day. It can also be part of family meals where a slice of cake adds joy to the gathering. If you have leftovers, they keep well in the fridge and can be enjoyed as a delightful dessert on a quiet evening at home.
Pro Tips for Best Results
- Ensure the cake has completely cooled before frosting, as warm layers will melt the icing.
- Use an offset spatula to create smooth, even frosting for a polished appearance.
- Chill the cake after applying the crumb coat for better frosting results.
- Be generous with the piñata filling to create a fun surprise for guests cut into the cake.
- Spraying luster dust should be done from a distance for even coverage.
- When placing candies, arrange them loosely to maintain an organic look.
Common Mistakes to Avoid
- Not cooling the cake sufficiently: If the cake is still warm when frosted, the icing may melt, creating a mess. Always let the layers cool completely before frosting.
- Incorrect cake layer leveling: Uneven layers lead to a tilting cake. Take your time to level off tops for stability.
- Skipping the crumb coat: Not applying a crumb coat may lead to unsightly crumbs in your final frosting layer. It helps achieve a clean finish.
- Overfilling the piñata layer: While filling is fun, overfilling can cause the cake to slide. Use a controlled amount to maintain structural integrity.
- Not securing candies: If mini chocolates or candies aren’t secured well, they might fall off when cutting. Make sure to attach them properly.
- Rushing the luster dust application: Applying too much at once can create clumps. A gentle, even spray ensures a smooth, shiny finish.
Variations & Substitutions
Consider using flavored cake mixes like chocolate or red velvet for a different taste. You might experiment with different buttercream flavors, such as vanilla or almond, to add more depth. Different types of piñata fillings can include nuts or dried fruits to cater to various preferences. For a seasonal touch, incorporate festive colors in the sprinkles or candies to match the occasion.
Storage & Reheating
Store the Mirror Ball Cake at room temperature in an airtight container for a couple of days. If you want to keep it longer, the cake can be kept in the refrigerator for up to a week. If you wish to freeze it, wrap the entire cake tightly in plastic wrap and then in aluminum foil. For the best texture, let it come to room temperature and enjoy without reheating; this way, you preserve the cake’s original moistness.
Frequently Asked Questions
Can I make this recipe ahead of time?
Yes, you can prepare the cake layers ahead of time. Bake them and let them cool completely, then wrap them in plastic wrap and store them in the refrigerator for a day. This can save you time on the day of your celebration.
How long does it last in the fridge?
When stored properly in an airtight container, the Mirror Ball Cake lasts about a week in the refrigerator. Keep it covered to maintain its moisture and freshness.
Can I freeze this recipe?
Yes, the cake can be frozen for longer storage. Ensure it’s well-wrapped to prevent freezer burn. When ready to enjoy, thaw it in the refrigerator overnight for the best results.
What can I substitute for one ingredient?
If you need to substitute the cake mix, you can make a homemade cake batter using flour, sugar, eggs, baking powder, and milk for a similar structure and taste profile.
Why didn’t my recipe turn out as expected?
Common issues might arise from overmixing the batter or not measuring ingredients accurately. Pay careful attention to mixing time and measuring techniques to ensure a successful outcome.
Final Thoughts
Making the Mirror Ball Cake can be a simple yet rewarding experience. With each step, you create not only a delicious treat but also a centerpiece that draws everyone together. The satisfaction of seeing it come together and witnessing others enjoying it reminds us of the joyous moments in our lives. Embrace the process; it’s comforting to create something special.

Mirror Ball Cake
Ingredients
Cake Base
- 1 box cake mix plus eggs, oil, and water per package instructions Base structure and moisture
Icing and Filling
- 2 cups buttercream icing For filling and coating
- as needed piñata filling (candies, sprinkles, or chocolates) Surprise element
Decoration
- as needed mini round chocolates or candies For mirror effect
- as needed edible silver spray or luster dust For shine
- as needed toothpicks or skewers To stabilize halves if needed
Instructions
Preparation
- Prepare the cake according to the instructions on the box, mixing together the cake mix with the required eggs, oil, and water.
- Pour the batter into prepared baking pans and smooth the tops before baking.
- As the cakes bake, check for doneness with a toothpick.
- Allow cakes to cool completely on a wire rack.
Layering
- Level off the tops of the cooled cakes if necessary.
- Place the first layer on a serving platter and spread a layer of buttercream icing on top.
- Add piñata filling before placing the second layer of cake on top.
- Apply a thin layer of buttercream icing as a crumb coat.
- Refrigerate for about 30 minutes to set the crumb coat.
- After chilling, apply a thicker layer of buttercream icing over the top and sides.
Decoration
- Sprinkle piñata filling over the top of the cake.
- Arrange mini round chocolates around the cake for the mirror effect.
- Use edible silver spray or luster dust to finish for a dazzling effect.


