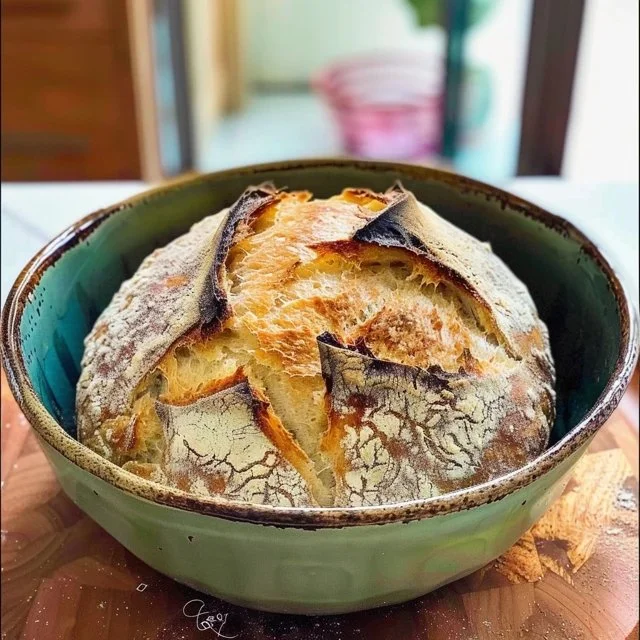
It’s truly satisfying to bake a loaf of fresh bread at home. This Dutch oven sourdough bread brings comfort and warmth to the table, making it perfect for weeknight dinners, lazy weekends, and gatherings with friends and family. There’s something special about the crispy crust and soft interior that makes every bite worthwhile. With simple ingredients and a straightforward process, you can create a delightful bread for those quiet moments or busy meals alike. Let’s dive in and start this rewarding journey together.
Why You’ll Love This Simplest Sourdough Dutch Oven
This recipe is straightforward and dependable, providing an excellent way to introduce homemade bread into your routine. The balance of flavors develops beautifully, resulting in a comforting loaf that suits any occasion. With ease and flexibility, this Dutch oven sourdough bread becomes a practical staple for breakfasts, snacks, or family meals, ensuring you get the most out of your cooking experience.
Kitchen Tools You’ll Need
- Dutch oven
- Mixing bowl
- Wooden spoon or spatula
- Kitchen scale (optional but helpful)
- Plastic wrap or towel
Ingredients
- ¼ cup sourdough starter (65 grams) discard or fed 12-24 hours prior
- 1 ⅔ cups filtered water (350 grams) about 100º F or baby bottle warm
- 4 ¼ cups all-purpose flour (500 grams) can substitute with bread flour
- 2 teaspoons fine salt (9 grams)

How to Make {focus_keyword}
Step 1. Begin by mixing the sourdough starter and warm water in a large mixing bowl. Use a wooden spoon or spatula to combine these ingredients until they are well blended. You’re aiming for a uniform mixture that resembles a thin, loose batter. This step is crucial as it hydrates the starter and ensures even fermentation as the bread dough develops later on.
Step 2. Next, add the all-purpose flour and fine salt to the bowl. Mix everything together until a rough dough forms. You’ll notice the flour absorbing the water, creating a sticky consistency. It’s important to combine the ingredients thoroughly, ensuring that no dry flour remains. This will be the base for your bread, so a good mix at this stage sets the foundation for a successful outcome.
Step 3. Once your dough comes together, cover the bowl with plastic wrap or a towel, and let it rest for about 30 minutes. This resting period, known as autolyse, allows the flour to fully hydrate. You may see the dough start to relax and become smoother. It creates a better texture for the finished bread since the gluten begins to develop naturally during this time.
Step 4. After the dough has rested, begin to knead it in the bowl or on a floured surface for about 5 to 10 minutes. You’re looking for a dough that is elastic and slightly tacky but not overly sticky. Kneading helps develop gluten, leading to a bread that has structure and chew. A well-kneaded dough is smoother, and when you press it, it should spring back gently.
Step 5. Now, shape your dough into a ball and place it back in the bowl. Cover it again and let it rise at room temperature for about 4 to 6 hours, or until it has roughly doubled in size. During this fermentation time, the dough will expand and develop flavor. Check it periodically; it’s ready when the surface is puffy and the dough has visibly increased in volume.
Step 6. Gently deflate the dough by pressing it down, then take it out of the bowl onto a lightly floured work surface. Shape it into a round loaf by folding the edges toward the center, creating tension on the top. The appearance should be smooth and round. This shaping will help structure the bread as it bakes, creating a nice crust and a well-defined crumb inside.
Step 7. Place the shaped loaf into a floured proofing basket or a bowl lined with a kitchen towel. Cover it loosely and let it rise for another 1 to 2 hours. You’re watching for a slight puff in size, indicating it’s nearing readiness to bake. A good way to check is gently poking the dough; it should spring back slowly but still leave a little indentation.
Step 8. About 30 minutes before the dough is ready, preheat your oven to 450º F. Place the Dutch oven inside to heat up, which will help create steam when the bread bakes. When the dough is ready, carefully remove the hot Dutch oven and place the loaf inside, taking care not to burn yourself. The heat of the pot will help create the crispy crust you’re hoping for.
Step 9. Cover the Dutch oven with its lid and bake for 30 minutes. The lid traps moisture, allowing the bread to rise as it bakes. You may begin to smell the baking bread as it gets closer to being done, and the crust starts to form beautifully. After 30 minutes, remove the lid to let the crust crisp up for an additional 15 to 20 minutes, monitoring the color. It should be a rich golden-brown.
Step 10. Once the bread is done, carefully remove it from the Dutch oven and let it cool on a wire rack. This cooling time is vital for allowing the crumb to set properly. You can tell it’s ready when it sounds hollow when tapped on the bottom. Enjoy your fresh Dutch oven sourdough bread once it’s cooled down a bit, savoring the fruits of your effort.

Serving Suggestions
This sourdough bread is delightful at any time of day. It makes for a comforting breakfast when paired with butter and jam or served alongside a warm bowl of soup. You can also enjoy it as a foundation for sandwiches during lunch or as a snack with cheese. Leftovers are great toasted for a quick snack, or you can use them to make delightful croutons for salads. The versatility of this bread will suit daily meals effortlessly.
Pro Tips for Best Results
- Consistent temperature is key: Keeping your ingredients at room temperature will help the dough rise better.
- Hydration matters: Use warm water to activate your starter and ensure even hydration throughout your dough.
- Watch the fermentation: Every environment is different, so keep an eye on your dough as it rises. Aim for about double the size.
- Dutch oven preparation: Preheating your Dutch oven is crucial for achieving that perfect crust.
- Cooling is essential: Let your loaf cool fully before slicing to prevent a gummy texture.
- Practice shaping: Take your time with shaping the dough; it sets the structure for your loaf.
Common Mistakes to Avoid
- Not using a mature sourdough starter: A young or inactive starter won’t provide enough lift, leading to dense bread. Ensure your starter is fed and bubbly for best results.
- Skipping the autolyse: Neglecting this rest period will lead to less developed gluten, affecting the texture. It’s an important step for a better rise and chew.
- Overkneading the dough: Kneading too long can make the dough tough instead of elastic. Aim for just enough kneading until it’s smooth and pliable.
- Not allowing enough time to rise: Rushing the rise means less flavor and an underdeveloped loaf. Be patient for the dough to double in size.
- Forgetting to preheat the Dutch oven: If the pot isn’t hot enough, your bread won’t rise well and could result in a thick, uneven crust.
- Cutting into the bread too soon: Slicing while it’s still warm will affect the texture. Allow it to cool completely for the best results.
Variations & Substitutions
For those looking to change things up, you may consider adding herbs or garlic powder to the dough for additional flavor. Seeds like sunflower or sesame can provide a nice crunch if sprinkled on top before baking. Experimenting with whole wheat flour can lend a different flavor and nutrition profile, but be mindful of adjusting the water for the extra absorbency. These simple variations can bring a fresh twist to your sourdough.
Storage & Reheating
To store your sourdough bread at room temperature, wrap it in a clean cloth or keep it in a bread bag to maintain its crust. Ideally, eat it within a few days for the best flavor. If you need to store it longer, consider refrigerating it in a sealed bag, but this can affect the texture. Freezing is also an option; slice the bread before freezing for convenience. To reheat and preserve texture, pop the slices in a toaster or place the whole loaf in a preheated oven for a few minutes.
Frequently Asked Questions
Can I make this recipe ahead of time?
Yes, you can prepare the dough and let it rise in the fridge overnight for a slower fermentation. This will enhance the flavor and texture, and you can bake it the next day after allowing it to come to room temperature.
How long does it last in the fridge?
When stored in an airtight container or bag, the sourdough bread can last about 5 to 7 days in the refrigerator. However, bread tends to taste best when fresh, so enjoy it sooner rather than later if you can.
Can I freeze this recipe?
Yes, you can freeze the sourdough bread. Wrap it tightly in plastic wrap or foil and place it in a freezer-safe bag. This helps preserve the texture for up to 3 months. Just remember to slice before freezing for easier thawing.
What can I substitute for one ingredient?
If you need to substitute, all-purpose flour can be swapped with bread flour for a chewier texture. The sourdough starter can often be replaced with an equal amount of a different starter, but results will vary depending on the new starter’s characteristics.
Why didn’t my recipe turn out as expected?
Several factors can affect the outcome, such as the activity level of your starter, room temperature, and not allowing enough time for rising. Ensure your dough rises adequately and your starter is active for the best results.
Final Thoughts
Baking Dutch oven sourdough bread is a fulfilling culinary experience that yields a beautiful loaf to enjoy. There’s satisfaction in watching the bread rise and transform into a crusty, golden loaf. Whether you share it with others or savor it on your own, this simple recipe invites you to explore the joy of baking. Trust the process, and you’ll find comfort in both making and relishing each slice.

Dutch Oven Sourdough Bread
Ingredients
Dough Ingredients
- 65 grams ¼ cup sourdough starter (discard or fed) 12-24 hours prior
- 350 grams 1 ⅔ cups filtered water about 100º F or baby bottle warm
- 500 grams 4 ¼ cups all-purpose flour can substitute with bread flour
- 9 grams 2 teaspoons fine salt
Instructions
Mixing
- Begin by mixing the sourdough starter and warm water in a large mixing bowl.
- Use a wooden spoon or spatula to combine these ingredients until they are well blended into a thin, loose batter.
Forming Dough
- Add the all-purpose flour and fine salt to the bowl, mixing until a rough dough forms.
- Cover the bowl with plastic wrap or a towel, and let it rest for about 30 minutes.
Kneading
- Knead the dough in the bowl or on a floured surface for about 5 to 10 minutes until elastic and slightly tacky.
First Rise
- Shape your dough into a ball and place it back in the bowl. Cover and let it rise at room temperature for about 4 to 6 hours, or until it has roughly doubled in size.
Shaping
- Gently deflate the dough and reshape it into a round loaf by folding the edges toward the center.
- Place the shaped loaf into a floured proofing basket or a bowl lined with a kitchen towel. Cover and let it rise for another 1 to 2 hours.
Baking
- Preheat your oven to 450º F about 30 minutes before the dough is ready.
- Carefully remove the hot Dutch oven and place the loaf inside.
- Cover the Dutch oven with its lid and bake for 30 minutes.
- Remove the lid and bake for an additional 15 to 20 minutes until golden-brown.
- Let the bread cool on a wire rack before slicing.


