Best Cake Pop Flavors have a special place in my heart because they remind me of those joyful afternoons in the kitchen with my mom. I’m Asmaa, 29, and some of my dearest memories are filled with the sweet scent of cake batter and laughter echoing through our home. My mom taught me that cooking isn’t just about recipes—it’s about love, creativity, and connection. Every swirl of frosting and sprinkle of color brings me back to those precious moments. These little treats capture that same warmth—bite-sized happiness made to share, savor, and celebrate life’s sweetest joys.
Serving Versatility
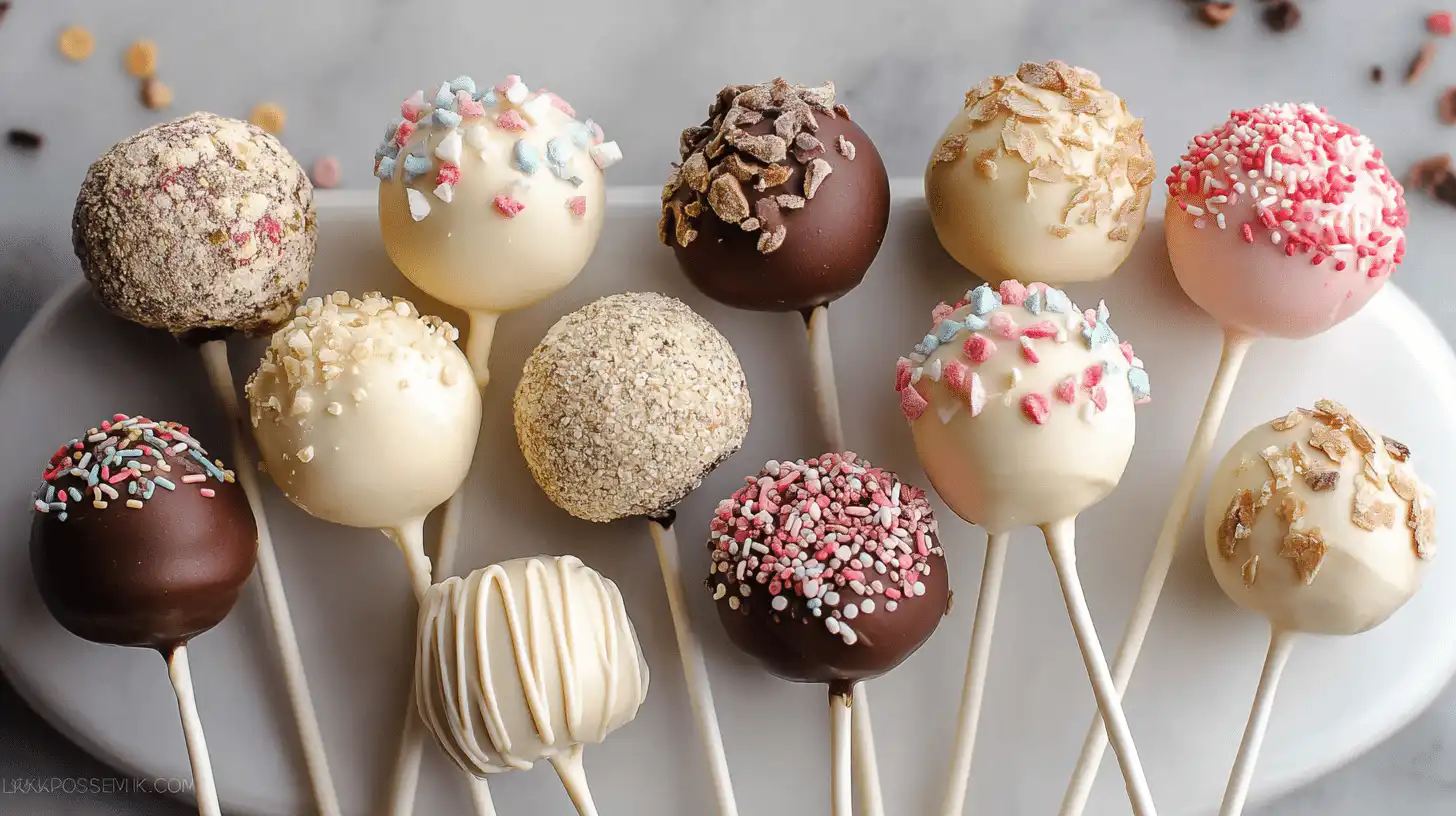
Cake pops aren’t just for dessert tables. Picture a platter of bright red velvet pops at a Valentine’s brunch, or salted caramel pops next to steaming mugs of coffee. For a lighter twist, you can even skip the coating and crumble the cake pop mixture over yogurt or ice cream. Mini pops make a delightful lunchbox treat for kids, while elegant dark chocolate-dipped ones with sea salt can elevate any dinner party. They’re also the ultimate edible gift—wrap them in cellophane, tie a ribbon, and you’ve got a thoughtful homemade present that never fails to impress.
Ingredients (Detailed & Humanized)
1 ½ cups cake crumbs (vanilla, chocolate, or funfetti): the base of your flavor—soft, moist, and full of personality.
½ cup frosting (buttercream, cream cheese, or ganache): binds everything together while adding richness.
1 cup candy melts or white chocolate: creates that iconic crisp outer shell.
1 tbsp coconut oil: makes your coating shiny and smooth.
Sprinkles or toppings: for color, crunch, and fun texture.
Lollipop sticks: to give your little treats their playful pop form.
Optional add-ins (crushed cookies, peanut butter, fruit puree): personalize your pops for any craving.
Each ingredient works like a team—cake brings softness, frosting adds moisture, and coating locks in sweetness. When you bite into a finished pop, you get the perfect balance of creamy, crunchy, and cakey all at once.
Directions (Step-by-Step Cooking Guide)
1️⃣ Bake your cake or use leftover pieces. Let the aroma fill your kitchen—it’s the first sign of something special coming together. Once cooled, crumble it gently with your fingers into a large mixing bowl. You want fine, even crumbs—soft and fluffy, no big chunks. This step is the heart of your cake pop’s texture.
2️⃣ Add frosting a spoonful at a time. Mix with your hands or a spatula until the crumbs begin to hold together like soft dough. It should feel moist but not sticky. Too much frosting and your pops will be heavy—just enough, and they’ll be perfectly tender.
3️⃣ Scoop small portions and roll into balls. Each should be about one inch in diameter, like little truffles. Roll them gently between your palms until smooth, then line them neatly on a parchment-covered tray. This is the part where the kitchen starts to look a little like a candy shop!
4️⃣ Chill the cake balls. Place them in the refrigerator for at least an hour—or in the freezer for 30 minutes—until firm to the touch. This chill step makes dipping so much easier and keeps your pops beautifully round.
5️⃣ Melt your candy coating or chocolate. Use a heat-safe bowl and microwave in 20-second intervals, stirring each time, until silky and smooth. Add a teaspoon of coconut oil to give it that glossy, bakery-style sheen. The scent of melted chocolate at this point? Absolute heaven.
6️⃣ Dip and secure the sticks. Take one lollipop stick and dip the end about half an inch into your melted coating before inserting it into a chilled cake ball. This little trick helps “glue” the cake pop to the stick, so it doesn’t fall off later.
7️⃣ Dip the entire cake pop. Hold the stick and gently submerge the ball into your melted coating. Swirl lightly and let the excess drip off. Be patient here—gentle tapping on the bowl’s edge gives that flawless, smooth finish you see in bakery displays.
8️⃣ Decorate with joy. While the coating is still wet, shower your cake pops with sprinkles, drizzle extra chocolate, or dust lightly with edible glitter. This is where creativity takes over—each pop becomes your own little masterpiece.
9️⃣ Let them dry and store. Stick your finished pops upright in a foam block or box to dry completely. Once set, store them in an airtight container or wrap individually for gifting. They’ll keep their sweetness and shape beautifully.
Every step feels like a mini celebration—the dipping, the decorating, the moment the chocolate sets into that satisfying shell. Whether you’re making these best cake pop flavors for family, friends, or just for fun, the process itself is pure happiness in motion.
Why You’ll Love This Recipe
✅ Quick to make: Start to finish in under two hours, with plenty of hands-on fun.
✅ Customizable: Mix and match cake and frosting for endless best cake pop flavors.
✅ Perfect for parties: Easy to transport and share.
✅ Kid-friendly: Safe, simple, and so much fun to decorate together.
✅ Make-ahead friendly: Store or freeze for stress-free prep before events.
✅ Crowd-pleasing: Everyone loves a dessert that’s as cute as it is tasty.
Cultural or Technique Note
The cake pop craze started in the early 2000s as a playful spin on cake truffles—mini desserts you could eat in one bite. Inspired by classic American baking traditions, they celebrate creativity over perfection. Today, cake pops have found their way into bakeries, weddings, and homemade gift boxes, representing the joy of baking made simple.
Serving Suggestions
Serve with coffee or tea for an afternoon pick-me-up.
Add to a dessert board with cookies and fruit.
Display in a bouquet-style arrangement for parties.
Pair with ice cream for a fun texture twist.
Pro Tips for Success
✨ Chill your cake balls well before dipping—they’ll stay perfectly round.
✨ Don’t overdo the frosting; too much makes the mixture greasy.
✨ Use a deep cup for dipping to fully submerge each pop.
✨ Stir your melted coating often—it thickens as it cools.
✨ Add sprinkles immediately after dipping before the shell hardens.
✨ If your coating cracks, your pops were likely too cold—let them warm slightly first.
Common Mistakes to Avoid
⚠️ Too much frosting: Leads to soggy pops—add gradually until just combined.
⚠️ Skipping the chill time: Warm cake balls fall apart in the coating.
⚠️ Overheating chocolate: Causes clumping—melt slowly and stir often.
⚠️ Uneven shapes: Use a small scoop for consistent size.
⚠️ Dipping too quickly: Wait for excess coating to drip off to avoid messy drips.
Storage & Reheating
Store your cake pops in an airtight container in the fridge for up to 4 days—they’ll stay moist and delicious. For longer storage, freeze them for up to 2 months, either coated or uncoated. To thaw, place them in the refrigerator overnight, never at room temperature to avoid condensation. You don’t really “reheat” cake pops, but if you want to refresh the flavor, let them sit at room temp for 15 minutes before serving.
Frequently Asked Questions (FAQ)
Can I use boxed cake mix?
Absolutely! It saves time and still tastes great. Just choose your favorite flavor and bake as directed.
What are the best cake pop flavors?
Classic favorites include red velvet, cookies and cream, birthday cake, lemon raspberry, and chocolate fudge. Try mixing flavors like strawberry shortcake or mocha caramel for fun twists.
Can I make cake pops without sticks?
Yes! You can serve them as cake truffles or bites—equally delicious and easier to store.
How can I make them less sweet?
Use less frosting or coat in dark chocolate instead of candy melts. It balances the sweetness beautifully.
How do I color the coating?
Use oil-based or gel food coloring—water-based dyes will make chocolate seize.
Closing Paragraph
There’s something heartwarming about crafting a tray of homemade cake pops. They’re tiny labors of love—each one dipped, decorated, and made to delight. Whether you’re baking for a celebration or just to brighten your week, these best cake pop flavors will make every bite feel special. Have fun mixing colors, testing flavors, and sharing your creations with those you love most.
Final Thoughts
Whenever I make cake pops, I’m reminded that baking doesn’t have to be grand or complicated to be meaningful. It’s the joy of creating something sweet from simple ingredients that makes it magical. A bite-sized cake pop can hold laughter, nostalgia, and love all at once. Follow me on Pinterest for more cozy, quick, and nostalgic recipes.

Best Cake Pop Flavors
Equipment
- Mixing Bowl
- Spatula or spoon
- Microwave-safe bowl
- Baking Sheet
- Parchment Paper
- Lollipop sticks
- Styrofoam block or cake pop stand
Ingredients
Base Cake Pop Mixture
- 1.5 cups cake crumbs vanilla, chocolate, or funfetti
- 0.5 cup frosting buttercream, cream cheese, or ganache
For the Coating
- 1 cup candy melts or white chocolate
- 1 tbsp coconut oil
Decorations & Add-Ins
- sprinkles or toppings for texture and fun
- optional add-ins crushed cookies, peanut butter, fruit puree
- lollipop sticks for forming pops
Instructions
- Bake a cake or use leftovers. Crumble into fine crumbs using fingers or a fork in a large mixing bowl.
- Gradually mix in frosting until the texture resembles dough that holds its shape when rolled.
- Roll mixture into 1-inch balls. Place on parchment-lined tray.
- Chill cake balls for at least 1 hour to firm up.
- Melt candy coating or chocolate in short microwave bursts until smooth. Stir in coconut oil for shine.
- Dip end of each lollipop stick in melted coating, then insert halfway into each cake ball.
- Dip each cake pop into the coating, gently swirling. Let excess drip off before decorating.
- Add sprinkles or drizzle with chocolate while still wet. Stand upright in foam block to dry.
- Once set, store in an airtight container or wrap individually for gifts.


