“I stumbled upon this Traditional Christmas Fruit Cake recipe on Pinterest and couldn’t resist adding my own touch. I swapped in a splash of vanilla for the rum and folded in a few extra cherries for that pop of color I love. A few small tweaks, and suddenly it felt like my version of a classic. That’s the beauty of cooking—creativity and confidence turn any recipe into something uniquely yours.”
Why You’ll Love This Recipe
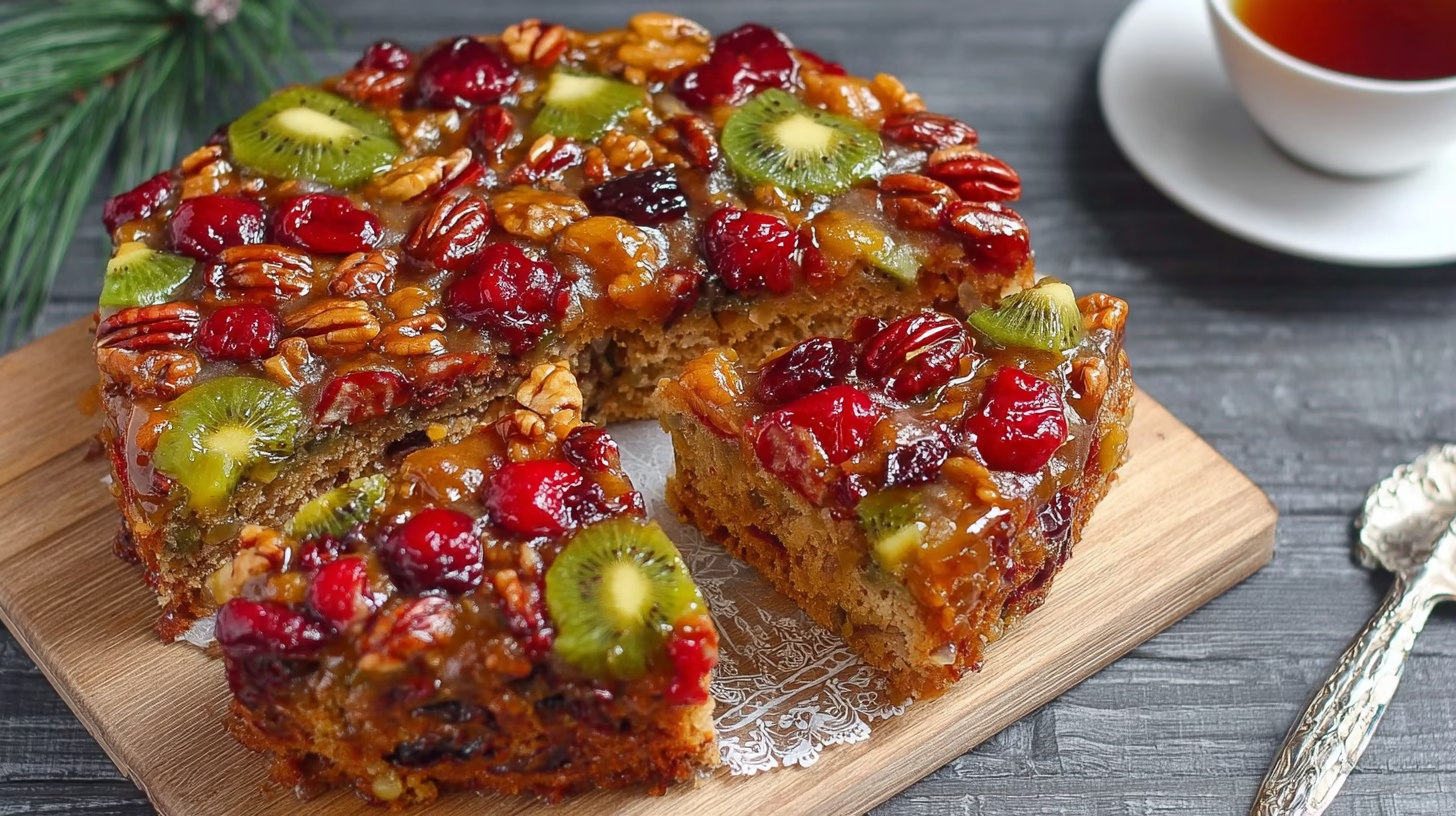
This fruit cake is easy enough for a casual baker yet special enough for Christmas morning. It’s been passed down for generations, filled with sticky dates, crunchy pecans, and brightly colored fruit that feels like Christmas on a plate. It’s one of those recipes that remind you holiday baking doesn’t need to be complicated to be meaningful. Simple ingredients, timeless flavor, and a chewy, candy-like texture — that’s the beauty of this old fashioned fruit cake recipe.
Ingredients (Detailed & Humanized)
1 pound pecans — for that rich, buttery crunch in every slice.
1 pound dates, pitted and chopped — sweet, chewy, and deeply comforting.
½ pound candied cherries (red and green) — they make every bite sparkle.
½ pound candied pineapple (red, green, or yellow) — adds tropical sweetness and color.
¾ cup sugar — just enough to bind all that fruity flavor together.
¾ cup flour — gives the cake its light structure without weighing it down.
½ teaspoon baking powder — for a gentle lift that keeps it tender.
½ teaspoon kosher salt — a little salt brings balance to the sweetness.
3 large eggs — the glue that holds everything together.
1 teaspoon vanilla extract (or 1 tablespoon rum, bourbon, or brandy) — warmth and aroma in a single splash.
Directions (Step-by-Step Cooking Guide)
Step 1: Preheat and prepare your oven for a gentle bake.
Start by preheating your oven to a low 250°F. Yes, it’s intentionally slow — this is how the cake stays tender, chewy, and full of moisture. While it warms, place a shallow pan filled one-third with boiling water on the lower rack. The steam it releases during baking keeps the air humid and your fruitcake glossy instead of dry.
Step 2: Prepare your pans.
Line two 9-inch loaf pans with wax or parchment paper, pressing it snugly into the corners. Lightly coat the paper with cooking spray to make removal a breeze later. You’ll be grateful when those loaves slide right out without sticking or crumbling.
Step 3: Chop and combine the fruit and nuts.
Grab your sharpest knife and chop the dates and pecans by hand. Avoid using a food processor—it breaks down the nuts too fine and turns the fruit into paste. Hand-chopping keeps those beautiful textures intact. Toss the chopped pieces into a large mixing bowl along with the candied cherries and pineapple. The sight of all those reds, greens, and golden hues will already feel like Christmas morning.
Step 4: Add the dry ingredients.
Sift the flour, baking powder, salt, and sugar directly over the fruit and nut mixture. This helps everything coat evenly. Then, roll up your sleeves and mix it gently with your hands. Yes, it’ll feel sticky, but that’s part of the fun. When every piece of fruit is lightly dusted, you know it’s ready.
Step 5: Whisk the wet ingredients.
In a separate small bowl, whisk together the eggs and vanilla (or your favorite festive spirit like rum or bourbon, if you prefer). You’ll notice the eggs turn pale and frothy—that’s your cue to pour them over the fruit mixture. Stir slowly with a sturdy spoon until everything is well coated and clings together in a thick, glossy mass.
Step 6: Fill the pans.
Spoon the batter evenly into your prepared loaf pans, pressing down lightly to remove air pockets. This ensures your slices are dense and uniform rather than crumbly. Smooth the tops gently with a spatula—it doesn’t need to be perfect, just even.
Step 7: Bake low and slow.
Place both pans on the oven rack directly above your pan of hot water. Bake for about 1 hour and 45 minutes. Don’t rush it—this slow bake is what keeps the fruit plump and the texture chewy. As the cake bakes, the kitchen will fill with that irresistible aroma of caramelized fruit and toasted nuts—a true Christmas scent that feels like home.
Step 8: Cool and wrap with care.
Once baked, let the cakes cool completely in their pans. Patience is key here; if you try to remove them too early, they may crumble. When cooled, gently lift each cake out using the paper lining. Wrap tightly in wax paper and then a layer of foil to lock in all that precious moisture. These cakes store beautifully and even ship well if you’re sending them as gifts to family or friends.
Step 9: Enjoy or share!
Once cooled and wrapped, you can slice into it right away—no aging required. The texture is chewy, the flavor rich, and each bite feels like a burst of holiday joy. Whether you serve it with morning coffee, a dab of cream cheese, or wrap it up for a loved one, this traditional Christmas fruit cake is truly made to share.
Cultural or Technique Note
Fruit cake has deep roots in holiday baking traditions around the world, but this version leans into classic Southern simplicity. There’s no aging or soaking in brandy here—just honest ingredients baked slow and low to create a rich, chewy dessert that tastes like family and nostalgia. It’s proof that traditional doesn’t have to mean complicated.
Serving Suggestions
• Serve thick slices with cream cheese or butter for brunch.
• Pair with a cup of tea or hot coffee for an afternoon treat.
• Wrap small slices as edible holiday gifts.
• Serve alongside vanilla ice cream or custard for dessert.
Pro Tips for Success
• Chop your nuts by hand for the best texture—avoid turning them into crumbs.
• Skip the “fruitcake mix” and use individual fruits for maximum flavor.
• Line pans carefully with parchment to prevent sticking.
• Add a pan of hot water in the oven—it keeps the cake beautifully moist.
• Let the cake cool completely before wrapping for storage or gifting.
• Use real vanilla extract or a touch of rum for the best aroma.
Common Mistakes to Avoid
Using pre-mixed candied fruit: Those colorful tubs of “fruitcake mix” might seem convenient, but they often taste overly sweet and lack the juicy texture that makes homemade fruitcake special. Choosing your own cherries, pineapple, and dates lets you control the flavor and moisture level. It’s the difference between a vibrant, chewy cake and one that feels flat.
Baking at a higher temperature: Fruitcake needs slow, gentle heat to stay tender and sticky. A hotter oven might seem like a shortcut, but it will dry out the fruit and make the cake tough on the edges before the center sets. Keep it at 250°F—patience here rewards you with that perfectly chewy, candy-like texture.
Overmixing the batter: It’s tempting to stir until it looks “smooth,” but fruitcake isn’t a smooth kind of recipe. Overmixing crushes the fruit and makes the texture dense. Fold gently until everything is coated and clinging—that’s when you know it’s ready.
Skipping the water bath: That pan of steaming water under your cake isn’t just an extra step—it’s the secret to moisture. It keeps the air humid inside the oven so the fruit stays glossy and soft instead of sticky or dry. Don’t skip it; your future self will thank you.
Unwrapping too soon: After baking, your fruitcake needs a moment to rest and set. If you peel off the paper or foil while it’s still warm, you’ll lose moisture and risk breaking the cake. Let it cool completely—this helps it firm up into those neat, candy-slice pieces that cut beautifully.
Storage & Reheating
Fridge: Once completely cooled, wrap your fruitcake in wax paper and foil, then place it in an airtight container. It will keep beautifully in the refrigerator for 3–4 days.
Freezer: This recipe freezes like a dream. Wrap tightly (wax paper first, then foil) and freeze for up to two months. When you’re ready to enjoy, thaw slowly in the fridge overnight so it stays moist and flavorful.
Reheat: For that just-baked taste, warm slices gently on low heat—either in the oven or on the stovetop—with a small splash of water, milk, or cream. This brings back the soft chew and shine of the fruit.
Frequently Asked Questions (FAQ)
Q1: Does this fruitcake freeze well?
Absolutely! This traditional Christmas fruit cake holds up beautifully in the freezer. Wrap it tightly in wax paper, then foil, and freeze for up to two months. When ready to serve, thaw overnight in the refrigerator. It’ll taste as rich and chewy as the day you baked it.
Q2: Can I use “fruitcake mix” instead of separate fruits?
It’s best not to. Those store-bought mixes tend to be dry and overly sweet, and they can make your cake dense. Handpicking your own cherries, dates, pineapple, and pecans gives you the perfect balance of texture and natural sweetness.
Q3: How long does this fruitcake stay fresh?
When properly wrapped and stored in a cool, dark spot, it stays moist and flavorful for several days. In the freezer, it can last up to two months without losing its texture.
Q4: Can I add a little alcohol for flavor?
Of course! While this recipe is delicious alcohol-free, you can easily replace the vanilla with a splash of rum, bourbon, or brandy for a warm, festive aroma.
Q5: What’s the best way to slice fruitcake neatly?
A5: Use a sharp, thin-bladed knife and wipe it clean between cuts. Chilling the cake briefly before slicing also helps create tidy, picture-perfect slices that show off all those jewel-toned fruits.
Closing Paragraph
There’s something so comforting about slicing into this traditional Christmas fruit cake. It’s sticky, sweet, and full of life—just like the holidays themselves. Whether you’re baking it for family brunch, gifting it to neighbors, or sneaking a slice with your morning coffee, this cake is made to share and celebrate. I hope it brings a little extra warmth and sparkle to your holiday table.
Final Thoughts
Every year, as the oven hums and the house fills with that caramel-fruit aroma, I’m reminded why this recipe has lasted for generations. It’s not just dessert—it’s memory, joy, and the comfort of something familiar. I hope this becomes your family’s tradition too, one slice at a time. Follow me on Pinterest for more cozy, quick, and nostalgic recipes.

Traditional Christmas Fruit Cake
Equipment
- 2 Loaf Pans (9-inch)
- Mixing Bowls
- Whisk
- Spatula
- Wax or Parchment Paper
- Large Roasting Pan (for water bath)
Ingredients
Fruit & Nut Base
- 1 pound pecans chopped by hand for texture
- 1 pound dates pitted and chopped
- ½ pound candied cherries red and green, halved
- ½ pound candied pineapple red, green, or yellow, chopped
Dry Ingredients
- ¾ cup sugar
- ¾ cup all-purpose flour
- ½ tsp baking powder
- ½ tsp kosher salt
Wet Ingredients
- 3 large eggs
- 1 tsp vanilla extract or 1 tbsp rum, bourbon, or brandy
Instructions
- Preheat oven to 250°F. Place a roasting pan filled one-third with boiling water on the lowest rack of the oven.
- Line two 9-inch loaf pans with wax or parchment paper. Spray lightly with cooking spray.
- Chop dates and pecans by hand. Combine with cherries and pineapple in a large bowl.
- Sift sugar, flour, baking powder, and salt over the fruit and nut mixture. Mix gently with hands until everything is coated.
- In a separate bowl, whisk eggs and vanilla. Pour over fruit mixture and stir until sticky and combined.
- Spoon batter into prepared pans, pressing down lightly to remove air pockets. Smooth the tops.
- Bake on the middle rack (above the water bath) for about 1 hour and 45 minutes, or until firm and golden.
- Cool completely in pans before unwrapping. Wrap tightly in wax paper and foil for storage or gifting.


