Amanda and her best friend made these No Bake Peanut Butter Bars on a cozy Saturday afternoon, turning the kitchen into their own little comedy show. Between sneaking spoonfuls of peanut butter and arguing over who got to lick the spatula, they laughed until their sides hurt. When the bars finally set, they shared a quiet, sweet moment over their creation — proof that the best recipes aren’t just delicious, they’re the ones made with love and laughter.
Why You’ll Love This Recipe
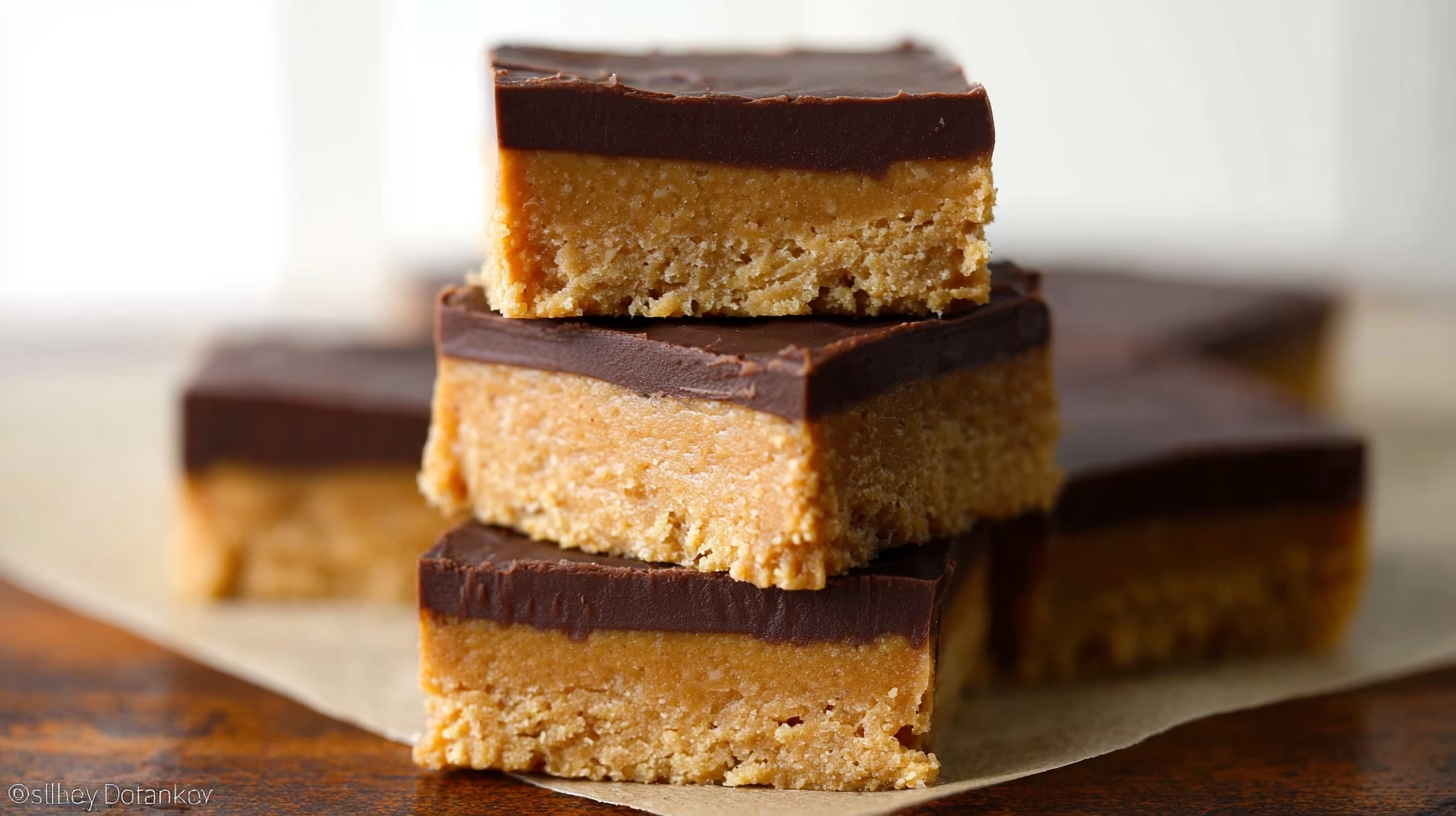
You’ll adore these no bake peanut butter bars because they deliver that decadent flavor with almost no effort. They’re rich, perfectly balanced, and don’t require any baking — ideal when you want dessert without the fuss. Plus, they freeze beautifully, so you can enjoy them anytime. They taste just like a peanut butter cup, only thicker, smoother, and even more satisfying.
Ingredients (Detailed & Humanized)
- ½ cup salted butter, melted – gives structure and a rich, buttery base.
- 1 cup graham cracker crumbs – adds a light crunch and classic cookie flavor.
- 2 cups powdered sugar – sweetens and binds everything together smoothly.
- 1 cup + 2 tablespoons creamy peanut butter, divided – the heart of the recipe; creamy, nutty, and comforting.
- 1 cup semi-sweet chocolate chips – melts into a glossy, rich chocolate topping that pairs perfectly with peanut butter.
Directions (Step-by-Step Cooking Guide)
- Prepare your pan. Line an 8- or 9-inch square baking pan with parchment paper or foil. This makes it easier to lift the bars out later.
- Create the peanut butter base. In a medium bowl, mix the melted butter, graham cracker crumbs, and powdered sugar. Stir in 1 cup of peanut butter until the mixture is thick, soft, and evenly blended. You’ll notice it smells like warm peanut butter cookies.
- Press and smooth. Gently press the mixture into your prepared pan, spreading it out evenly. Take your time here — a smooth layer makes for pretty bars later.
- Melt the topping. Combine the remaining 2 tablespoons of peanut butter with the chocolate chips in a heat-safe bowl. Microwave or melt over low heat until smooth and glossy. Stir often so the chocolate doesn’t seize.
- Assemble the layers. Pour the melted chocolate-peanut butter mixture over the base, tilting the pan or using a spatula to spread it evenly.
- Chill to set. Refrigerate for at least 2 hours, or until firm to the touch. As it chills, the chocolate layer hardens slightly while the peanut butter base stays soft and creamy.
- Slice and serve. Let the bars sit at room temperature for about 10 minutes before cutting into squares. They’re easiest to slice cleanly when the chocolate is just beginning to soften.
- Enjoy and store. Keep them chilled for that perfect bite — firm chocolate on top, smooth peanut butter below.
Cultural or Technique Note
This recipe embodies the spirit of classic American no-bake desserts — quick, fuss-free, and full of nostalgic flavors. It’s the kind of treat families have been making for decades, especially during the holidays, when ovens are full and there’s still a craving for something sweet and homemade.
Serving Suggestions
- With a tall glass of cold milk
- Crumbled over vanilla ice cream
- As a lunchbox or picnic treat
- On a holiday dessert tray alongside cookies and fudge
Pro Tips for Success
- Use processed creamy peanut butter for the best texture — natural varieties can make the bars oily.
- Don’t rush the chilling time; it ensures clean, neat slices.
- Line your pan with parchment for easy removal and minimal cleanup.
- Melt chocolate slowly to avoid seizing — stir often.
- Cut with a warm knife for smooth, even edges.
- Double the batch if serving a crowd; they disappear fast!
Common Mistakes to Avoid
Using natural peanut butter: Natural or oily peanut butter can separate easily, leaving a greasy texture and uneven layers. For the best results, stick with creamy, processed brands like Jif or Skippy.
Skipping the chill: These bars rely on refrigeration to firm up. If you rush the process, the layers will slide apart and the texture won’t hold. Always chill for at least two hours.
Overheating chocolate: Melt chocolate slowly and stir often. Overheating causes it to seize or become grainy, which makes it hard to spread evenly over the peanut butter layer.
Uneven pressing: When pressing the peanut butter base into the pan, smooth it out evenly. If it’s lumpy or too thick in spots, the chocolate layer may crack as it sets.
Cutting too early: The bars need time to firm up completely. Cutting before they’re fully chilled can cause messy, uneven slices. Wait until they’re cold, then use a warm knife for clean edges.
Storage & Reheating
Fridge: Store in an airtight container for 3–4 days. The cool temperature keeps both the peanut butter and chocolate layers perfectly set.
Freezer: These bars freeze beautifully. Place parchment paper between layers to prevent sticking, and store for up to 2 months.
Reheat: No reheating needed — just thaw in the fridge or enjoy chilled straight from the freezer for a firmer texture.
Frequently Asked Questions (FAQ)
Q1: Can I use gluten-free graham crackers?
Absolutely! Gluten-free graham crackers work just as well. The texture and taste remain deliciously similar, so no adjustments are needed.
Q2: Can I use chunky peanut butter instead of creamy?
Yes! Chunky peanut butter adds a bit of crunch and texture. Just keep in mind the bars might be slightly more crumbly.
Q3: Do these bars need to stay refrigerated?
Yes, refrigeration helps the layers hold their shape and keeps the chocolate from softening too much.
Q4: Can I freeze them for later?
Definitely. Freeze them in a sealed, freezer-safe container for up to 3 months. When you’re ready to enjoy, let them thaw overnight in the refrigerator.
Q5: How do I make clean cuts without cracking the chocolate?
Let the bars rest at room temperature for about 10 minutes before slicing. Use a knife warmed under hot water (and wiped dry) to glide through the chocolate layer effortlessly.
Closing Paragraph
These No Bake Peanut Butter Bars are the kind of dessert that brings pure joy with minimal effort. Keep a batch in your fridge for busy afternoons, movie nights, or last-minute guests. The balance of chocolate and peanut butter makes them an instant classic — creamy, sweet, and just a little salty in the best way. Try them once, and they’ll become part of your family’s dessert rotation forever.
Final Thoughts
Every time I make these bars, I’m reminded that the simplest recipes are often the most loved. There’s no fancy equipment, no waiting on the oven — just the comfort of peanut butter and chocolate coming together perfectly. I hope you find the same joy in sharing them as I do.

No Bake Peanut Butter Bars
Equipment
- 8- or 9-inch square baking pan
- Mixing Bowl
- Spatula
- Microwave or double boiler
- Parchment or foil
Ingredients
Peanut Butter Base
- 0.5 cup salted butter melted
- 1 cup graham cracker crumbs
- 2 cups powdered sugar
- 1 cup creamy peanut butter
Chocolate Topping
- 1 cup semi-sweet chocolate chips
- 2 tbsp creamy peanut butter
Instructions
- Line an 8- or 9-inch square baking pan with parchment or foil, leaving an overhang for easy removal.
- In a medium bowl, combine melted butter, graham cracker crumbs, and powdered sugar. Stir in 1 cup peanut butter until thick and well combined.
- Press the mixture evenly into the prepared pan, smoothing the surface with a spatula.
- In a heatproof bowl, melt the chocolate chips with the remaining 2 tablespoons peanut butter, stirring until smooth and glossy.
- Pour the chocolate mixture over the peanut butter base and spread evenly. Chill for at least 2 hours or until set.
- Let sit at room temperature for 10 minutes before cutting. Slice into bars using a warm knife for clean edges.


