Why You’ll Love This Recipe
This Easy Peanut Butter Pie is not only simple to make but also delivers a comforting balance of flavors. The creamy filling blends beautifully with the crunchy crust, making each bite enjoyable. Its practicality shines through as it’s a reliable dessert for various occasions, whether it’s a weeknight dinner or a special celebration. The focus keyword truly lives up to its name, offering an easy yet tasty solution to satisfy your sweet cravings.
Kitchen Tools You’ll Need
- Mixing bowl
- Electric mixer (or whisk)
- Measuring cups and spoons
- Spatula
- Pie plate
Ingredients
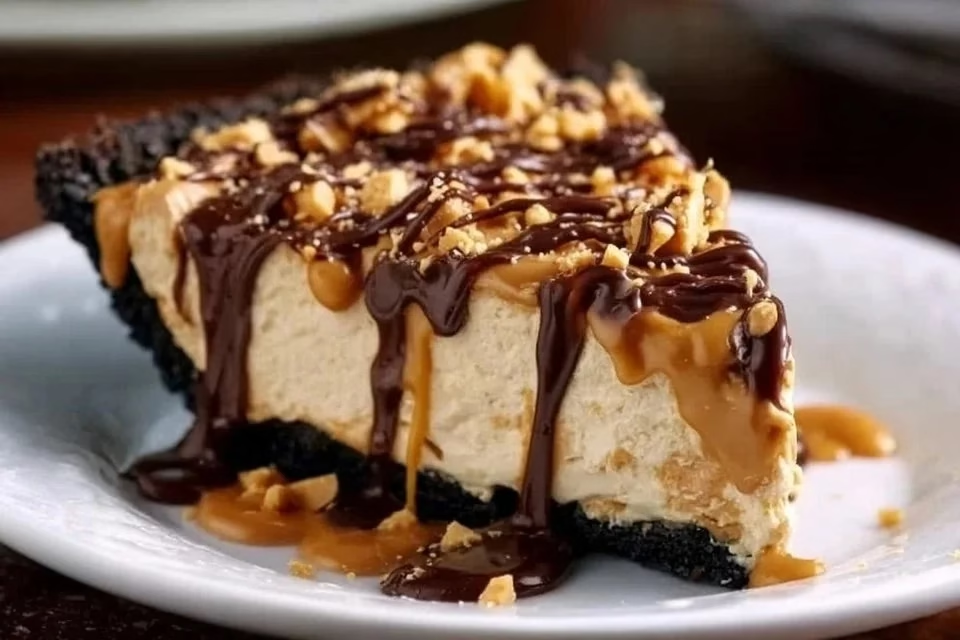
- 1 Chocolate Pie Crust (structure)
- 24 Oreos (regular, not double stuffed) (texture and flavor)
- 5 tablespoons unsalted butter (melted) (moisture)
- 1 cup whipping cream (texture)
- 2 tablespoons powdered sugar (sweetness)
- 8 ounces cream cheese (softened) (creaminess)
- ½ cup creamy peanut butter (flavor)
- ½ cup powdered sugar (sweetness)
- 1 teaspoon vanilla extract (flavor contribution)
- ½ cup chopped peanuts (crunch)
- ¼ cup chocolate syrup (optional) (flavor and moisture)
- ¼ cup butterscotch syrup (optional) (flavor and moisture)
How to Make Easy Peanut Butter Pie
Step 1. Begin by preparing the crust. Crush the 24 Oreos in a mixing bowl until they resemble fine crumbs. You can use a food processor or crush them by hand in a sealed bag. Once crushed, mix the Oreos with 5 tablespoons of melted butter until the mixture is well combined and resembles wet sand. This will ensure the crust holds together properly.
Step 2. Press the Oreo and butter mixture evenly into the bottom and up the sides of a pie plate to form the crust. Use the bottom of a measuring cup or your fingers to pack it tightly. This step is crucial as it will provide a firm base for your pie. Make sure there are no loose crumbs to prevent the crust from falling apart later.
Step 3. Set the crust aside in the refrigerator while preparing the filling. Chilling the crust will help it firm up while the filling is being prepared, ensuring that your pie has a sturdy base. This step is essential for holding the pie together once it is assembled.
Step 4. In a mixing bowl, whip 1 cup of whipping cream until soft peaks form. This means the cream should hold its shape but still be smooth. Be cautious not to over-whip it, or you may end up with butter instead of whipped cream. The whipped cream adds lightness to the peanut butter filling.
Step 5. In another bowl, combine 8 ounces of softened cream cheese and ½ cup of creamy peanut butter. Mix until smooth and creamy, ensuring there are no lumps. This will create a rich and delicious base for your pie filling. The cream cheese adds a tangy balance to the sweetness of the peanut butter.
Step 6. Gradually add ½ cup of powdered sugar and 1 teaspoon of vanilla extract to the cream cheese and peanut butter mixture. Mix until completely combined. Taste the filling to adjust sweetness if necessary. This step enhances the flavor profile, making your filling smooth and appealing.
Step 7. Carefully fold the whipped cream into the peanut butter mixture using a spatula. Do this gently to maintain the light texture of the whipped cream. This folding technique involves incorporating the whipped cream without deflating it, ensuring the filling remains airy and fluffy.
Step 8. Pour the filling into the chilled Oreo crust, spreading it evenly with a spatula. Make sure it reaches the edges for a professional-looking finish. Once the filling is in place, gently tap the pie plate on the counter to remove any air bubbles. This step helps create a smooth top for the pie.
Step 9. Sprinkle ½ cup of chopped peanuts over the top of the pie for added crunch and flavor. You can be generous here, and this will enhance the texture and visual appeal of the dessert. Ensure the peanuts are distributed evenly for a delightful crunch in every bite.
Step 10. If desired, drizzle ¼ cup of chocolate syrup or butterscotch syrup over the top for an extra layer of flavor. This is completely optional, but it adds a lovely touch to the presentation. You can create a pattern or simply drizzle it for a rustic look.
Step 11. Cover the pie with plastic wrap or foil and refrigerate for at least 4 hours, or overnight if time allows. Chilling allows the flavors to meld together and the filling to set properly. Ensure it’s well covered to prevent it from absorbing any odors from the refrigerator.
Step 12. Once set, slice the pie and serve chilled. Enjoy each slice with the rich flavors of peanut butter, cream, and the chocolateiness of the crust. This pie is best enjoyed cold, and you can add extra toppings like whipped cream if you’d like.
Serving Suggestions
This Easy Peanut Butter Pie is versatile and great for a variety of occasions. Consider serving it as a serene ending to a family dinner, or slice it up for a late-night snack while relaxing at home. It’s ideal for birthdays or potlucks as it easily brings a smile to everyone’s face. Leftovers can be enjoyed the next day, making it a treat that lingers in taste and satisfaction.
Pro Tips for Best Results
- Chill the crust well before adding the filling to ensure it stays intact.
- Soften the cream cheese thoroughly for a smoother filling.
- Fold gently when combining the whipped cream to keep the texture light.
- Taste the filling before pouring it to adjust sweetness, if necessary.
- Consider using a pie server for a clean slice when serving.
- Allow the pie to chill overnight for the best flavor development.
Common Mistakes to Avoid
- Over-whipping the cream: This can lead to a buttery texture instead of airy whipped cream. Aim for soft peaks and stop as soon as it reaches that stage.
- Not chilling the crust: Skipping this step can result in a weak base that falls apart. Always chill for adequate time to strengthen the crust.
- Under mixing the filling: If you don’t mix well enough, the cream cheese can be lumpy. Ensure it’s smooth before folding in the whipped cream.
- Skipping the refrigeration stage: Not allowing it to chill can make the pie filling runny. The pie needs time to set for proper slicing.
- Using double-stuffed Oreos: This can create an overly sweet crust that overpowers the filling. Stick to regular Oreos for a well-balanced flavor.
- Not tasting the filling: Failing to adjust sweetness can leave the pie too bland or unbearably sweet. Always taste and adjust if needed before setting it.
Variations & Substitutions
You can experiment with different cookie crusts, such as graham crackers or even a nut-based crust for a gluten-free option. Adding a layer of fudge or butterscotch sauce between the crust and filling can elevate your pie further. For a lighter version, consider using reduced-fat cream cheese or whipped topping instead of heavy cream.
Storage & Reheating
Store the pie covered in the refrigerator for optimal freshness. The pie can last up to four days when properly stored. If you wish to freeze leftovers, wrap individual slices tightly in plastic wrap and then in foil. For best results, freeze it for no longer than two months. When you want to enjoy it again, thaw the slices in the refrigerator overnight.
Nutrition Information
Nutrition information was not provided for this recipe. Nutrition values are estimates and may vary based on ingredients used.
Frequently Asked Questions
Can I make this recipe ahead of time?
Yes, you can prepare the pie a day ahead and let it chill overnight. This not only saves time but also allows the flavors to meld beautifully. Just make sure to keep it covered in the refrigerator until serving.
How long does it last in the fridge?
The pie can last up to four days in the refrigerator when stored properly. Keep it covered to prevent any absorption of odors from other foods in the fridge.
Can I freeze this recipe?
Yes, you can freeze the pie. Wrap individual slices tightly in plastic wrap followed by foil to keep them fresh. It’s best consumed within two months for optimal flavor.
What can I substitute for one ingredient?
If you need a substitution, you could use crunchy peanut butter instead of creamy for added texture. However, the flavor balance may adjust slightly.
Why didn’t my recipe turn out as expected?
Possible reasons could include over-whipping the cream, not chilling the pie sufficiently, or not mixing the filling thoroughly enough. Each step is essential to achieving the desired texture and consistency.
Final Thoughts
Making this Easy Peanut Butter Pie is a straightforward process that delivers a delightful dessert for any occasion. The combination of creamy peanut butter and crunchy Oreo crust creates a nostalgic flavor that is truly comforting. No matter the occasion, this pie will surely be a hit. Enjoy the process of making it, and rest easy knowing you’ll have a lovely treat to share with family and friends.

Easy Peanut Butter Pie
Ingredients
For the crust
- 24 pieces Oreos (regular, not double stuffed)
- 5 tablespoons unsalted butter (melted)
For the filling
- 8 ounces cream cheese (softened)
- ½ cup creamy peanut butter
- 1 cup whipping cream
- ½ cup powdered sugar
- 2 tablespoons powdered sugar (for extra sweetness)
- 1 teaspoon vanilla extract
- ½ cup chopped peanuts (for garnish)
- ¼ cup chocolate syrup (optional) (for garnish)
- ¼ cup butterscotch syrup (optional) (for garnish)
Instructions
Preparation
- Begin by preparing the crust. Crush the 24 Oreos in a mixing bowl until they resemble fine crumbs.
- Mix the crushed Oreos with 5 tablespoons of melted butter until well combined.
- Press the Oreo and butter mixture evenly into the bottom and up the sides of a pie plate to form the crust.
- Refrigerate the crust to firm it while preparing the filling.
Making the filling
- In a mixing bowl, whip 1 cup of whipping cream until soft peaks form.
- In another bowl, combine 8 ounces of softened cream cheese and ½ cup of creamy peanut butter. Mix until smooth.
- Gradually add ½ cup of powdered sugar and 1 teaspoon of vanilla extract to the creamy mixture and mix completely.
- Gently fold the whipped cream into the peanut butter mixture using a spatula.
- Pour the filling into the chilled Oreo crust and spread evenly.
- Sprinkle ½ cup of chopped peanuts over the pie for added crunch.
- Drizzle chocolate syrup or butterscotch syrup over the top if desired.
- Cover the pie with plastic wrap or foil and refrigerate for at least 4 hours, or overnight.
Serving
- Once set, slice the pie and serve chilled.
- Enjoy with your favorite toppings or as is.


