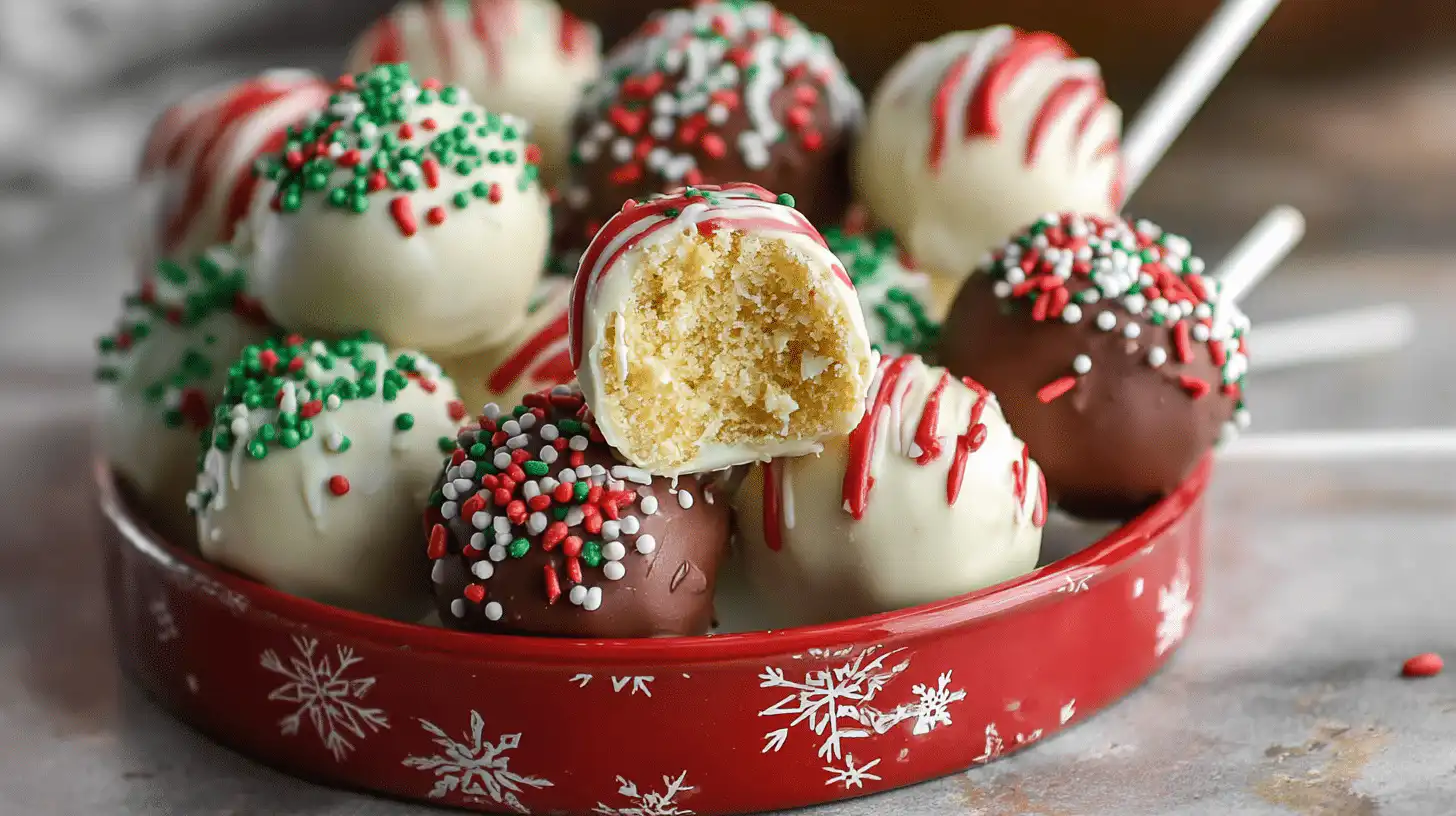
Christmas Cake Pops Recipe Hi, I’m Anna Isam. This recipe takes me back to snowy December afternoons in my mother’s kitchen, where the scent of vanilla cake and melted chocolate filled the air while carols played softly in the background. I’d watch her roll warm cake into perfect little balls, her hands steady and kind. Now, every time I make these Christmas cake pops, I feel her love guiding mine. Because the sweetest recipes are always made to share.
Why You’ll Love This Christmas cake pops recipe
These cake pops are the perfect mix of fun and flavor — a treat that brings out everyone’s inner child. They’re soft on the inside, perfectly sweet, and coated in a candy shell that gives a satisfying snap when you bite in.
You’ll also love how flexible this recipe is. Use any cake mix, any frosting, and any color of candy melts to fit the season or theme. It’s a no-fuss recipe that still looks like you spent hours making them.
Ingredients (Detailed & Humanized)
- Boxed Cake Mix – I love a moist yellow cake mix; it bakes up soft, light, and rich every time.
- Frosting – Cream cheese frosting adds that perfect tang and smooth creaminess to bind the crumbs together.
- Candy Melts – These melt into a shiny, velvety coating — the secret to that signature candy shell.
- EZ Thin (optional) – A little helper that makes your melted chocolate easier to dip and keeps the texture silky.
- Holiday Sprinkles – The most joyful touch — red, green, gold, or silver, they bring instant Christmas sparkle.
🍳 Directions (Step-by-Step Cooking Guide)
Step 1: Prepare your cake mix according to the box instructions, but replace the oil with melted butter for extra richness. This small change gives your cake a homemade flavor that’s warm and buttery.
Step 2: After baking, allow the cake to cool slightly. Crumble it finely using your hands or a food processor — you’re aiming for soft, even crumbs with no large pieces.
Step 3: Add frosting one spoonful at a time, gently mixing until the texture holds together when pinched. The mixture should be moist and pliable, never sticky.
Step 4: Use a mini ice cream scoop to portion the mixture, then roll each scoop between your palms to form smooth, uniform balls.
Step 5: Place the rolled cake balls on parchment paper and chill them until firm. This step keeps them from falling apart when coated in chocolate.
Step 6: Melt your candy melts in a heat-safe bowl, stirring often to avoid scorching. Add a bit of EZ Thin if needed — it makes the coating smooth and glossy.
Step 7: Using a toothpick or small skewer, dip each chilled cake ball into the melted candy. Gently tap off the excess so it forms a clean, even layer.
Step 8: Before the coating hardens, top each one with festive sprinkles. Let them rest on parchment paper until the shell is set and gleaming.
Cultural or Technique Note
Cake pops have become a modern American classic — playful, colorful, and perfect for celebrating holidays. Their charm lies in their simplicity: leftover cake transformed into something whimsical and beautiful. Whether you call them cake pops, cake bites, or “stickless cake truffles,” they capture the cozy creativity that defines homemade holiday baking.
Serving Suggestions
• Pile them on a holiday dessert tray for a party centerpiece
• Wrap individually in clear bags for edible gifts
• Serve as bite-sized sweets after Christmas dinner
• Pair with hot cocoa or peppermint lattes for a festive treat
Pro Tips for Success
- Let your cake cool before crumbling to avoid soggy texture.
- Don’t add too much frosting — a little goes a long way.
- Chill the cake balls before dipping so they stay firm.
- Use candy melts or Ghirardelli wafers for smooth coating.
- Allow excess chocolate to drip off before setting them down.
- Wash your hands between rolling to keep the texture clean.
Common Mistakes to Avoid
⚠️ Overheating chocolate: It can seize or thicken quickly — melt it slowly and stir often.
⚠️ Using cold cake balls: The chocolate may crack when the temperature difference is too big.
⚠️ Too much frosting: Makes the mixture mushy — start small and add as needed.
⚠️ Skipping the chill: Warm cake balls can crumble or fall apart when dipped.
⚠️ Leaving oil in the mix: Oil can seep through the chocolate coating — butter works best.
Storage & Reheating
Fridge: Store airtight for 3–4 days to keep the coating crisp.
Freezer: Freeze up to 2 months in a tightly sealed container for longer storage.
Reheat: Not needed — simply let them thaw before serving for the perfect bite.
Frequently Asked Questions (FAQ)
Q1: Can I use different cake flavors?
A1: Absolutely! Red velvet, chocolate, or funfetti cake mixes are all delicious options for this Christmas cake pops recipe.
Q2: How do I dip cake balls without sticks?
A2: Use a toothpick or mini skewer to dip, then patch the small hole with a dab of melted chocolate once they’ve dried.
Q3: Can I make these ahead of time?
A3: Yes! You can freeze undipped cake balls for weeks, then coat them in chocolate just before serving.
Q4: What frosting works best?
A4: Cream cheese frosting is my favorite for its creamy texture and tang, but vanilla or buttercream also work beautifully.
Q5: How long do they keep?
A5: When stored in an airtight container, these Christmas cake pops stay fresh up to 10 days in the fridge.
Closing Paragraph
These Christmas cake pops are proof that festive desserts don’t need to be complicated. With just a few simple ingredients, you can create something joyful, colorful, and irresistibly sweet. Whether you serve them at a party or gift them in a pretty tin, these little bites bring a smile to every face.
So roll up your sleeves, melt that chocolate, and make your own batch of edible holiday cheer.
Final Thoughts
Every year, I look forward to the moment I bite into one of these — the snap of chocolate, the soft cake inside, and the sparkle of sprinkles that always makes me smile. They’re more than just sweets; they’re tiny reminders of how fun it is to bake for people you love. Follow me on Pinterest for more cozy, quick, and nostalgic recipes.

Christmas Cake Pops
Equipment
- Mixing Bowl
- Mini Ice Cream Scoop
- Toothpicks or Skewers
- Parchment Paper
- Microwave-safe bowl
Ingredients
Cake
- 1 box yellow cake mix or your preferred flavor
- melted butter replace oil in cake mix instructions
Frosting & Decoration
- 1/2 cup cream cheese frosting adjust to texture
- 2 cups candy melts any festive color
- EZ Thin or vegetable shortening optional, for smooth dipping
- holiday sprinkles for decorating
Instructions
- Prepare your cake mix according to box instructions, substituting melted butter for oil.
- Let cake cool slightly, then crumble it into fine crumbs using your hands or a food processor.
- Add cream cheese frosting a spoonful at a time, mixing until mixture holds together but isn’t sticky.
- Use a mini scoop to portion, then roll into smooth balls with your hands.
- Place cake balls on parchment paper and chill until firm (about 20 minutes).
- Melt candy melts gently in a microwave-safe bowl, stirring frequently. Add EZ Thin if needed.
- Dip each chilled cake ball into melted candy using a toothpick or skewer. Let excess drip off.
- Sprinkle with festive decorations before coating hardens. Let set on parchment paper.