
Cranberry Christmas Cake — a festive treat that captures the heart of the holidays. I’m Salma, a 32-year-old home cook from the United States, and my journey into cooking started with curiosity and plenty of trial and error. What began as online recipe experiments soon turned into something much deeper—a way to connect with family, celebrate moments, and share love through food. This Cranberry Christmas Cake is one of those recipes that brings joy to bake and beauty to serve. It’s rich, colorful, and filled with the magic that makes every holiday table feel extra special.
Why You’ll Love This Recipe
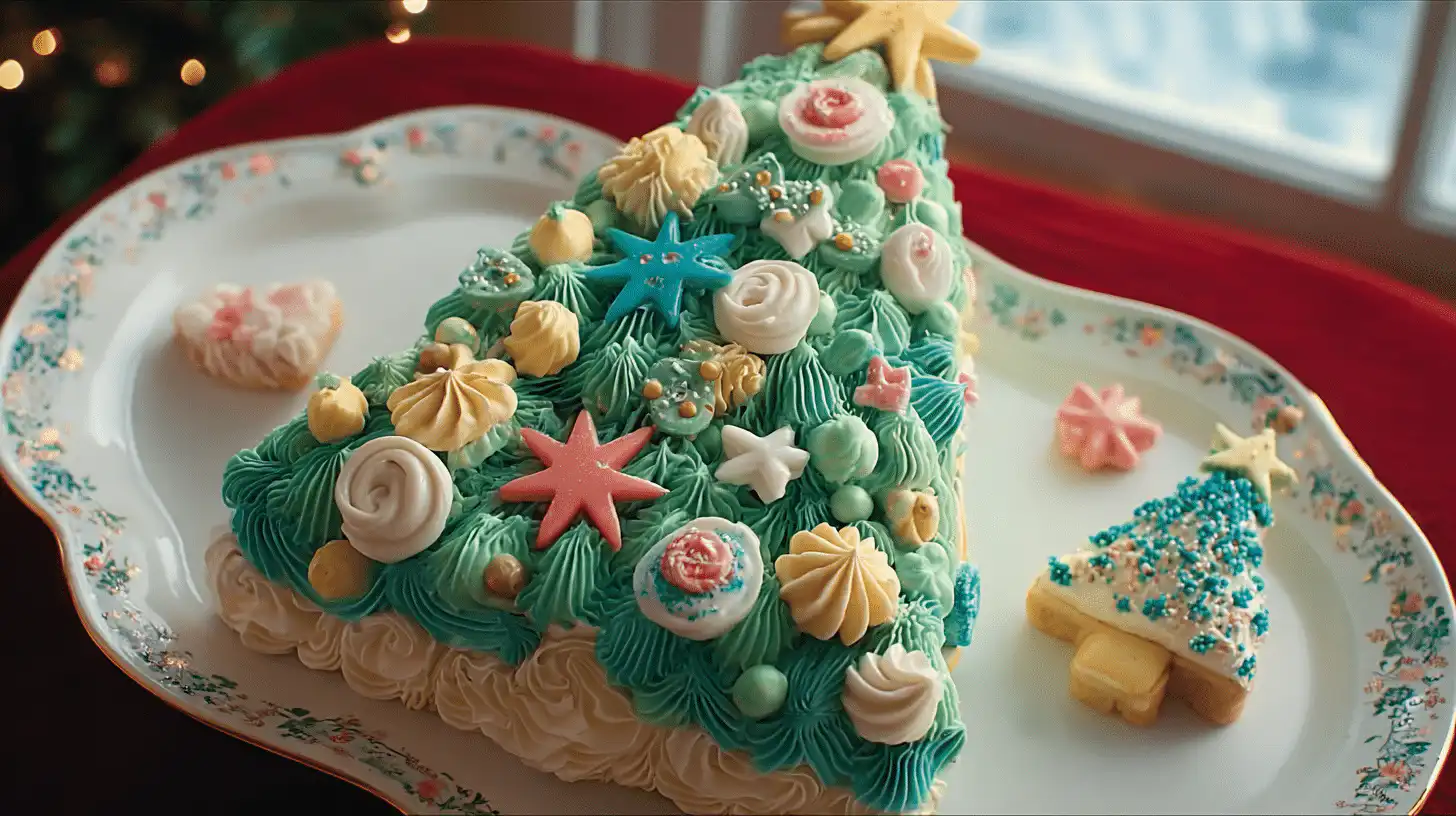
This cake is pure Christmas magic — easy to make, deeply chocolatey, and fun to decorate. You don’t need professional skills to create something stunning. Every swipe of green frosting and sprinkle of candy adds charm and holiday spirit. Plus, it’s the perfect project for family time — everyone can join in on the decorating!
Ingredients (Detailed & Humanized)
- Baking Spray with Flour – keeps the cake from sticking for a clean release.
- 1 box Pillsbury™ Moist Supreme® Dark Chocolate Cake Mix – rich, chocolatey base that’s perfectly moist.
- 1 cup water – helps achieve that soft, fluffy texture.
- 1/3 cup vegetable oil – adds moisture and smooth crumb.
- 3 large eggs – bind the batter and give structure.
- 1 tub Pillsbury™ Creamy Supreme® Chocolate Fudge Flavored Frosting – deep, fudgy richness for layering and details.
- 2 tubs Pillsbury™ Funfetti® Vibrant Green Vanilla Flavored Frosting – cheerful color for your Christmas “tree.”
- 1 tub Pillsbury™ Creamy Supreme® Vanilla Flavored Frosting – light, creamy touch for decorating accents.
- Candy-coated chocolate pieces – the “ornaments” that make the tree sparkle.
- 1 flat-bottom ice cream cone – forms the sturdy tree trunk.
- Yellow decorator sprinkles – a golden “star” to top it all off.
Directions (Step-by-Step Cooking Guide)
Step 1: Preheat your oven to 350°F. Line a 15 x 10-inch baking pan with foil, letting it hang over the edges for easy lifting. Coat the foil generously with baking spray with flour — this ensures your cake slides right out without a crumb left behind.
Step 2: In a large bowl, prepare the cake mix as directed, whisking together the water, oil, and eggs until smooth. Pour the batter evenly into the prepared pan and bake for 18 to 20 minutes, or until a toothpick inserted in the center comes out clean. The aroma will be irresistible! Let it cool for 10 minutes, then lift it out using the foil and let it cool completely on a rack. For easier shaping later, freeze it for 30 minutes.
Step 3: Once firm, cut a large triangle shape from the cake — starting at the top center of one short side down to the two opposite corners. Arrange the two cut-off pieces on your tray, rounded sides up, to form a second triangle matching the first. Spread a generous layer of chocolate fudge frosting between them, then set the full triangle on top to form your “tree.” Trim edges as needed, then freeze for 20 minutes to set.
Step 4: Coat the sides and top of the cake with the green Funfetti® frosting, spreading it evenly and smoothing it like wrapping paper over a gift. Add the candy bits from the frosting for a pop of festive color.
Step 5: Now comes the fun part — decorating! Use the vanilla frosting to pipe details like garlands or snow drifts. Press in the candy-coated chocolates for ornaments, scattering them like lights across your frosted branches.
Step 6: To create the trunk, cut the ice cream cone crosswise where the top and bottom meet. Cover the flat-bottom half with chocolate fudge frosting and press it gently into the bottom of your tree. For the star, frost the other cone half with vanilla frosting, coat it in yellow sprinkles, and set it cut-side down on top of the cake. Step back and admire your festive masterpiece!
Cultural or Technique Note
Decorating a Christmas tree cake is a beloved holiday tradition across many American kitchens. It blends classic chocolate cake comfort with whimsical, hands-on fun that celebrates creativity. This style of cake decorating — transforming simple shapes into festive symbols — is what makes holiday baking so joyful and memorable.
Serving Suggestions
- Display on a large platter surrounded by holly or cranberries.
- Serve with warm cocoa or peppermint coffee.
- Add a scoop of vanilla ice cream for extra indulgence.
- Dust lightly with powdered sugar for a “snowy” finish.
Pro Tips for Success
- Chill the cake before cutting — it keeps the shape neat.
- Use an offset spatula for smooth frosting edges.
- Freeze briefly before decorating to prevent crumbs.
- Pipe frosting details slowly for more control.
- Let the cake sit at room temperature before serving for the best texture.
Common Mistakes to Avoid
⚠️ Rushing the cooling: Warm cake will crumble — always chill before frosting.
⚠️ Skipping the foil lining: Makes removal tricky and can break your cake.
⚠️ Overbaking: Leads to dryness — check early for doneness.
⚠️ Uneven frosting: Use a chilled cake to spread frosting evenly.
Storage & Reheating
Fridge: Store airtight for 3–4 days.
Freezer: Store airtight for up to 2 months.
Reheat: Allow to come to room temperature before serving; avoid microwaving to keep frosting smooth.
Frequently Asked Questions (FAQ)
Q1: Can I use a different cake flavor?
A1: Absolutely! While the chocolate base makes this Cranberry Christmas Cake rich and decadent, you can easily switch things up. Vanilla, red velvet, or even a spiced gingerbread mix adds a lovely holiday twist. The key is to choose a flavor that pairs well with your frosting and decorations.
Q2: How can I make it more cranberry-forward?
A2: To highlight the cranberry flavor, fold chopped dried cranberries into the batter before baking or scatter them between the layers with a thin spread of frosting. You can also garnish the base with sugared cranberries for sparkle and a tangy contrast to the sweet frosting.
Q3: Can I prepare it ahead of time?
A3: Yes! You can bake the cake layers up to two days in advance and store them tightly wrapped in the fridge, or freeze them for up to a month. When you’re ready to serve, thaw, frost, and decorate—it’ll taste as fresh as the day you baked it.
Q4: What’s the best way to transport it?
A4: Chill the finished cake for about 30 minutes to firm the frosting and keep decorations in place. Set it on a sturdy flat tray or a cake board, then cover it loosely with foil or place it in a cake box. Keep it cool during transport, and once you arrive, let it rest at room temperature before serving for the best texture and flavor.
Closing Paragraph
This Cranberry Christmas Cake captures everything we love about the holidays — sweetness, creativity, and that feeling of home. Each bite is a little piece of celebration, from the rich chocolate base to the playful frosting details. Make it your own with extra cranberries, different candies, or even a shimmer of edible glitter. However you decorate it, it’s sure to bring smiles and sparkle to your holiday table.
Final Thoughts (Emma’s Voice)
I love how this cake brings people together — one to mix, one to frost, one to sneak candy decorations. It’s more than dessert; it’s a moment shared in laughter and sugar. If you bake this, I hope it fills your kitchen with warmth and your heart with Christmas joy. Follow me on Pinterest for more cozy, quick, and nostalgic recipes.

Holiday Cranberry Christmas Tree Cake
Equipment
- 15×10-inch baking pan
- Aluminum foil
- Offset Spatula
- Mixing Bowls
- Cake knife or serrated knife
Ingredients
Cake & Frosting
- 1 box Pillsbury™ Moist Supreme® Dark Chocolate Cake Mix
- 1 cup water
- 1/3 cup vegetable oil
- 3 large eggs
- 1 tub Pillsbury™ Creamy Supreme® Chocolate Fudge Frosting
- 2 tubs Pillsbury™ Funfetti® Vibrant Green Vanilla Frosting
- 1 tub Pillsbury™ Creamy Supreme® Vanilla Frosting
Decorations
- 1 flat-bottom ice cream cone
- Candy-coated chocolate pieces for ornaments
- Yellow decorator sprinkles for the star
- Baking spray with flour for greasing the pan
Instructions
- Preheat oven to 350°F. Line a 15×10-inch baking pan with foil and coat with baking spray with flour.
- In a large bowl, prepare the cake mix using water, oil, and eggs. Pour into pan and bake 18–20 minutes. Cool 10 minutes, then lift using foil and cool completely. Freeze for 30 minutes.
- Cut a large triangle from the cake. Use cut-off corners to form a second triangle, creating a tree shape. Spread chocolate frosting between layers. Freeze again for 20 minutes.
- Frost entire cake with green Funfetti® frosting. Add sprinkles and candy bits across the surface.
- Use vanilla frosting to pipe snow-like accents or garlands. Add candy-coated chocolate pieces as ornaments.
- Frost the flat-bottom half of the ice cream cone with chocolate frosting and press into bottom of cake for the trunk. Frost the other cone half with vanilla frosting and coat with yellow sprinkles to create a star. Place on top of the cake.


