
There’s something lovely about the process of making bread from scratch. This sourdough bread recipe captures the essence of home baking, relying on simple ingredients to create a wholesome loaf that can be enjoyed at any time. Whether it’s for a quiet Sunday morning or a family gathering, the reliability and comfort of homemade sourdough is undeniable. Let’s dive into this nourishing recipe—it’s a rewarding endeavor that you can truly appreciate in the calm of your own kitchen.
Why You’ll Love This Sourdough Bread Recipe
This recipe is straightforward and dependable, making it perfect for bakers at any level. The delightful balance of flavor brings comfort, while the ease of the process ensures it fits into your everyday routine. With this sourdough bread recipe, you not only get a delicious loaf but also the satisfaction of creating something from scratch.
Kitchen Tools You’ll Need
- Large mixing bowl
- Kitchen scale
- Bench scraper
- Proofing baskets
- Baking stone or Dutch oven
- Plastic wrap or damp kitchen towel
Ingredients
- 650 grams water (provides moisture for the dough)
- 200 grams ripe sourdough starter (100% hydration) (introduces flavor and fermentation)
- 85 grams whole wheat flour (adds depth and nutrition)
- 815 grams unbleached bread flour (provides structure and chew)
- 20 grams fine sea salt (enhances flavor and controls fermentation)
- 20 grams water (for mixing) (helps combine ingredients)
- 60 grams brown rice flour (for flouring proofing baskets) (prevents sticking)

How to Make Sourdough Bread Recipe
Step 1. Begin by mixing the water and ripe sourdough starter in a large mixing bowl. Stir them together until the starter is well dispersed and the two ingredients are fully combined. This initial mixing ensures an even distribution of yeast and bacteria, leading to a consistent fermentation process.
Step 2. Next, add the whole wheat flour and unbleached bread flour to the bowl with the water and starter. Use a spatula or your hands to mix the ingredients until no dry flour remains. This stage is crucial for developing gluten, which gives the bread its texture. The dough will be rough and shaggy at this point, and that’s just fine.
Step 3. Sprinkle the fine sea salt over the dough, ensuring it has good coverage. Add the 20 grams of water intended for mixing as well. Mix everything well until the salt is fully incorporated. It’s important to distribute the salt evenly to help control the fermentation process and improve the flavor of the bread.
Step 4. Once the dough is mixed, it’s time to knead. On a clean surface, knead the dough for about 8–10 minutes by stretching and folding it. You’ll know it’s ready when it feels smooth and elastic, without sticking excessively to your hands. This helps develop the gluten structure, contributing to a good rise in the final loaf.
Step 5. Gather the dough into a ball and place it in a lightly greased bowl. Cover it with a damp kitchen towel or plastic wrap to keep it from drying out. Allow the dough to undergo its first fermentation or bulk rise for around 4-6 hours at room temperature, until it has roughly doubled in size. You can check this by gently pressing on the dough—if it springs back slowly, you’re ready for the next step.
Step 6. After the rise, turn the dough out onto a floured surface. Gently shape it into a round, tucking the edges of the dough into the center. This creates surface tension, which helps the loaf keep its shape during the final proof. The texture should feel slightly tacky but manageable.
Step 7. Prepare your proofing baskets by generously flouring them with brown rice flour to prevent sticking. Place the shaped dough seam side up into the baskets. Cover again with a towel and let it proof for another 2-4 hours, depending on the ambient temperature. The dough should expand but look a bit puffy rather than fully doubled.
Step 8. Preheat your oven to a high temperature about 30 minutes before you plan to bake. If using a baking stone, place it in now to heat. Bread bakes best when the oven is very hot, creating a good crust and allowing the loaf to rise properly.
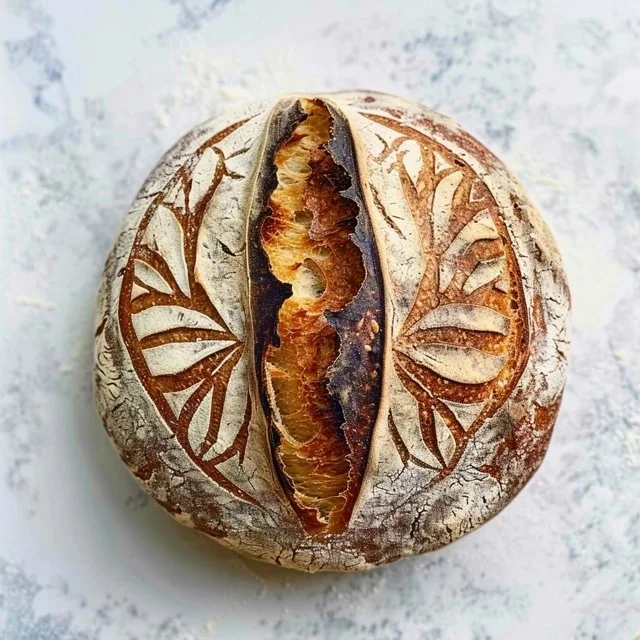
Step 9. Once preheated, carefully flip your proofed dough out of the basket onto parchment paper. Using a sharp blade, score the top of the loaf to control how it expands in the oven. This also adds a rustic look to your bread.
Step 10. Transfer the dough into the oven. If you like, add steam by placing a pan of hot water at the bottom of the oven. This moisture helps develop a nice crust. Bake until the bread is golden brown and sounds hollow when tapped on the bottom.
Step 11. When your loaf is done, remove it from the oven and let it cool on a wire rack. Cooling is an essential step that allows the interior to set properly, ensuring the texture is just right. Resist the urge to cut too soon—you’ll appreciate the difference in crumb structure!

Serving Suggestions
This sourdough bread is versatile and an excellent choice for any mealtime. Enjoy it warm, slathered with butter for breakfast, or use it to make classic sandwiches for lunch. It pairs beautifully with soups or salads for a comforting dinner. If you have leftovers, consider toasting slices for a delightful snack or quick breakfast option. The bread also makes a great foundation for bruschetta topped with fresh tomatoes—simple yet elevating.
Pro Tips for Best Results
- Ensure your sourdough starter is active and bubbly before using it; this ensures good fermentation.
- Pay attention to the texture of your dough during mixing and kneading; it should become elastic.
- Adjust proofing times based on the warmth of your kitchen; warmer environments may ferment faster.
- Use a sharp blade for scoring, as it makes cleaner cuts and enhances the bread’s appearance.
- Allow the bread to cool completely before slicing to enhance texture and crumb.
Common Mistakes to Avoid
- Using an inactive starter: If your sourdough starter isn’t bubbly, the bread may not rise effectively. Ensure it’s fed and bubbly before mixing.
- Not measuring accurately: Baking relies on precise measurements; even small discrepancies can affect the dough’s hydration and texture. Use a kitchen scale for best results.
- Over-kneading the dough: Kneading too long can lead to a dense texture. Stop when the dough is smooth and elastic but still slightly tacky.
- Under-proofing: Cutting the proofing time short can lead to bread that is dense or gummy. Pay attention to the volume of the dough and aim for the right rise.
- Not using steam: Skip the steam, and your crust may be tough or leathery. Incorporate steam during the first part of baking to help develop the outer layer.
- Slicing too soon: Cutting into the loaf while it’s still warm can result in a gummy texture. Allow it to cool for at least an hour to achieve the best texture.
Variations & Substitutions
While this recipe is designed to capture the essence of classic sourdough, you can experiment with the flour types. For example, try swapping a portion of the bread flour with rye flour for a deeper flavor. Or, you might add various seeds like sesame or poppy seeds for a different texture and crunch.
Storage & Reheating
To store your sourdough bread at room temperature, wrap it in a kitchen towel to maintain a bit of moisture while allowing airflow. For longer storage, consider placing it in a paper bag to prevent mold. If you need to refrigerate, place the bread in a plastic bag but be aware this can dry it out. Freezing is a good option if you want to save slices; wrap them tightly in plastic wrap and keep in a freezer bag. To reheat, simply toast or warm it in the oven to help revive its crusty exterior.
Frequently Asked Questions
Can I make this recipe ahead of time?
Yes, you can prepare the dough in advance. After the first rise, shape the dough and store it in the fridge for an overnight proof. This can enhance the flavor before baking.
How long does it last in the fridge?
Sourdough bread can be stored in the fridge for about 3 to 5 days. However, it’s best enjoyed fresh, so consider toasting it if it becomes slightly stale.
Can I freeze this recipe?
Absolutely. Sourdough bread freezes well. Just wrap it tightly in plastic wrap and store it in a freezer-safe bag. It’ll last for about 3 months.
What can I substitute for one ingredient?
If you need to substitute flour, consider using a blend that includes whole grain for added flavor, though the proportions will need adjusting for hydration.
Why didn’t my recipe turn out as expected?
Common issues could stem from an inactive starter, inaccurate measurements, or incorrect proofing times. It’s essential to ensure each step is followed carefully for the best result.
Final Thoughts
Making sourdough bread is a gratifying endeavor—a blend of art and science that yields a delightful result. The process may seem intricate, but with practice, it becomes second nature. As you slice into your freshly baked loaf, the flavor of your efforts shines through. Enjoy the fruits of your labor, and remember that each loaf contributes to your growing baking journey.

Sourdough Bread
Ingredients
Main Ingredients
- 650 grams water provides moisture for the dough
- 200 grams ripe sourdough starter (100% hydration) introduces flavor and fermentation
- 85 grams whole wheat flour adds depth and nutrition
- 815 grams unbleached bread flour provides structure and chew
- 20 grams fine sea salt enhances flavor and controls fermentation
- 20 grams water (for mixing) helps combine ingredients
- 60 grams brown rice flour (for flouring proofing baskets) prevents sticking
Instructions
Preparation
- Mix the water and ripe sourdough starter in a large mixing bowl until fully combined.
- Add whole wheat flour and unbleached bread flour; mix until no dry flour remains.
- Sprinkle fine sea salt over the dough and add the 20 grams of water for mixing; mix until salt is incorporated.
- Knead the dough on a clean surface for 8-10 minutes until smooth and elastic.
- Gather the dough into a ball and place it in a greased bowl; cover and allow to ferment for 4-6 hours or until doubled in size.
- Turn the dough onto a floured surface and shape it into a round.
- Flour proofing baskets with brown rice flour; place dough seam side up into the baskets and let proof for 2-4 hours.
Baking
- Preheat your oven for 30 minutes before baking.
- Flip the proofed dough onto parchment paper and score the top to control expansion.
- Transfer dough to the oven; add steam if desired for a better crust.
- Bake until golden brown and sounds hollow when tapped.
- Cool on a wire rack for at least an hour before slicing.


