
There’s something truly rewarding about working with sourdough bread. The process of scoring is a simple yet essential step that elevates the appearance and texture of your loaf. This technique not only allows for artistic expression but also helps control how the dough expands while baking. It’s perfect for a variety of occasions, whether you’re sharing slices with family during cozy weeknight dinners or enjoying a quiet weekend morning with fresh bread. With a little practice, scoring can become a comforting routine in your baking journey.
Why You’ll Love This How to Score Sourdough Bread
Scoring sourdough bread is an approachable technique that adds reliability to your baking. This process enhances the comforting texture and unified flavors of the bread, making it appealing for daily enjoyment. Learning to score accurately offers practical value, allowing you to feel more confident in the kitchen while mastering sourdough.
Kitchen Tools You’ll Need
- A sharp knife or lame
- A cutting board
- A small bowl for flour
Ingredients
- 1 loaf of sourdough bread (provides a chewy texture and tangy flavor)
- Flour for dusting (prevents sticking and aids in visibility of cuts)
How to Make {focus_keyword}
Step 1. Start by preparing your workspace. Ensure that you have a clean cutting board ready for the sourdough bread. You want a surface that allows for easy movement while also maintaining stability as you score. Lightly dust the board with flour to prevent the bread from sticking.
Step 2. Take your loaf of sourdough bread and place it gently on the floured cutting board. Before you begin scoring, observe the surface of the dough. Scoring should be done on a well-shaped loaf, so ensure that your bread has a smooth, even surface to work on.
Step 3. Grab your sharp knife or lame. This tool is crucial for making precise cuts that will show off the beautiful interior of the bread once it’s baked. Holding the knife at a slight angle, prepare for the scoring process with a firm grip that allows for control over your cuts.
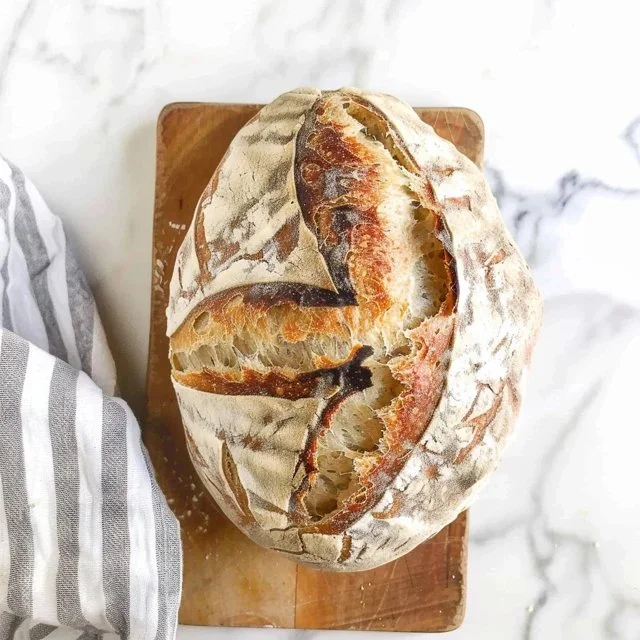
Step 4. Begin scoring the top of the loaf with swift, decisive movements. You can create patterns, like slashes or curves, depending on your preference. The depth of your cuts should be about one-quarter inch, allowing for controlled expansion during baking. Watch as the flour from the dusting accentuates your design.
Step 5. After scoring, ensure that the cuts are visible. This helps the bread open up as it bakes, providing a lovely crust. With this step complete, your loaf is ready to transition into the oven for baking, where the magic of rising occurs.
Step 6. Once you’ve finished scoring, you may want to let it rest for a moment before placing it in the oven. This brief pause helps relax the dough further, preparing it for the heat ahead. In this stage, the flour around the cuts may absorb some moisture, which creates a nice texture when baked.

Serving Suggestions
Sourdough bread is incredibly versatile and can complement various meals and occasions. Slice it fresh for breakfast, pairing it with butter or jam. It’s also perfect for sandwiches or toasted as a satisfying snack. Consider serving it alongside soups or salads for family meals or enjoying leftover slices with your favorite toppings during quiet evenings at home. The possibilities are as comforting as the bread itself.
Pro Tips for Best Results
- Use a sharp knife or lame to ensure clean cuts, promoting better expansion and appearance.
- Dust the blade with flour to prevent it from sticking to the dough.
- Score just before placing in the oven for the best texture and appearance during baking.
- Experiment with different patterns to develop your unique style and enjoy the process.
- Make sure your dough is adequately proofed to achieve the best results when scoring.
Common Mistakes to Avoid
- Not using a sharp blade. A dull knife can tear the dough rather than slice through it cleanly. Ensure your tool is sharp so cuts maintain their shape.
- Cutting too deep or too shallow. If cuts are too deep, it might create unsightly holes; if too shallow, the bread will not bloom. Aim for about a quarter-inch depth for the best results.
- Failing to dust with flour. Skipping the flour dusting can cause sticking, making it difficult to score neatly. Always dust your surface and blade for smooth cuts.
- Waiting too long after scoring. Delaying the baking process can lead to loss of those sharp cuts. Score just before baking to maintain shape and visibility.
- Not preheating your oven properly. A properly heated oven produces a better crust. Ensure your oven is fully preheated to get the best rise and texture during the baking process.
- Scoring too late in the baking process. Attempting to score after the dough has started baking leads to unpredictable results. Always score before placing the loaf in the oven for even expansion.
Variations & Substitutions
Explore scoring patterns that reflect your preference. You can create simple slashes or intricate designs using a lame, which can add a personal touch. While the core technique remains the same, feel free to adjust the scoring depth or angles to create different crust effects. Practice these variations regularly to find what feels right for you.
Storage & Reheating
For room-temperature storage, wrap the bread in a clean kitchen towel and store in a bread box or a cool, dry place. This helps maintain its crust while preventing excessive moisture. In the refrigerator, it’s best to seal it in a plastic bag for a slightly extended life, but be mindful that the crust may soften. For freezing, wrap the bread tightly in plastic wrap and store in an airtight bag. To reheat, place the bread in a preheated oven at 350°F for a few minutes to restore its texture and warmth.
Frequently Asked Questions
Can I make this recipe ahead of time?
You can definitely score your bread in advance, but it’s suggested to score just before baking for the best results. Preparing the dough ahead gives you flexibility while also ensuring freshness when serving.
How long does it last in the fridge?
When stored properly in an airtight container, sourdough bread can last about 3 to 5 days in the refrigerator. The texture may change, and it may become a bit stale, so it’s best enjoyed fresh.
Can I freeze this recipe?
Yes, sourdough bread freezes well. Sliced bread can be placed in a resealable plastic bag and frozen for up to three months. Thaw slices as needed and enjoy at your convenience.
What can I substitute for one ingredient?
In this recipe, the essential ingredients are specific to scoring sourdough. However, if you find you run out of flour for dusting, any light dusting powder can suffice, but flour is the most effective choice for easy visibility and clean cuts.
Why didn’t my recipe turn out as expected?
If the scoring didn’t yield the results you were looking for, it may have been caused by a dull knife, incorrect cutting depth, or the dough not being adequately proofed. Reviewing these areas next time can enhance your scoring experience.
Final Thoughts
Scoring sourdough bread is a fulfilling process that enhances both the appearance and texture of your finished product. As you practice, you’ll find joy in the routine and comfort in each slice, ready to be enjoyed in so many ways. Embrace the simplicity of this technique and remember that every loaf is a chance to learn something new. Your baking journey is uniquely yours.

Sourdough Bread Scoring
Ingredients
Main ingredients
- 1 loaf sourdough bread Provides a chewy texture and tangy flavor
- to taste flour for dusting Prevents sticking and aids in visibility of cuts
Instructions
Preparation
- Start by preparing your workspace. Ensure that you have a clean cutting board ready for the sourdough bread. Lightly dust the board with flour to prevent the bread from sticking.
- Take your loaf of sourdough bread and place it gently on the floured cutting board.
- Grab your sharp knife or lame. Holding the knife at a slight angle with a firm grip, prepare for the scoring process.
Scoring
- Begin scoring the top of the loaf with swift, decisive movements. Make cuts about one-quarter inch deep to allow for controlled expansion during baking.
- Ensure that the cuts are visible to help the bread open up as it bakes.
- Let the loaf rest for a moment before placing it in the oven to help relax the dough further.


