
Hi, I’m Anna Isam. I’m 30 years old and based here in the United States, and for as long as I can remember, food has been my way of connecting with people I care about. I’m not from a family of professional chefs, but I grew up surrounded by home cooking and the comforting smells of simmering soups and freshly baked cakes. Watching my mom and grandmother cook taught me that food is about love, not perfection. That’s why I adore creating November birthday cake designs — they celebrate warmth, creativity, and family, turning simple homemade cakes into something truly memorable.
Serving Versatility November birthday cake designs
This cake isn’t just about beauty — it’s about sharing. You can serve it as a showpiece dessert after a comforting fall dinner or pair it with a steaming mug of chai tea or pumpkin-spiced coffee for an afternoon treat. For a birthday gathering, top it with sparkling candles or a rustic cake topper made from twigs or dried leaves. You can even turn this November birthday cake design into mini versions — cupcakes or small layer cakes — perfect for gifting or individual servings. However you serve it, it brings the cozy glow of autumn to your table.
Ingredients (Detailed & Humanized)
Favorite Cake Mix or Recipe: The base of your creation — soft, tender, and ready to soak in autumn colors.
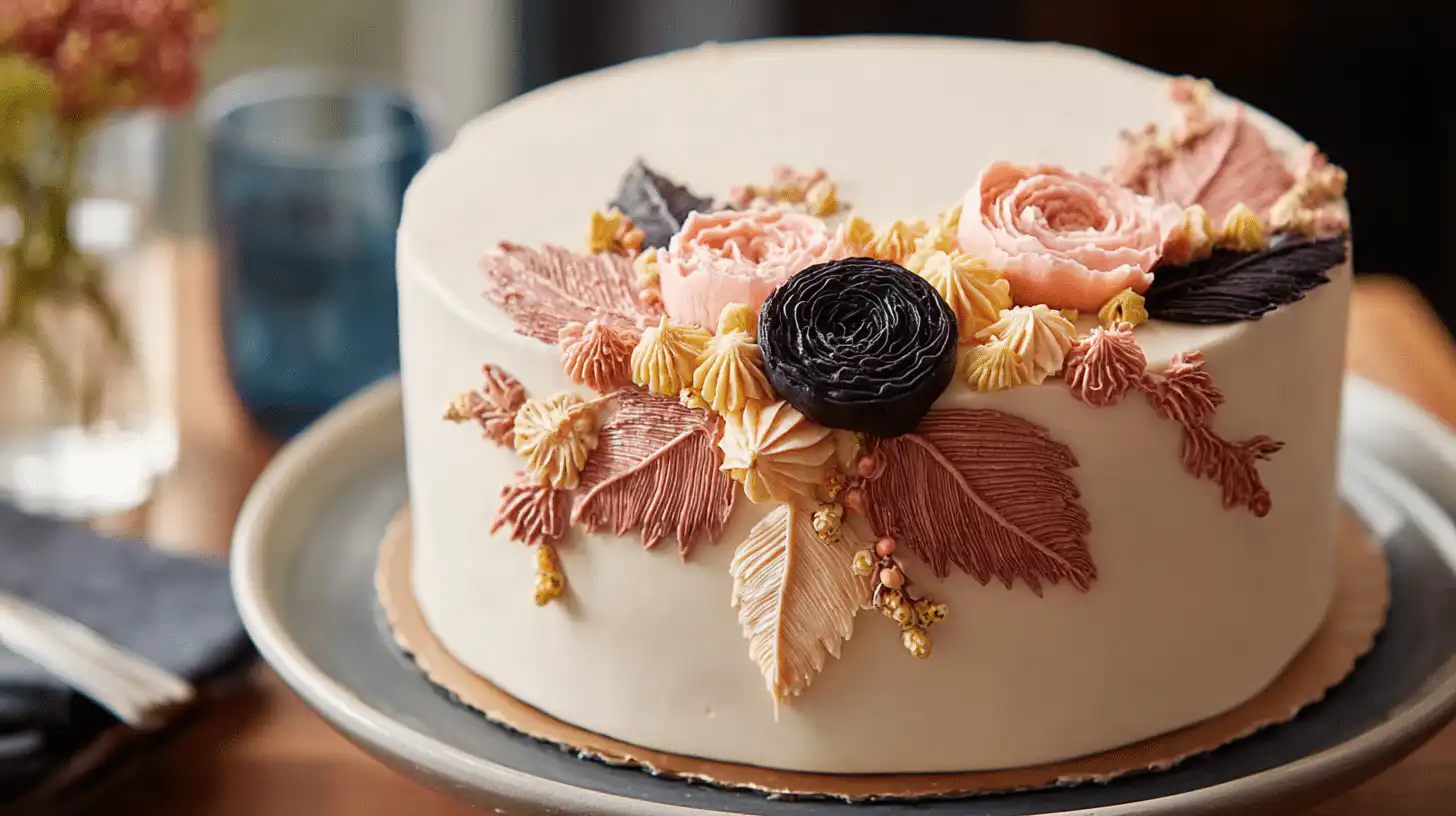
Lemon Yellow Icing Color, 1 oz.: Adds a cheerful brightness that mimics golden fall leaves.
Creamy White Decorator Icing, 4 lb.: Your blank canvas — smooth, soft, and deliciously creamy.
Black Icing Color, 1 oz.: For contrast and depth; gives that elegant background to make colors pop.
Golden Yellow Icing Color, 1 oz.: A mellow, buttery hue that feels like sunlight through leaves.
Orange Icing Color, 1 oz.: Warm and bold — captures the heart of fall.
Christmas Red Icing Color, 1 oz.: Adds richness and warmth, perfect for soft vine accents.
Tools:
Round Cake Decorating Tip 2: For those fine, graceful lines of vine embroidery.
Non-Stick Cooling Grid: Keeps your layers even and cool.
Toothpick: A simple tool for sketching leaf outlines before piping.
8-inch Aluminum Cake Pans: Ensures even baking every time.
Angled Spatulas (9 and 13 inch): For smoothing frosting effortlessly.
12-Inch Disposable Decorating Bags: For easy color switching and clean piping.
Directions (Step-by-Step Cooking Guide)
- Bake the cakes. Prepare your cake batter according to your chosen recipe. Divide it into three equal parts and tint each one — one with orange, one with golden yellow, and one with lemon yellow. Each layer becomes a reflection of fall’s palette. Bake until golden, then cool completely before trimming each layer to about one inch high.
- Tint your icing. Using black icing color, tint about four cups of decorator icing. Use this to fill, stack, and ice your three cake layers until smooth. The black creates a striking canvas for your colorful decorations.
- Prepare autumn shades. Divide about six and one-third cups of icing into small bowls, then tint each a different warm shade — red, orange, and yellow. For the vine details, tint a small portion very light red with the Christmas Red icing color. These will be your leaf-painting colors.
- Design your pattern. Using a toothpick, lightly sketch vines and leaves on the top and sides of your cake. This simple outline will guide your piping and keep your design balanced.
- Set up your piping bags. Fit seven decorating bags with round tip #2 and fill each with different shades of icing. Arrange them so you can switch between colors easily as you work.
- Pipe the vines. Start with the light red icing and draw delicate vine lines across the cake’s surface. Don’t worry about perfection — nature is beautifully irregular.
- Add the leaves. Using your yellow, orange, and red shades, pipe the leaf shapes, filling them in with small, graceful strokes. Let the colors overlap slightly for a natural look.
- Finishing touch. Step back and admire your creation — a cake that looks like a swirl of falling leaves captured in frosting.
Why You’ll Love This Recipe
✅ Quick to make: Built on a simple cake base that’s easy to prepare.
✅ Budget-friendly: Uses basic pantry ingredients and affordable decorating tools.
✅ Cozy homemade flavor: Tastes like a sweet autumn afternoon.
✅ Nutritious and balanced: Can be made with whole-grain flour or low-sugar frosting if desired.
✅ Great for meal prep: Layers can be baked ahead and assembled later.
✅ Family-approved: A joyful, hands-on project that kids love helping with.
Cultural or Technique Note
Leaf embroidery cakes draw inspiration from the delicate art of royal icing embroidery — a European technique that transforms simple cakes into works of art. This version celebrates the natural beauty of American autumn, blending rustic charm with modern minimalism. It’s an edible ode to the season’s artistry.
Serving Suggestions
With vanilla ice cream for a dreamy birthday treat.
Alongside warm cider or hot cocoa on a chilly night.
As a showpiece dessert for Thanksgiving gatherings.
Topped with edible gold flakes for a more elegant celebration.
Pro Tips for Success
- Don’t skip cooling the cake layers — warm cakes can melt your icing.
- Use gel-based colors for vibrant hues without thinning the frosting.
- Wipe your piping tip often to keep the leaf lines clean and smooth.
- Chill the cake briefly before piping for a steadier surface.
- Practice leaf designs on parchment paper first — it boosts confidence.
- Add edible glitter or gold dust for that extra fall sparkle.
Common Mistakes to Avoid
⚠️ Overmixing batter: Makes the cake dense — mix just until smooth.
⚠️ Tinting icing too dark: Colors deepen over time; start lighter.
⚠️ Skipping crumb coat: Without it, crumbs can ruin the sleek finish.
⚠️ Rushing decoration: Let icing set slightly before switching colors to avoid smudging.
⚠️ Storing uncovered: Always cover your cake to prevent drying out.
Storage & Reheating
Store leftover cake in an airtight container in the refrigerator for up to four days. For longer storage, wrap slices individually in plastic wrap and freeze for up to two months. To enjoy again, let the cake thaw in the fridge overnight, then bring to room temperature before serving. Avoid microwaving — gentle warmth keeps the texture soft and the frosting intact.
Frequently Asked Questions (FAQ)
Can I use a homemade cake recipe instead of a mix?
Absolutely! Any light, fluffy cake recipe works beautifully — from vanilla to butter or even pumpkin spice for extra fall flavor.
How can I make this dairy-free?
Use plant-based butter and dairy-free frosting — the colors and design will stay just as vibrant.
Can I change the icing colors?
Yes! Try burgundy, rust, or copper tones for a deeper autumn look, or soft blush for a November wedding version.
How do I transport the cake safely?
Chill it first to firm up the frosting, then use a sturdy cake box to protect your artwork.
Can I make it ahead?
Yes, bake the layers up to two days in advance, wrap tightly, and frost the day of serving for best freshness.
Closing Paragraph
Every slice of this Fall Leaves Cake feels like a love letter to the season — warm, cozy, and full of color. Whether it’s your November birthday cake design or a special autumn dessert, this cake reminds us that beauty doesn’t have to be complicated. With just a few colors, a steady hand, and a bit of heart, you can create something truly memorable.
Final Thoughts
Whenever I make this cake, I’m reminded that simple food can be the most meaningful. It’s not about perfection — it’s about care, creativity, and the joy of sharing something beautiful. I hope this recipe inspires you to celebrate every leaf, every layer, and every cozy moment this fall.

November Birthday Cake Design (Fall Leaves Cake)
Equipment
- 8-inch aluminum cake pans
- Non-stick cooling grid
- Toothpick
- Angled spatulas (9 and 13 inch)
- 12-inch disposable decorating bags
- Round cake decorating tip #2
Ingredients
Cake Base
- favorite cake mix or recipe your base — light, fluffy, and easy to customize
Icing and Colors
- 4 lb creamy white decorator icing smooth, soft, and perfect for clean layers
- 1 oz lemon yellow icing color cheerful brightness like golden fall leaves
- 1 oz golden yellow icing color buttery and mellow autumn hue
- 1 oz orange icing color bold and warm — classic fall tone
- 1 oz Christmas red icing color rich accent for vines and leaves
- 1 oz black icing color elegant base that makes colors pop
Instructions
- Prepare your cake batter using your favorite mix or recipe. Divide into three equal parts and tint one with orange, one with golden yellow, and one with lemon yellow. Bake in 8-inch pans until golden. Cool completely.
- Trim cooled cake layers to about 1 inch high for even stacking.
- Tint about 4 cups of decorator icing with black icing color. Use it to fill, stack, and ice the cake layers smoothly. Chill briefly if needed.
- Divide 6 1/3 cups of icing into bowls and tint each with red, orange, and yellow. Tint a small portion very light red for vine piping.
- Sketch your leaf and vine design lightly on the cake using a toothpick as a guide.
- Set up piping bags fitted with round tip #2 and fill each with a different tinted icing.
- Pipe delicate vines using the light red icing. Let lines flow naturally across the top and sides.
- Pipe small leaf shapes in yellow, orange, and red shades. Allow colors to overlap slightly for a natural effect.
- Finish with optional decorations like gold flakes, dried flowers, or a birthday message. Admire your cozy fall birthday creation.


