
There’s something truly comforting about creating an easy dessert that you know will please. These bars come together without much fuss, making them perfect for weeknights, weekends, gatherings, or just quiet moments at home. With a blend of nut flours, coconut, and a touch of sweetener, they bring a satisfying crunch alongside a chewy texture. They are simple to make, allowing you to enjoy a cozy bite that fits into a Paleo lifestyle. Let’s dive into this straightforward recipe.
Why You’ll Love Thi Paleo Magic Cookie Bars
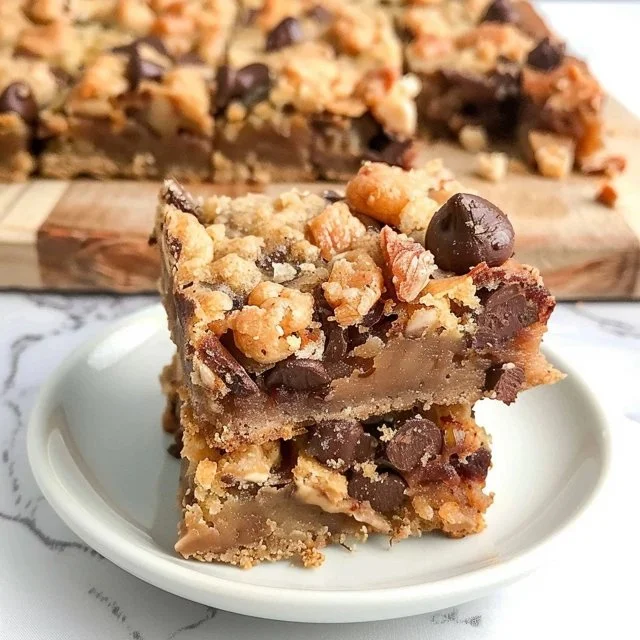
These Paleo Magic Cookie Bars are a delightful treat that offers both ease and reliability. The combination of nutty flavors and a hint of sweetness creates a harmonious balance that comforts without overwhelming. Their practical nature means you can whip them up as an afternoon snack, a sweet breakfast option, or even a satisfying dessert at family meals. You’ll appreciate how simple they are to make.
Kitchen Tools You’ll Need
- Mixing bowls
- Measuring cups
- Baking pan
- Spoon or spatula
- Oven
Ingredients
- 2 cups almond flour (provides a nutty flavor and adds structure)
- 2 tablespoons coconut flour (absorbs moisture for a light texture)
- ⅓ cup melted coconut oil (offers moisture and a subtle coconut taste)
- ⅓ cup maple syrup (adds sweetness and flavor depth)
- 1 teaspoon vanilla extract (enhances overall flavor)
- ½ teaspoon salt (balances sweetness)
- ½ cup unsweetened shredded coconut (adds chewiness and coconut flavor)
- ½ cup chopped raw pecans (provides crunch and nutty richness)
- 1 cup dairy-free chocolate chips (adds sweetness and richness)
- 1 can full fat coconut milk (13.5 oz) (contributes creaminess and moisture)
- ⅓ cup honey (adds sweetness and moisture)
- ⅛ teaspoon salt (enhances flavor)

How to Make Paleo Magic Cookie Bars
Step 1. Begin by preheating your oven to the desired temperature indicated in your instructions. This ensures that once your mixture is ready, it will go straight into a hot oven for even baking. Preheating is crucial for achieving the right texture and helps in proper rising.
Step 2. In a mixing bowl, combine the almond flour and coconut flour. Whisk them together until they are fully blended. This fusion creates the foundation of your cookie bars, ensuring an even distribution of flavor and texture. The combination of flours lends a nutty taste and a slightly chewy bite.
Step 3. Pour in the melted coconut oil, maple syrup, vanilla extract, and salt into the flour mix. Stir everything together until the mixture is well combined. This step is important as it helps to bind the dry ingredients with the moisture, creating a cohesive dough-like consistency.
Step 4. Add the unsweetened shredded coconut and chopped pecans to the mixture. Fold them in gently to ensure even distribution without overworking the dough. The coconut adds a wonderful texture, while the pecans introduce a delightful crunch, enhancing the overall experience of the bars.
Step 5. Incorporate the dairy-free chocolate chips into the batter. Mix until they are evenly dispersed throughout the dough. These chips melt slightly during baking, creating pockets of rich chocolate that provide a sweet contrast to the nutty flavors.
Step 6. Press the mixture firmly into an even layer in a prepared baking pan. Make sure it is evenly packed down so that the bars hold together well once baked. This step is crucial for the structure of the bars, so take your time to ensure it is level and compact.
Step 7. Prepare the filling by blending the full-fat coconut milk, honey, and the additional salt in a separate bowl. Whisk until smooth and well combined. This creamy layer will add moisture and richness to the bars, balancing the texture on top of the crumbly base.
Step 8. Carefully pour the coconut milk mixture over the pressed cookie base. Gently spread it out with a spatula to ensure even coverage. Watching for an even distribution helps in achieving a balanced flavor and consistent texture throughout the bars.
Step 9. Bake the bars according to the specified time in your instructions. Keep an eye on the edges for a gentle golden color and a set appearance. The baking process melds all the flavors while firming up the texture.
Step 10. Once baked, remove the bars from the oven and allow them to cool completely in the baking pan. This cooling period helps them finish setting up, making it easier to cut them into squares without crumbling. Patience during this step will yield a better result.

Serving Suggestions
These Paleo Magic Cookie Bars are versatile and can be enjoyed at various times. They make a great breakfast option, especially when you’re in need of something quick and satisfying. A simple serving alongside a cup of coffee can truly enhance your morning. As snacks, they’re perfect for afternoon energy boosts or packing in lunchboxes. For family meals, consider serving them after dinner as a sweet conclusion. Leftovers can be stored easily and enjoyed throughout the week.
Pro Tips for Best Results
- Ensure your coconut oil is fully melted; this helps achieve a uniform consistency.
- Press the mixture tightly into the pan to prevent crumbling.
- Allow bars to cool completely before cutting; this helps maintain their structure.
- Store them in an airtight container to keep them fresh for longer.
- Experiment with different nuts or chocolate options while keeping the basics the same.
Common Mistakes to Avoid
- Not measuring flours properly: Using too much flour can lead to dry cookie bars. Always measure accurately to ensure your bars have a moist texture.
- Skipping the coconut oil: Omitting the coconut oil can result in a crumbly mixture that doesn’t hold together well. This ingredient provides essential moisture for structure.
- Overmixing the batter: Mixing the batter too vigorously can toughen the cookie bars. Mix just enough to combine the ingredients for a tender result.
- Underbaking the bars: Removing the bars too early can cause them to collapse. Look for a lightly golden appearance and a set center before taking them out of the oven.
- Cutting the bars too soon: Cutting the bars while they’re still warm may lead to crumbling. Allow them to cool completely before slicing for neat squares.
- Using sweeteners incorrectly: Altering the amounts of maple syrup or honey can upset the balance and texture. Stick to the recipe for the best results.
Variations & Substitutions
You can explore different flavor profiles by adjusting the nuts or using other dairy-free chocolate options. Consider adding spices like cinnamon or nutmeg for warmth. If you want to make the bars a bit richer, try using a mix of different nut butters in the base. Just be careful not to change the proportions drastically, as this affects texture and taste.
Storage & Reheating
Store the cookie bars at room temperature for up to 3 days. For longer storage, keep them in the refrigerator, where they can last up to a week. You may also freeze them for up to 2 months; just wrap them tightly in plastic wrap or foil. When ready to enjoy, thaw them in the refrigerator or let them sit at room temperature for about 30 minutes for the best texture.
Frequently Asked Questions
Can I make this recipe ahead of time?
Yes, you can prepare the bars ahead. They hold well in the fridge or freezer, making them a great option for meal prep or entertaining.
How long does it last in the fridge?
These bars can last up to a week in the refrigerator when stored in an airtight container. Keeping them sealed ensures they maintain their freshness.
Can I freeze this recipe?
Absolutely. Freezing is an excellent way to extend their shelf life. Just be sure to wrap them tightly to prevent freezer burn.
What can I substitute for one ingredient?
If you need to replace honey, consider using agave syrup or additional maple syrup. Just ensure the texture and flavor profile align with your preference.
Why didn’t my recipe turn out as expected?
Common issues like incorrect measurements or baking times can affect results. Double-checking these can help you achieve the desired outcome.
Final Thoughts
Making Paleo Magic Cookie Bars offers a straightforward way to enjoy something sweet without complexity. They deliver a comforting mix of flavors and textures that satisfy in multiple settings. Enjoying them fresh out of the oven or as leftovers provides a reliable treat that fits into your routine. It’s simple yet rewarding to create something that brings such warmth to the table.

Paleo Magic Cookie Bars
Ingredients
Base Ingredients
- 2 cups almond flour provides a nutty flavor and adds structure
- 2 tablespoons coconut flour absorbs moisture for a light texture
- ⅓ cup melted coconut oil offers moisture and a subtle coconut taste
- ⅓ cup maple syrup adds sweetness and flavor depth
- 1 teaspoon vanilla extract enhances overall flavor
- ½ teaspoon salt balances sweetness
Filling Ingredients
- ½ cup unsweetened shredded coconut adds chewiness and coconut flavor
- ½ cup chopped raw pecans provides crunch and nutty richness
- 1 cup dairy-free chocolate chips adds sweetness and richness
- 1 can full fat coconut milk (13.5 oz) contributes creaminess and moisture
- ⅓ cup honey adds sweetness and moisture
- ⅛ teaspoon salt enhances flavor
Instructions
Preparation
- Begin by preheating your oven to 350°F (175°C).
- In a mixing bowl, combine the almond flour and coconut flour. Whisk them together until fully blended.
- Pour in the melted coconut oil, maple syrup, vanilla extract, and salt into the flour mix. Stir until well combined.
- Add the unsweetened shredded coconut and chopped pecans to the mixture. Fold them in gently.
- Incorporate the dairy-free chocolate chips into the batter. Mix until evenly dispersed.
- Press the mixture firmly into an even layer in a prepared baking pan.
- Prepare the filling by blending the full-fat coconut milk, honey, and salt in a separate bowl. Whisk until smooth.
- Carefully pour the coconut milk mixture over the pressed cookie base and gently spread it out with a spatula.
Baking
- Bake the bars in the preheated oven for about 25 minutes.
- Once baked, remove the bars from the oven and allow them to cool completely in the baking pan.


