There’s something soothing about preparing lemon bars, whether it’s after a long day or on a lazy weekend morning. Their bright, tart flavor paired with a buttery crust offers a comforting treat that fits perfectly into gatherings or peaceful moments at home. This recipe brings simplicity to the kitchen while delivering a delightful balance of sweetness and acidity. It’s practical enough for everyday enjoyment, inviting you to savor each delicious bite. Let’s jump into making these classic lemon bars.
Why You’ll Love This Delicious Classic Lemon Bars Recipe
What makes this recipe a go-to is its ease and reliability. You’ll appreciate the comforting, balanced flavor that combines tart and sweet notes with a satisfying, buttery crust. This recipe offers practical everyday value, making it a fantastic choice for weeknight desserts or weekend treats. You can turn to it again and again, and it rarely disappoints.
Kitchen Tools You’ll Need
- Mixing bowls
- Whisk
- Measuring cups
- Baking dish
- Parchment paper (optional)
- Sifter (optional)
Ingredients
- 1 cup (2 sticks) unsalted butter, softened (for a tender crust)
- 1/2 cup granulated sugar (adds sweetness)
- 2 cups all-purpose flour (provides structure)
- 1/4 teaspoon salt (enhances flavor)
- 1 1/2 cups granulated sugar (for filling, adds sweetness)
- 1/4 cup all-purpose flour (for filling, helps with consistency)
- 4 large eggs (binds ingredients together)
- 2/3 cup freshly squeezed lemon juice (about 3–4 lemons, provides tartness)
- 1 tablespoon lemon zest (adds bright citrus flavor)
- Powdered sugar, for dusting (optional, for presentation)

How to Make Delicious Classic Lemon Bars Recipe
Step 1. Begin by preheating your oven to 350°F. This step is crucial for preparing the environment for your lemon bars. Ensure that the oven reaches the right temperature before proceeding, which will help in achieving that perfect bake.
Step 2. In a mixing bowl, cream together the softened butter and 1/2 cup of granulated sugar until the mixture becomes light and fluffy. You’ll want to beat it well to incorporate air, which helps create a tender crust and enhances the overall texture.
Step 3. Gradually incorporate 2 cups of all-purpose flour and 1/4 teaspoon of salt into the butter-sugar mixture. Mix until the ingredients just come together, forming a crumbly dough. Make sure not to overmix; this will ensure your crust remains tender and doesn’t become tough.
Step 4. Press the dough evenly into the bottom of a greased baking dish. It’s important to create an even layer to ensure that the crust bakes uniformly. Use your fingers or a spatula to flatten it gently, bringing it up slightly on the edges if you like a little crust around the filling.
Step 5. Bake the crust in the preheated oven for about 20 minutes, or until it’s lightly golden. Keep an eye on it as it bakes; the goal is to have the edges set without over-baking, which helps to maintain that buttery texture.
Step 6. While the crust bakes, whisk together the remaining 1 1/2 cups of granulated sugar and 1/4 cup of flour in a separate bowl. This mixture will help to stabilize the filling, ensuring a smooth consistency.
Step 7. In the same bowl, add the four large eggs, 2/3 cup of freshly squeezed lemon juice, and 1 tablespoon of lemon zest. Whisk these ingredients together until fully combined. The eggs will provide structure, while the lemon juice and zest will impart a vibrant flavor to the filling.
Step 8. Once the crust has baked and is lightly golden, pour the lemon filling over. Spread it gently to cover the crust evenly without disrupting it too much. This layer will set beautifully on top of the crust, creating a harmonious dessert.
Step 9. Return the baking dish to the oven and bake for an additional 20–25 minutes. You’ll want to look for the filling to firm up and take on a slight jiggle when done. The surface can turn a light golden color, indicating it’s ready.
Step 10. Once baked, remove the lemon bars from the oven and let them cool in the dish. If you used parchment paper, lifting them out can make cutting easier. Allowing them to cool will help set the filling further.
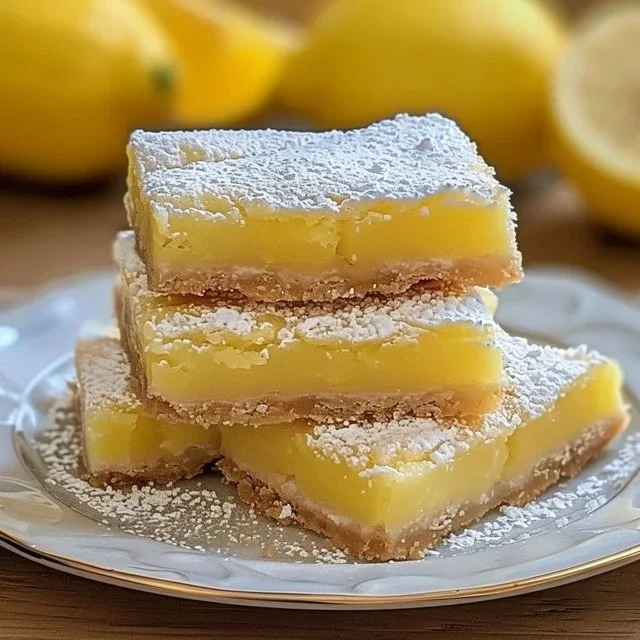
Step 11. For serving, dust the cooled bars with powdered sugar, if desired. Just a light sprinkle will enhance the presentation and add a touch of sweetness. Cut into squares and enjoy the delightful balance of flavors.
![image_2]
Serving Suggestions
These classic lemon bars can brighten up a range of occasions. They work wonderfully as a refreshing breakfast treat paired with coffee or tea. During family meals, they serve as a delightful dessert option that can please both kids and adults alike. Leftovers make for an ideal snack, as they hold up well for a few days. Their sweet and tart profile makes them suitable for gatherings, ensuring that there’s something light and satisfying for your guests.
Pro Tips for Best Results
- Always use fresh lemons for the best flavor in your filling.
- Make sure to fully cream the butter and sugar for a light crust.
- The filling should be slightly jiggly but not liquid when removed from the oven.
- Allow your lemon bars to cool completely before cutting for cleaner slices.
- Sifting the powdered sugar before dusting can enhance its presentation.
- Store lemon bars in an airtight container for optimal freshness.
Common Mistakes to Avoid
1. Overmixing the crust. This can lead to a tough texture instead of a tender one. Mix just until the ingredients come together.
2. Not cooling fully before cutting. If you cut the bars too soon, they may crumble. Allow them to cool completely in the pan to firm up.
3. Using pre-packaged lemon juice. While convenient, it lacks the fresh flavor of real lemons. Fresh juice is key for authentic taste.
4. Skipping the dusting of powdered sugar. It adds a beautiful finish and balances the tartness of the bars. A light dusting is all that’s needed.
5. Not adjusting the baking time. Ovens can vary, so check for doneness carefully. Baking too long can lead to a dry filling.
6. Forgetting the salt. Even a pinch enhances the overall flavor of desserts. Be sure to include it in the crust mixture.
Variations & Substitutions
Consider experimenting by adding a hint of vanilla extract to the filling for a different layer of flavor. If you’re feeling adventurous, you could also try incorporating fresh berries into the recipe for a fruity twist. Another option is to use a gluten-free flour blend in place of all-purpose flour if needed, as this can accommodate various dietary preferences.
Storage & Reheating
To store lemon bars at room temperature, keep them covered in a cool, dry place for about 2 days. For longer storage, they can be kept in the refrigerator in an airtight container for up to a week. If freezing, wrap them tightly in plastic wrap and then in foil to prevent freezer burn. Thawing them in the refrigerator before enjoying can preserve the texture. For reheating, a few seconds in the microwave can bring warmth back without drying them out.
Frequently Asked Questions
Can I make this recipe ahead of time?
Absolutely! Lemon bars can be made a day or two in advance. Just ensure they are stored properly in the refrigerator, covered to keep them fresh.
How long does it last in the fridge?
When properly stored in an airtight container, lemon bars will last for about a week in the fridge. Enjoy them within that timeframe for the best flavor and texture.
Can I freeze this recipe?
Yes, lemon bars freeze well. Just wrap them tightly in plastic wrap and then foil before placing them in the freezer. They can be frozen for up to three months.
What can I substitute for one ingredient?
For the butter, you could use margarine, but keep in mind it may slightly change the flavor and texture. Regular flour can also be swapped with a gluten-free blend if needed.
Why didn’t my recipe turn out as expected?
Common reasons include overbaking the filling, which can cause it to dry out, or under-mixing the crust, leading to a tough texture. Be sure to follow the instructions carefully for best results.
Final Thoughts
Making classic lemon bars is a straightforward process that culminates in a delicious treat enjoyed by many. The balance of tartness and sweetness, along with the buttery crust, makes them a satisfying dessert or snack. They hold a special place in comforting dessert traditions, inviting you to relish each bite. Embrace the simplicity and enjoy the rewarding experience of homemade lemon bars.

Classic Lemon Bars
Ingredients
For the crust
- 1 cup unsalted butter, softened for a tender crust
- 1/2 cup granulated sugar adds sweetness
- 2 cups all-purpose flour provides structure
- 1/4 teaspoon salt enhances flavor
For the filling
- 1 1/2 cups granulated sugar for filling, adds sweetness
- 1/4 cup all-purpose flour helps with consistency
- 4 large eggs binds ingredients together
- 2/3 cup freshly squeezed lemon juice about 3–4 lemons, provides tartness
- 1 tablespoon lemon zest adds bright citrus flavor
- Powdered sugar, for dusting optional, for presentation
Instructions
Preparation
- Preheat your oven to 350°F.
- In a mixing bowl, cream together the softened butter and 1/2 cup of granulated sugar until light and fluffy.
- Gradually incorporate 2 cups of all-purpose flour and 1/4 teaspoon of salt. Mix until crumbly.
- Press the dough evenly into a greased baking dish.
- Bake the crust for about 20 minutes, or until lightly golden.
Filling
- In a separate bowl, whisk together the remaining 1 1/2 cups of granulated sugar and 1/4 cup of flour.
- Add the four large eggs, 2/3 cup of freshly squeezed lemon juice, and 1 tablespoon of lemon zest. Whisk until fully combined.
- Once the crust has baked, pour the lemon filling over it and spread evenly.
- Return to the oven and bake for an additional 20–25 minutes until the filling is firm with a slight jiggle.
Cooling and Serving
- Remove the lemon bars from the oven and allow to cool in the dish.
- Dust with powdered sugar before cutting into squares.


