There’s something incredibly satisfying about making your own sourdough bread, especially knowing that it can be a cozy addition to weeknight meals or a delightful centerpiece for weekend gatherings. This recipe embraces simplicity and is perfect for quiet moments in the kitchen as you watch the dough rise and transform. It offers a straightforward process that requires only a handful of ingredients, making it approachable for beginners. Let’s dive into this comforting baking adventure.
Why You’ll Love This Recipe Easy Sourdough Bread Recipe for Beginners
This recipe stands out for its ease and reliability, making it a fantastic choice for home bakers seeking comfort and balanced flavor. The slow fermentation allows for wonderful depth while the crust provides a satisfying texture. With practical everyday value, this sourdough bread fits seamlessly into various meals and snacking occasions, making it a dependable staple.
Kitchen Tools You’ll Need
- Mixing bowl
- Kitchen scale
- Bench scraper
- Proofing basket or bowl
- Dutch oven or baking stone
Ingredients
- 60 g active sourdough starter (provides leavening)
- 340 g water (adds moisture)
- 490 g bread flour (gives structure and chew)
- 10 g salt (enhances flavor)

How to Make Easy Sourdough Bread Recipe for Beginners
Step 1. In a large mixing bowl, combine the active sourdough starter with the water. Stir them together until the starter is fully dissolved, and the mixture is somewhat homogeneous. Mix until you see no lumps from the starter. This step is key, as the water helps activate the starter, allowing it to introduce air bubbles into the dough.
Step 2. Gradually add the bread flour to the water-starter mixture. Using a spatula or your hands, mix until all the flour is hydrated, and no dry spots remain. You should have a rough and shaggy dough at this point. Make sure everything is blended well; this will help with gluten development later on.
Step 3. Sprinkle the salt over the dough. Again using your hands, fold the dough over itself several times to integrate the salt evenly. The dough will be sticky but should become more cohesive as you knead it slightly. This step is important because the salt enhances flavor and allows for better fermentation.
Step 4. Cover the mixing bowl with a clean kitchen towel to keep in moisture, and set the dough aside to rise for 4 to 6 hours at room temperature until it appears noticeably puffed and expanded. During this time, the yeast will work through the dough, contributing to its texture and flavor.
Step 5. After the dough has risen sufficiently, gently turn it out onto a lightly floured surface. Use a bench scraper to divide the dough into two equal pieces if desired. Then gently shape each piece into a round by folding the edges towards the center. A smooth top will help create a nice crust during baking.
Step 6. Place the shaped dough into a proofing basket or bowl, seam side up, and cover it with a kitchen towel. Allow it to proof for another 30 minutes to 1 hour until it has visibly puffed. This step gives the bread its final shape and lightness before baking.
Step 7. Preheat your oven to 450°F (230°C). If you are using a Dutch oven, place it in the oven to heat up. A hot baking environment is crucial for achieving a good bakery-style crust. When the oven reaches temperature, carefully take out the Dutch oven, and place a piece of parchment paper on it.
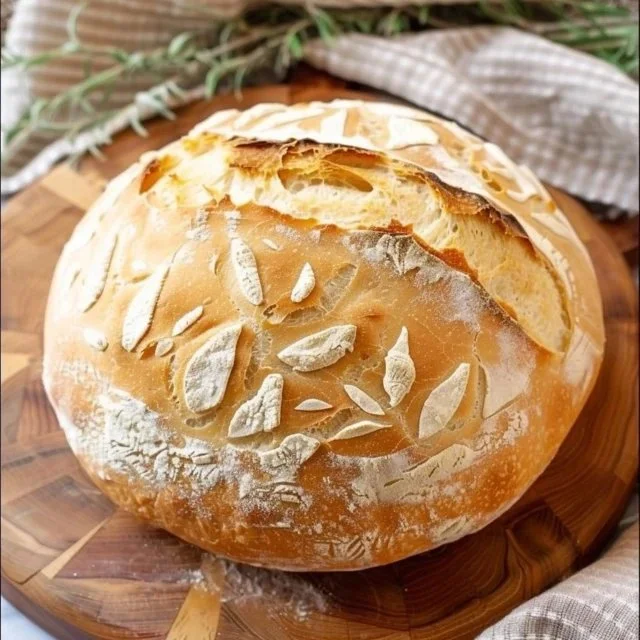
Step 8. Gently flip the dough out onto the parchment paper, seam side down. You can score the top of the dough with a sharp knife to allow for expansion during baking. This is an optional step that helps create an inviting, rustic appearance and allows steam to escape.
Step 9. Cover the Dutch oven with its lid and return it to the oven. Bake for about 30 minutes, then remove the lid and bake for an additional 15 to 20 minutes until the top is a deep golden brown. The lower lid traps steam, which helps achieve that chewy crust, while the final uncovered baking allows for browning.
Step 10. Once the crust is invitingly brown, remove the bread from the oven and let it cool on a wire rack for at least an hour. Cooling on the rack helps maintain the crust’s texture. This part may feel like a test in patience, but it’s worth it to achieve the best flavor and texture.

Serving Suggestions
Freshly baked sourdough bread is incredibly versatile. Enjoy it as a breakfast item slathered with butter and jam or as the base for a comforting sandwich with your favorite fillings. It can also serve as a perfect side for hearty soups or salads, making it a great choice for family meals. Leftovers can be toasted for snacks or used for a satisfying bread pudding.
Pro Tips for Best Results
- Make sure your sourdough starter is active and bubbly before use.
- Pay attention to the dough’s texture; it should be somewhat sticky but not overly wet.
- A bench scraper can be helpful for handling sticky dough or when shaping.
- Keep the dough covered to prevent it from drying out during the rising process.
- For best flavor, allow your dough to rise slowly in a cool place, if possible.
- Use a scale for accurate measurements to achieve consistent results.
Common Mistakes to Avoid
- Using an inactive starter: If your starter isn’t bubbling, the dough may not rise well. Keep your starter fed and active for best results.
- Not measuring ingredients accurately: Relying on volume rather than weight can lead to inconsistent dough. Always use a scale for precision.
- Skipping the resting time: Allowing the dough to rest is crucial for gluten development. Skipping this step can result in dense bread.
- Not preheating the oven properly: Failing to have a hot oven before baking can affect the crust. Be sure it’s ready at the right temperature.
- Cutting the bread too soon: Slicing the bread while still warm can result in a gummy texture. Let it cool for at least an hour for the best results.
- Ignoring signs of doneness: Relying solely on time can be misleading. Watch for a deep golden crust and tapping on the bottom for a hollow sound.
Variations & Substitutions
Consider adding herbs or spices for subtle flavor variations. You might also experiment with whole grain flour for added texture and taste. If you’re feeling adventurous, try incorporating seeds or nuts for a unique twist.
Storage & Reheating
Store the sourdough bread at room temperature in a paper bag or wrapped in a kitchen towel; this helps maintain the crust. For longer storage, keep it in a sealed plastic bag in the refrigerator for about 3 to 5 days. Sourdough can also be frozen for up to three months; just slice before freezing for easy use. To reheat, warm it in the oven at 350°F until heated through, which revitalizes the crust.
Frequently Asked Questions
Can I make this recipe ahead of time?
Yes, sourdough bread can be made ahead of time by preparing the dough and allowing it to rise overnight in the refrigerator. This slow fermentation enhances flavor.
How long does it last in the fridge?
Sourdough bread will typically last about 3 to 5 days in the refrigerator. Store it in a sealed bag or wrapped in a towel to help prevent it from drying out.
Can I freeze this recipe?
Absolutely, this bread freezes well. Slice it before freezing for easy access, and store it in a freezer-safe bag for up to three months.
What can I substitute for one ingredient?
If you need to substitute the bread flour, you can use all-purpose flour, though the texture may be a bit different, being less chewy.
Why didn’t my recipe turn out as expected?
Mixing and rising conditions can greatly affect the outcome. Your starter may not have been active enough, or the dough might not have risen adequately. Pay attention to texture and visual cues for best results.
Final Thoughts
Making sourdough bread can be a fulfilling process that turns into a cherished routine in your kitchen. The attention to detail in every step not only nurtures the bread but also creates a community feel around meals shared with family and friends. There’s genuine comfort in the aroma of bread baking and the knowledge that you’re creating something delicious and wholesome. Enjoy this journey, knowing each loaf is a small but rewarding achievement.

Easy Sourdough Bread
Ingredients
For the dough
- 60 g active sourdough starter Provides leavening
- 340 g water Adds moisture
- 490 g bread flour Gives structure and chew
- 10 g salt Enhances flavor
Instructions
Preparation
- In a large mixing bowl, combine the active sourdough starter with the water. Stir until the starter is fully dissolved.
- Gradually add the bread flour to the water-starter mixture and mix until all the flour is hydrated.
- Sprinkle the salt over the dough and fold the dough over itself to integrate the salt evenly.
- Cover the bowl with a kitchen towel and let the dough rise for 4 to 6 hours at room temperature.
Shaping the dough
- Gently turn the dough out onto a lightly floured surface and divide into two equal pieces.
- Shape each piece into a round by folding the edges towards the center.
- Place the shaped dough into a proofing basket, seam side up, and cover with a kitchen towel. Proof for 30 minutes to 1 hour.
Baking
- Preheat your oven to 450°F (230°C). If using a Dutch oven, place it in the oven to heat up.
- Gently flip the dough onto parchment paper, seam side down, and score the top of the dough.
- Cover the Dutch oven with its lid and bake for about 30 minutes, then remove the lid and bake for an additional 15 to 20 minutes.
- Once the crust is brown, remove the bread from the oven and let it cool on a wire rack for at least an hour.


