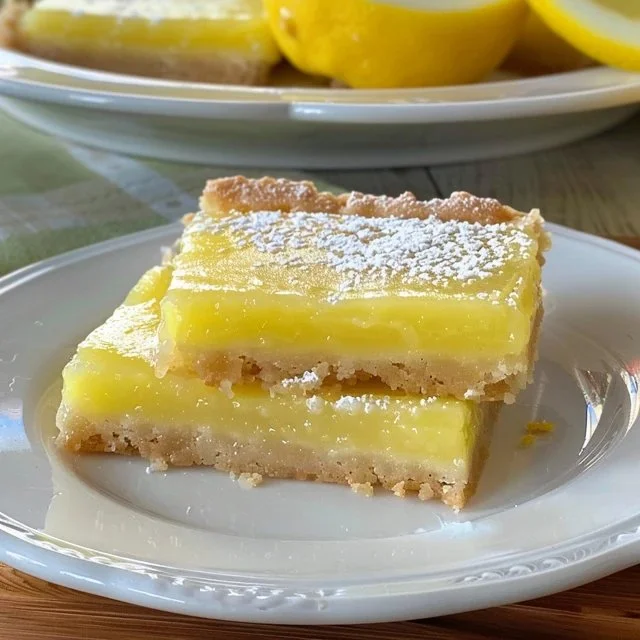
There’s something comforting about a well-made lemon bar, one that offers a gentle balance of sweetness and tartness with a buttery base. These easy gluten-free lemon bars can be enjoyed on weeknights, at casual family gatherings, or during quiet weekend afternoons. Their simplicity in both preparation and flavor makes them a reliable choice for those who appreciate a classic treat without any fuss. Let’s embark on this straightforward journey into a delightful, zesty dessert.
Why You’ll Love This Easy Gluten-Free Lemon Bars
These easy gluten-free lemon bars are a joy to make, providing warmth and comfort with their balanced flavor profile. The essence of lemon mingles beautifully with a buttery crust, delivering a practical addition to everyday meals or snacks. The recipe’s ease and reliability allow for a quick preparation, catering to both spontaneous cravings and planned gatherings, making it a welcome staple in your kitchen.
Kitchen Tools You’ll Need
- Mixing bowl
- Whisk
- Baking dish
- Rubber spatula
- Fine mesh sieve (optional)
Ingredients
- 1½ cups gluten-free flour with xanthan gum (provides structure)
- ⅓ cup granulated white sugar (adds sweetness)
- 1 teaspoon lemon zest (optional) (introduces citrus aroma)
- ¼ teaspoon salt (enhances flavor)
- 8 tablespoons butter or dairy-free butter (softened) (contributes moisture)
- 1 cup cane sugar (provides overall sweetness)
- 3 tablespoons gluten-free flour (offers additional structure)
- 3 large eggs (room temperature) (binds the ingredients)
- ½ cup fresh lemon juice (imparts tartness)
- Powdered or confection’s sugar for topping (adds a sweet finish)

How to Make Easy Gluten-Free Lemon Bars
Step 1. Start by preheating your oven to the appropriate temperature, which will establish a warm environment for baking the bars. Meanwhile, prepare your baking dish by greasing it lightly or lining it with parchment paper to ensure easy removal once they’re baked. This step helps the lemon bars maintain their neat appearance when serving.
Step 2. In a mixing bowl, combine the gluten-free flour, granulated white sugar, optional lemon zest, and salt. Whisk these dry ingredients together until they are evenly mixed. Doing this helps to distribute the flavors uniformly throughout the crust, enhancing the overall taste of the finished bars.
Step 3. Next, add the softened butter or dairy-free butter to the dry mixture. Using a fork or pastry cutter, blend the butter into the flour mixture until the texture becomes crumbly. This creates a rich, buttery base that will hold the filling nicely and contribute to a tender crust.
Step 4. Once the butter is fully incorporated, press the mixture firmly into the bottom of the prepared baking dish. Make sure it’s even and compact, as this will become the base for your lemon bars. Baking the crust first will ensure it sets properly, giving it a firm foundation for the lemon filling.
Step 5. After the crust is set in the baking dish, place it in the oven to bake for a short time until it turns lightly golden and solidifies. This initial baking phase is critical, as it allows the crust to develop a desirable texture, ready to support the lemony filling.
Step 6. In another clean bowl, whisk together the one cup of cane sugar and the three tablespoons of gluten-free flour to combine. This mixture will avoid any clumps when added to the liquid ingredients, ensuring a smooth filling for the bars. The flour here helps stabilize the filling as it bakes, giving it just the right consistency.
Step 7. Now, crack the three large eggs into the bowl and add the fresh lemon juice. Whisk everything together until it’s well blended and smooth. The mixture should appear homogeneous, indicating that the eggs and juice are fully incorporated, setting the stage for a luscious filling.
Step 8. Once your filling is combined, pour it over the pre-baked crust in the baking dish. Spread it gently with a rubber spatula to ensure an even layer. This creates a lovely contrast between the crumbly crust and the smooth, vibrant filling.
Step 9. Place the dish back into the oven and bake until the filling is just set, with a slight jiggle in the center. You’ll want to keep an eye on it as it bakes, watching for that perfect balance of firmness and a bit of softness, which indicates that the bars are done.
Step 10. Once out of the oven, allow the lemon bars to cool completely in the dish before transferring. This cooling period is essential for them to firm up, making it easier to cut them into neat squares for serving. After they’ve cooled, you can dust them with powdered sugar for a sweet finish.

Serving Suggestions
These lemon bars are wonderfully versatile, making them a great choice for various occasions. They can shine as a delightful breakfast option alongside your morning coffee or tea, providing a touch of sweetness to your day. For snacks, they offer a refreshing pick-me-up during the afternoon slump and are perfect for family meals when a light dessert is welcome. They also keep well in the fridge, making leftovers an easy treat for later.
Pro Tips for Best Results
- Use room temperature eggs for a smoother filling that incorporates more easily with the lemon juice.
- Sift the powdered sugar to avoid clumps when dusting the lemon bars after baking.
- Let them cool completely before cutting to ensure clean edges and presentation.
- Adjust lemon juice slightly to suit your taste preference; use less if you prefer a milder tang.
- Store in an airtight container to keep the bars fresh and prevent them from drying out.
Common Mistakes to Avoid
- Not using room temperature eggs can result in a lumpy filling. Cold eggs don’t mix well with the other ingredients; let them sit out for about 30 minutes before use.
- Skipping the cooling step makes cutting the bars difficult and leads to messy pieces. Always allow them to cool completely in the pan for better slicing.
- Overbaking the filling can lead to a rubbery texture. Keep an eye on the bars, looking for a slight jiggle in the center before removing them from the oven.
- Using stale flour or sugar can dull the flavor of your bars. Always ensure your ingredients are fresh for the best results.
- Not compacting the crust enough can lead to a crumbly base that doesn’t hold together. Press the crust firmly into the dish when baking for optimal results.
- Forgetting to grease or line the baking dish can result in broken bars when trying to remove them. Always take this extra step to make lifting them out easy.
Variations & Substitutions
You can add a layer of thinly sliced strawberries or raspberries on top of the filling before baking for a fruity twist. Additionally, if you enjoy a bit of herbal flavor, consider infusing the lemon juice with fresh mint before mixing it into the filling for a refreshing change.
Storage & Reheating
For short-term storage, keep the lemon bars at room temperature in an airtight container for up to three days. If you want to store them longer, refrigerate them for about a week. For freezing, wrap individual bars tightly in plastic wrap before placing them in a freezer-safe bag. When you’re ready to enjoy them again, let them thaw in the fridge overnight. For best texture, serve them cold or at room temperature after thawing.
Frequently Asked Questions
Can I make this recipe ahead of time?
Yes, these lemon bars are perfect for making ahead. They can be baked a day in advance and stored in the refrigerator until you’re ready to serve them.
How long does it last in the fridge?
In the refrigerator, the lemon bars can last up to a week when properly stored in an airtight container, maintaining their flavor and texture.
Can I freeze this recipe?
Absolutely! They freeze well when wrapped individually. Just ensure they’re well-sealed to prevent freezer burn for up to three months.
What can I substitute for one ingredient?
If you don’t have cane sugar, granulated sugar can be used in the same quantity without affecting the overall flavor or texture of your lemon bars.
Why didn’t my recipe turn out as expected?
This can happen for various reasons, such as variations in ingredient measurements, baking time, or oven temperature. Always double-check your measurements and baking times for the best results.
Final Thoughts
Making these easy gluten-free lemon bars brings a sense of calm and satisfaction. Their simplicity and familiar flavor make them a comforting treat for any gathering or quiet moment at home. There’s something special about preparing a dish that can be enjoyed widely, making it a reliable choice that anyone can appreciate. Enjoy your time in the kitchen as you create these delightful bars.

Gluten-Free Lemon Bars
Ingredients
For the crust
- 1.5 cups gluten-free flour with xanthan gum provides structure
- 1/3 cup granulated white sugar adds sweetness
- 1 teaspoon lemon zest (optional) introduces citrus aroma
- 1/4 teaspoon salt enhances flavor
- 8 tablespoons butter or dairy-free butter (softened) contributes moisture
For the filling
- 1 cup cane sugar provides overall sweetness
- 3 tablespoons gluten-free flour offers additional structure
- 3 large eggs (room temperature) binds the ingredients
- 1/2 cup fresh lemon juice imparts tartness
- Powdered or confection's sugar for topping adds a sweet finish
Instructions
Preparation
- Preheat your oven and prepare the baking dish by greasing or lining it with parchment paper.
- In a mixing bowl, combine gluten-free flour, granulated sugar, lemon zest, and salt. Whisk until evenly mixed.
- Add softened butter to the dry mixture and blend until crumbly.
- Press the mixture firmly into the bottom of the prepared baking dish to create an even crust.
- Bake the crust until lightly golden and solidified.
Filling
- In a bowl, combine cane sugar and gluten-free flour, whisking to avoid clumps.
- Crack the eggs into the mixture, add fresh lemon juice, and whisk until smooth.
- Pour the filling over the pre-baked crust and spread evenly.
- Return the dish to the oven and bake until the filling is just set with a slight jiggle.
- Allow the lemon bars to cool completely in the dish before transferring.
- Dust the cooled bars with powdered sugar before serving.


