There’s something wonderful about preparing a loaf of sourdough, especially as the aroma fills your kitchen. It invites a sense of calm as you create, whether on a quiet weekend morning or during a busy weeknight. Scoring the bread beautifully adds an extra touch, transforming a simple act into a delightful expression of creativity. This approach is flexible and practical—it doesn’t require extensive baking knowledge, just some gentle guidance. Let’s explore how to make your sourdough sing with beautiful designs.
Why You’ll Love This Easy Sourdough Scoring Ideas
Embracing easy sourdough scoring techniques brings a sense of reliability to your baking routine. With their inviting texture and rich flavor, these designs enhance the comforting experience of homemade bread. You’ll find that scoring provides practical everyday value, turning each loaf into a visually appealing centerpiece at your table. The ease and elegance of these ideas make them a delightful addition to your baking repertoire.
Kitchen Tools You’ll Need
- Sharp knife or bread lame
- Cutting board
- Flour (for dusting)
Ingredients
- Your prepared sourdough loaf (proofed and ready)

How to Make Easy Sourdough Scoring Ideas for Beautiful Bread Designs
Step 1. Start with your prepared sourdough loaf that has been properly proofed and is ready for baking. Take a moment to inspect its surface; it should have a slightly puffed appearance, indicating that it has risen well. A properly proofed loaf will have a smooth skin and maintain a good shape, which are ideal for scoring.
Step 2. Dust the top of the loaf lightly with flour. Use a small sieve for even distribution, which helps to prevent the dough from sticking to your knife or lame. This dusting creates a contrast in color when baked, enhancing the beauty of your scoring designs after baking is complete.
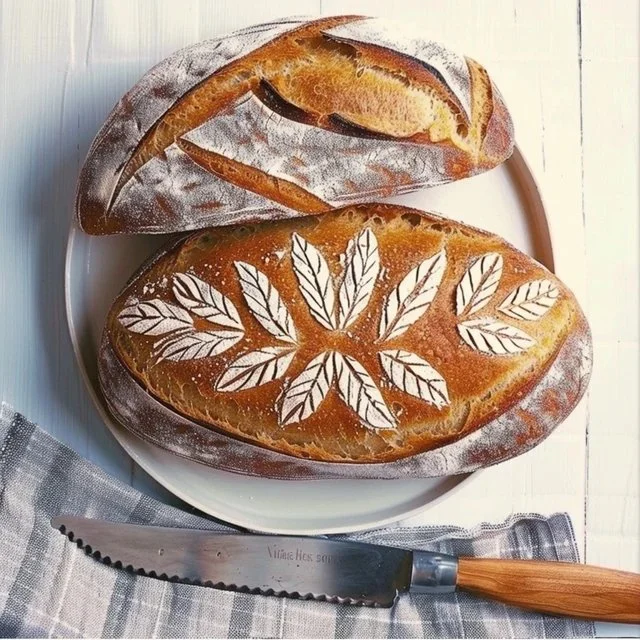
Step 3. Choose your scoring pattern. Simple patterns like crosses or slashes work well for beginners. If you’re feeling creative, explore more intricate designs that reflect your personality. Having a clear plan for your design can make the scoring process smoother and ensure your bread has character.
Step 4. With your sharp knife or bread lame, make precise, confident cuts in the surface of the loaf. Apply gentle pressure, starting from the edge and moving inward. The cuts should be about ¼ inch deep. Watch for the dough’s response; it should spring slightly as you score, indicating that you’ve scored it properly.
Step 5. Allow your bread to rest for a few minutes after scoring. This short pause lets any moisture on the surface evaporate slightly, which can help improve the final crust texture. You might notice that the flour you dusted can become slightly absorbed into the dough, providing a nice visual touch before baking.
Step 6. Bake the loaf according to your preferred method. As the bread bakes, the scored designs will open up, creating beautiful patterns. Keep an eye on the loaf’s color; you want a deep golden brown crust that signifies it’s fully baked and ready to enjoy.

Serving Suggestions
Freshly baked sourdough bread is perfect for various meals throughout the day. Slices make a delightful breakfast, whether topped with butter or homemade jam. Serve it as part of a family meal, perhaps alongside savory soups or salads. Leftovers can be enjoyed as a simple snack, perhaps toasted for a crispy texture, or as part of a charcuterie board for gatherings. There are so many ways to incorporate your beautifully scored bread into everyday life.
Pro Tips for Best Results
- Use a very sharp knife or lame to ensure clean cuts, which helps maintain the dough’s structure.
- Experiment with different scoring patterns to find what resonates with your personal style and tastes.
- Ensure your loaf is fully proofed before scoring; under-proofed dough can lead to poor results.
- Dust the scoring area with flour to improve visibility and help your knife glide.
- Practice scoring on dough scraps until you feel comfortable with your technique.
- Keep a steady hand while scoring for the most attractive results.
Common Mistakes to Avoid
- Not proofing the dough enough: Insufficient proofing can lead to a dense loaf without proper texture. Always ensure your dough has risen sufficiently before scoring.
- Using a dull knife: A dull tool can tear the dough instead of making clean cuts. Invest in a sharp knife or bread lame for better results.
- Scoring too shallow or too deep: If cuts are too shallow, they might not expand properly when baking, while too deep cuts can lead to a collapsed loaf. Aim for about ¼ inch depth.
- Scoring after the dough has dried out: If you let the loaf sit too long before scoring, the surface might dry out, causing difficulties with clean cuts. Dusting with flour and scoring promptly helps prevent this.
- Not considering the loaf’s surface: A sticky surface can hinder smooth scoring. A light dusting of flour just before scoring will mitigate this issue.
- Overcomplicating the designs: Starting with elaborate patterns can lead to frustration. Stick to simple designs until you feel more confident in your scoring ability.
Variations & Substitutions
While this guide is focused on scoring sourdough, you might consider varying the styles of cuts. For instance, try parallel slashes for a classic look or a simple spiral for a touch of whimsy. Each variation can highlight the personality of your loaf while remaining straightforward.
Storage & Reheating
To store your bread at room temperature, keep it in a paper bag or bread box to maintain its crust. If you need to store it in the refrigerator, wrap it tightly in plastic wrap to avoid drying out, though it may not retain its best texture. For longer storage, freezing is also an option; slice the loaf first for easier thawing. To reheat, place slices in a toaster or warm them in the oven to revitalize their texture and flavor.
Frequently Asked Questions
Can I make this recipe ahead of time?
Scoring is best done just before baking to ensure the dough remains fresh. While you can prepare the dough in advance, score it at the last minute for best results.
How long does it last in the fridge?
Sourdough bread can last about a week in the refrigerator when properly wrapped. However, it is best enjoyed fresh or within a few days to maintain flavor and texture.
Can I freeze this recipe?
Yes, you can freeze your sourdough bread. Slice it beforehand for individual servings, making it easy to thaw as needed.
What can I substitute for one ingredient?
This recipe focuses solely on scoring, so there are no alternate ingredients involved. However, you can customize the design pattern to your liking.
Why didn’t my recipe turn out as expected?
Several factors can affect the outcome, including under-proofing or over-baking. Ensure to monitor the proofing and baking process for the best results.
Final Thoughts
Making sourdough bread is a rewarding experience, and adding beautiful scoring designs elevates the entire process. It’s a practice that invites creativity and care into your kitchen routine. As you enjoy your freshly baked loaf, may this experience become a comforting part of your culinary journey. Each slice you create is a reflection of your effort and intention, bringing a simple pleasure to your day.

Sourdough Scoring Techniques
Ingredients
Main Ingredients
- 1 loaf Prepared sourdough loaf (proofed and ready) Ensure the loaf is well-proofed for best results.
Tools
- 1 piece Sharp knife or bread lame A sharp tool is essential for clean cuts.
- 1 piece Cutting board Use a stable surface for scoring.
- 1 tablespoon Flour For dusting to prevent sticking.
Instructions
Preparation
- Start with your prepared sourdough loaf that has been properly proofed and is ready for baking. Inspect its surface; it should have a slightly puffed appearance.
- Dust the top of the loaf lightly with flour using a small sieve for even distribution.
- Choose your scoring pattern. Start with simple patterns like crosses or slashes.
Scoring
- Make precise, confident cuts in the surface of the loaf with your sharp knife or bread lame, about ¼ inch deep.
- Allow your bread to rest for a few minutes after scoring to let any moisture evaporate.
Baking
- Bake the loaf according to your preferred method. Watch for a deep golden brown crust.


