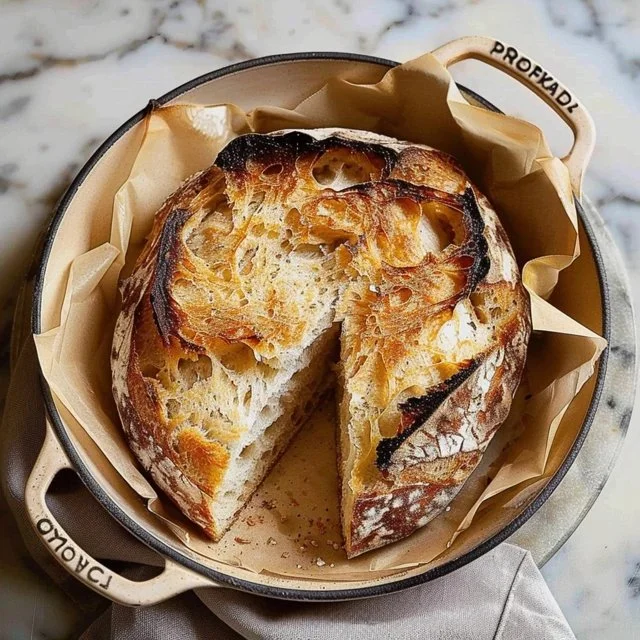
There’s something comforting about making sourdough bread at home. The sensory experience of working with the dough, nurturing it to rise, and the delightful aroma that fills the kitchen as it bakes is truly rewarding. Whether you enjoy it on quiet weeknights or during lively weekend gatherings, this rustic loaf is simple yet satisfying. With its crusty exterior and soft, chewy center, it’s the kind of bread that complements any meal or can simply be savored on its own. Let’s get started on bringing this comforting bread to life.
Why You’ll Love This Soft Chewy Sourdough Bread
This recipe is easy to follow and produces beautifully crusty bread with a soft and chewy texture inside. The balance of flavors reflects the natural fermentation of the sourdough starter, making it a comforting addition to any meal. It serves well for everyday use, whether as part of breakfast, lunch, or with dinner. The reliability of this bread will have you returning to it time and again, making it a cherished recipe in your home.
Kitchen Tools You’ll Need
- Large mixing bowl
- Wooden spoon or spatula
- Clean kitchen towel
- Baking sheet or Dutch oven
- Parchment paper (optional)
Ingredients
- 4 cups bread flour or all-purpose flour (adds structure and chew)
- 1⅔ cups warm water (hydrates the flour for dough)
- 1 cup active sourdough starter (provides flavor and leavening)
- 2 teaspoons salt (enhances flavor and strengthens gluten)

How to Make Soft Chewy Sourdough Bread
Step 1. In a large mixing bowl, combine the bread flour and salt. Stir them together until they are well mixed, ensuring the salt is evenly distributed within the flour, which helps to develop flavor throughout the dough. Taking this initial step seriously lays a solid foundation for a more cohesive dough.
Step 2. Next, add the warm water and active sourdough starter to the dry ingredients. Use a wooden spoon or spatula to mix until all the flour is incorporated. The dough will be sticky and shaggy at this point, but that’s perfectly normal. Mixing until there are no dry flour patches is key for consistency.
Step 3. Cover the bowl with a clean kitchen towel and allow the dough to rest for about 30 minutes, a process known as autolyse. This resting period helps the flour fully absorb the water, making it easier to knead and improving gluten development, which contributes to the bread’s texture.
Step 4. After the resting period, it’s time to knead. Lightly flour your work surface and turn the dough out onto it. Knead the dough for about 10 minutes until it becomes smooth and elastic, developing that desirable chewy texture. You’ll notice a change in the dough’s resistance; it should stretch without tearing.
Step 5. Shape the kneaded dough into a round ball and place it back into the bowl. Cover it again with the towel and let it rise at a warm room temperature for 4 to 6 hours, or until it doubles in size. Look for visual cues of the dough’s expansion; this is a good indication that fermentation is happening.
Step 6. Gently punch down the risen dough to release some of the gas created during fermentation. Turn it out onto a lightly floured surface once again. Shape the dough into a tight round loaf, which helps develop surface tension, contributing to a better rise during baking.
Step 7. Transfer the shaped dough onto a lightly floured piece of parchment paper or directly onto a floured surface. Cover it with the towel and let it rest for another 30 minutes. This final rest allows the gluten to relax and makes it easier to score and manage.
Step 8. Preheat your oven to 450°F. Place your baking sheet or Dutch oven inside while it heats, allowing it to get hot. This step is crucial for creating steam in the oven, which contributes to a crusty exterior.
Step 9. Once the oven is preheated, carefully remove the hot baking sheet or Dutch oven. Use a sharp knife or a bread lame to score the top of the dough. This controls how the bread expands while baking. A simple slash pattern works well, and the dough should be glossy and ready for the oven.
Step 10. Place the scored dough into the hot baking vessel and cover if using a Dutch oven. Bake for about 30 minutes, then remove the lid (if applicable) to allow the crust to brown nicely. The bread should turn a golden brown, with a crust that feels firm to the touch, indicating a nicely baked loaf.
Step 11. Once baked, carefully remove the bread from the oven and let it cool completely on a wire rack before slicing. This cooling period allows the crumb to set properly, ensuring that the texture is just right when served.

Serving Suggestions
This sourdough bread makes for a wonderful breakfast option when paired with butter and jam or enjoyed alongside eggs. For lunch, use it to make gourmet sandwiches filled with deli meats or cheeses, enhancing the flavor with your favorite spreads. It can also be served alongside soups and stews for dinner, or simply enjoyed as a snack throughout the day. The bread’s delightful crust and chewy center make it a perfect canvas for all kinds of toppings, leaving plenty of room for creativity.
Pro Tips for Best Results
- Ensure your sourdough starter is active and bubbly for the best rise and flavor in the bread.
- Adjust the hydration by checking the dough consistency; if too sticky, add a touch more flour during kneading.
- Give the dough enough time to rise; patience leads to better texture and flavor.
- Use a sharp blade for scoring, allowing for a clean cut that leads to a more visually appealing loaf.
- Consider a longer fermentation in cooler environments; the flavors deepen with time.
- Avoid opening the oven frequently while baking, as this can cause temperature fluctuations that affect crust formation.
Common Mistakes to Avoid
- Under-kneading the dough: This can result in a dense loaf because gluten won’t develop properly. Knead until you notice the dough is smooth and elastic.
- Ignoring the resting times: Skipping or shortening these can hinder gluten formation and lead to less flavor and texture in the final product. Respecting rise and rest times is crucial.
- Using cold ingredients: Cold water or starter can slow fermentation. Always ensure your water is warm and your starter is at room temperature before combining.
- Not properly scoring the dough: Failing to make a clean score might cause the bread to explode unpredictably in the oven. Scoring allows the dough to expand as intended.
- Opening the oven door too often: This lets heat escape, which can negatively affect the crust. Try to avoid peeking until close to the end of the bake time.
- Failing to cool the bread properly: Cutting into warm bread can lead to a gummy texture. Allow it to cool completely to set the crumb properly.
Variations & Substitutions
Consider adding herbs or cheese for added flavor. A sprinkle of rosemary or grated cheese can enhance the taste without altering the essential process. You could also mix in seeds such as sesame or poppy seeds for additional texture and flavor.
Storage & Reheating
Store the bread at room temperature, wrapped in a kitchen towel to maintain its crust. For longer storage, it can be placed in a paper bag. If you need to refrigerate, it’s best to slice and store in an airtight container, though this might affect the crust. The loaf can also be frozen, sliced, and wrapped tightly in plastic. When ready to enjoy, reheat slices in a toaster or a low oven to revive its texture and warmth.
Frequently Asked Questions
Can I make this recipe ahead of time?
Yes, you can prepare the dough up to the first rise and then refrigerate it overnight. Just allow it to come to room temperature before shaping and proceeding.
How long does it last in the fridge?
The bread typically lasts about 4-5 days in the refrigerator but can dry out. It’s best enjoyed fresh within a few days.
Can I freeze this recipe?
Absolutely. If frozen, the bread keeps well for about three months. Just slice it before freezing for convenience, and it can be toasted from frozen.
What can I substitute for one ingredient?
If you only have all-purpose flour, it can be used in place of bread flour; just expect slightly different texture results.
Why didn’t my recipe turn out as expected?
Common issues may arise from an inactive starter, incorrect flour measurements, or skipping fermentation times. Double-checking these areas can help prevent concerns.
Final Thoughts
Making this crusty golden sourdough bread is a journey that fills your space with warmth and satisfaction. The gradual process of preparing the dough and watching it transform provides a comforting rhythm in the kitchen. Enjoying a slice fresh from the oven or sharing it with others creates a simple yet fulfilling experience. Trust in your abilities and savor the joy that comes with creating something homemade.

Crusty Golden Sourdough Bread
Ingredients
Dough
- 4 cups bread flour or all-purpose flour Adds structure and chew
- 1⅔ cups warm water Hydrates the flour for dough
- 1 cup active sourdough starter Provides flavor and leavening
- 2 teaspoons salt Enhances flavor and strengthens gluten
Instructions
Preparation
- In a large mixing bowl, combine the bread flour and salt. Stir until well mixed.
- Add the warm water and active sourdough starter to the dry ingredients. Mix until all flour is incorporated.
- Cover the bowl with a clean kitchen towel and let the dough rest for about 30 minutes.
- Knead the dough on a lightly floured surface for about 10 minutes until smooth and elastic.
- Shape the kneaded dough into a round ball and place it in the bowl. Cover it with a towel and let it rise at room temperature for 4 to 6 hours.
- Punch down the risen dough, shape it into a tight round loaf, and place it on a floured surface or parchment paper. Cover and let it rest for another 30 minutes.
- Preheat your oven to 450°F. Place a baking sheet or Dutch oven inside to heat up.
Baking
- Once the oven is preheated, remove the hot baking sheet or Dutch oven. Score the top of the dough with a sharp knife.
- Place the scored dough into the hot baking vessel and cover if using a Dutch oven. Bake for about 30 minutes.
- Remove the lid (if applicable) to allow the crust to brown nicely. The bread should turn golden brown.
- Once baked, carefully remove the bread from the oven and let it cool completely on a wire rack before slicing.


