
Reese’s Peanut Butter Trifle with Chocolate Layers
After a long day or on a slow weekend, it’s lovely to indulge in something sweet and comforting. This trifle offers a delightful combination of textures and flavors, making it a perfect dessert for gatherings or moments of quiet enjoyment. With its layers of brownie, creamy peanut butter, and fluffy Cool Whip, it’s a simple recipe that brings people together over a shared love of chocolate and peanut butter. Let’s dive into the recipe and create something truly enjoyable.
Why You’ll Love This Recipe {focus_keyword}
This Reese’s Peanut Butter Trifle with Chocolate Layers combines ease and reliability, making it a great choice for any occasion. The layered dessert offers comforting chocolate and peanut butter flavors that balance beautifully, providing a satisfying treat. It’s practical for both weeknight cravings and special gatherings, ensuring that you can whip this up with minimal effort and maximum enjoyment.
Kitchen Tools You’ll Need
- 9×13-inch baking dish
- Mixing bowls
- Whisk
- Spatula
- Knife for cutting brownies
Ingredients
- 1 box (18.2 oz) brownie mix (plus ingredients to prepare) (for a rich chocolate base)
- 2 packages (14 oz each) Reese’s Mini Peanut Butter Cups (for a sweet, nutty flavor)
- 4 cups 2% or whole milk (adds creaminess)
- 2 packages (5.1 oz each) instant vanilla pudding mix (for thickness and sweetness)
- 1 cup creamy peanut butter (not natural) (for a smooth, rich texture)
- 4 teaspoons vanilla extract (enhances overall flavor)
- 16 oz Cool Whip, thawed (for a light, airy layer)

How to Make {focus_keyword}
Step 1. Start by preparing the brownie mix according to the package directions. Once mixed, pour the batter into a greased 9×13-inch baking dish and bake until the edges are set and the center looks slightly gooey. This will create a dense, chocolatey base for your trifle once cooled. Allow the brownies to cool completely before assembling the layers.
Step 2. While the brownies are cooling, chop the Reese’s Mini Peanut Butter Cups into smaller pieces. This will help distribute the peanut butter flavor throughout the trifle and provide little bites of sweetness in each serving. Set the chopped cups aside as you move on to the next step.
Step 3. In a mixing bowl, whisk together the instant vanilla pudding mix and cold milk until the mixture thickens and is smooth. Keep whisking until you see no lumps left. The pudding will add a creamy, rich layer that complements the brownies nicely.
Step 4. Next, add the creamy peanut butter and vanilla extract into the thickened pudding mixture. Use a spatula or whisk to fully incorporate these ingredients until the mix is smooth and creamy. The peanut butter will enrich the flavor of the pudding, creating a silky layer.
Step 5. Once the brownies are cool, cut them into cubes that are about 1-2 inches in size. This will allow them to layer nicely within your trifle and make it easy to serve. Aim for uniformity in size, so each spoonful includes a bit of brownie.
Step 6. Begin layering the trifle in your baking dish. Start with half of the brownie cubes as the bottom layer. Spread them evenly, creating a solid base for the next layers that will add flavor and texture harmoniously.
Step 7. After the brownie layer, add half of the peanut butter pudding mixture on top. Spread it out gently to cover the brownie layer completely. This will create a rich, creamy layer that works well with the brownies underneath.
Step 8. Sprinkle half of the chopped Reese’s Mini Peanut Butter Cups over the pudding layer, distributing them evenly. This adds texture and a burst of peanut butter flavor in every bite, enhancing the dessert’s overall taste.
Step 9. Repeat the layering process, starting with the remaining brownie cubes. Add another layer of brownie on top of the first layers to build up the trifle, ensuring that you have the same structure as before.
Step 10. Follow with the rest of the peanut butter pudding mixture, spreading it to cover the brownies once again. Ensure the pudding layer reaches the edges so every part of the dessert has that delicious peanut butter flavor.
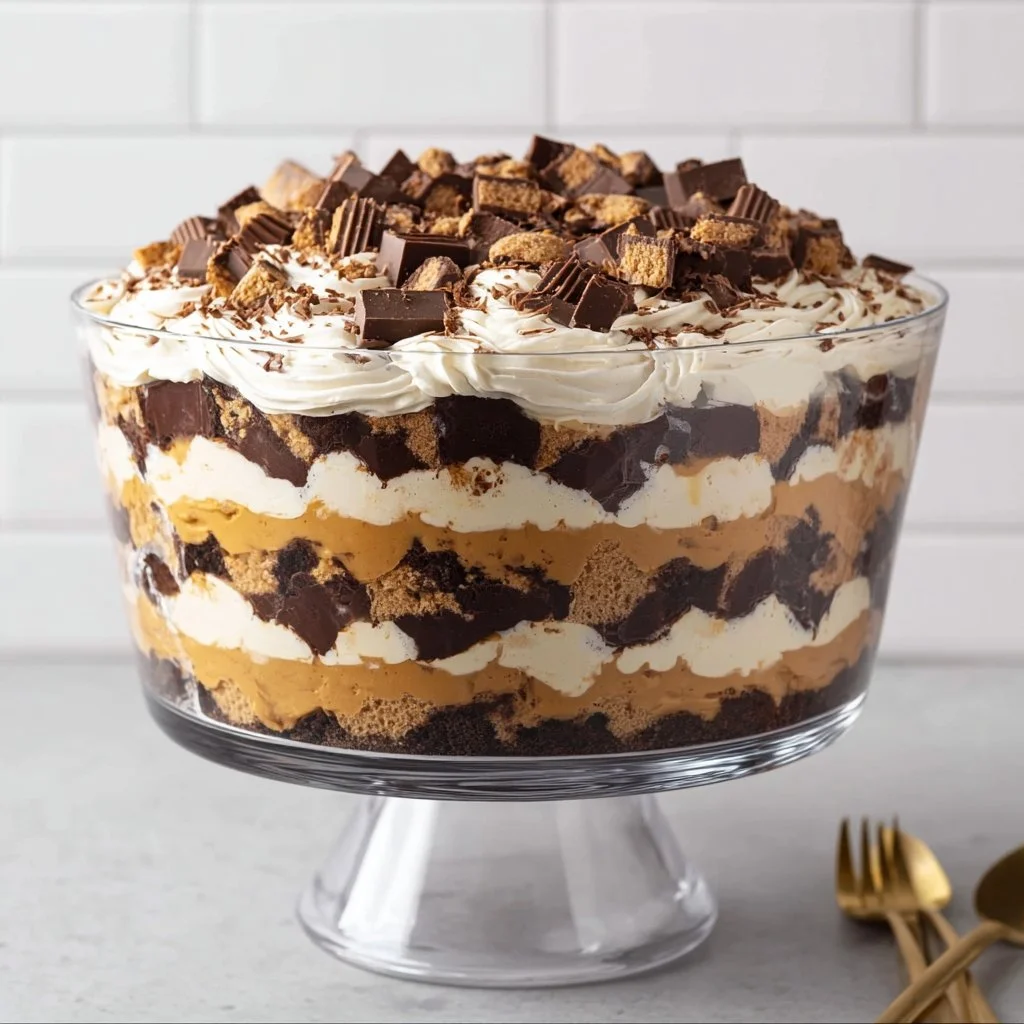
Step 11. Finally, finish off the trifle with a generous layer of Cool Whip. Use a spatula to spread it evenly on top, making it look smooth and inviting. This light layer balances the brownie and pudding, offering a fluffy texture that contrasts beautifully.
Step 12. For a decorative touch, sprinkle the remaining chopped Reese’s Mini Peanut Butter Cups over the Cool Whip layer. This not only adds to the presentation but also promises delightful bites of peanut butter that guests will enjoy.

Serving Suggestions
This trifle is a versatile dessert that suits various occasions. Serve it as a delightful treat for breakfast with a side of fruit, or offer it as a sweet snack throughout the day. It also makes a great addition to family meals or get-togethers, allowing everyone to indulge together. If there are any leftovers, it can be enjoyed later, making it a practical option for busy weekends.
Pro Tips for Best Results
- Allow the brownies to cool completely before layering to prevent the pudding from warming and losing its creaminess.
- Use creamy peanut butter for easier mixing and a smoother flavor profile.
- Be careful not to overwhip the pudding mixture; this can lead to a less smooth consistency.
- When cutting the brownies, a sharp knife helps achieve clean edges for layering.
- Customize the layers by introducing different flavors or a chocolate ganache if desired.
- Chill the completed trifle for an hour before serving. This helps set the layers and makes it easier to serve.
Common Mistakes to Avoid
- Not Cooling Brownies: If the brownies are still warm, they can break apart and affect the pudding’s consistency. Always let them cool completely to maintain structure.
- Overmixing Pudding: Whisking the pudding too long can cause it to become overly thick or lumpy. Mix just until smooth and combined.
- Imprecise Measurements: Using more or less pudding mix or milk can affect the thickness. Measure accurately for the intended texture and flavor.
- Skipping the Cool Whip Layer: Omitting the final layer will result in a denser dessert. The Cool Whip adds lightness and texture that it needs.
- Ignoring Layer Order: If the layers are not assembled correctly, they can blend together and lose their individual flavors. Each layer should be distinctly visible for the best presentation.
- Serving Immediately: If served right after assembly, the layers may not have set properly. Allowing it to chill helps solidify the dessert and improves flavors.
Variations & Substitutions
- For a different flavor twist, you could alternate with chocolate pudding instead of vanilla.
- Swap out the Cool Whip for homemade whipped cream for a more personalized touch.
- Incorporate crushed chocolate cookies for added crunch between layers.
- Instead of peanut butter cups, use chopped chocolate bars or different candies for variety.
- For a more decadent layer, drizzle melted chocolate ganache over the top before adding the whipped cream.
Storage & Reheating
Store the trifle in the refrigerator, covered with plastic wrap or a lid to maintain freshness. It can last for up to three days when properly stored. Freezing is not recommended as it can alter the texture of the whipped and pudding layers.
If you decide to take it out of the fridge to serve, it’s best enjoyed cold, so no reheating is necessary. Simply spoon it directly from the dish into serving bowls.
Nutrition Information
- Calories: Not provided
- Total Fat: Not provided
- Saturated Fat: Not provided
- Carbohydrates: Not provided
- Fiber: Not provided
- Sugar: Not provided
- Protein: Not provided
- Sodium: Not provided
Frequently Asked Questions
Can I make this recipe ahead of time?
Yes, this trifle can be made ahead of time. Assembling it a day in advance allows the flavors to meld and ensures the layers set properly.
How long does it last in the fridge?
When stored correctly in the refrigerator, this trifle can last up to three days. The layers remain delicious if covered tightly to prevent drying.
Can I freeze this recipe?
Freezing is not recommended for this trifle because the texture of the Cool Whip and pudding will change upon thawing, likely resulting in a less appealing dessert.
What can I substitute for one ingredient?
If you need to substitute, consider using a different pudding flavor, like chocolate or butterscotch, though it will change the overall taste.
Why didn’t my recipe turn out as expected?
Common issues include not cooling the brownies completely or incorrect measurements of the pudding mix, which can lead to a different texture or flavor balance. Pay attention to chilling times and measurements to ensure the best results.
Final Thoughts
Making this Reese’s Peanut Butter Trifle with Chocolate Layers is straightforward and rewarding. Each layer brings a delightful mix of rich chocolate and creamy peanut butter that is bound to please anyone you share it with. It’s a simple yet indulgent dessert that fits many occasions and offers a comfort just right for any time. Enjoy the process and the wonderful results.

Reese's Peanut Butter Trifle
Ingredients
Brownie Base
- 1 box 1 box (18.2 oz) brownie mix (plus ingredients to prepare) For a rich chocolate base
Peanut Butter Layer
- 1 cup 1 cup creamy peanut butter (not natural) For a smooth, rich texture
- 4 teaspoons 4 teaspoons vanilla extract Enhances overall flavor
- 2 packages 2 packages (5.1 oz each) instant vanilla pudding mix For thickness and sweetness
- 4 cups 4 cups 2% or whole milk Adds creaminess
Toppings
- 16 oz 16 oz Cool Whip, thawed For a light, airy layer
- 2 packages 2 packages (14 oz each) Reese’s Mini Peanut Butter Cups For a sweet, nutty flavor; chopped for layering
Instructions
Preparation
- Prepare the brownie mix according to the package directions. Pour the batter into a greased 9×13-inch baking dish and bake until the edges are set and the center looks slightly gooey. Allow the brownies to cool completely.
- Chop the Reese’s Mini Peanut Butter Cups into smaller pieces and set aside.
- In a mixing bowl, whisk together the instant vanilla pudding mix and cold milk until thickened and smooth.
- Add the creamy peanut butter and vanilla extract into the thickened pudding mixture and mix until smooth.
- Cut the cooled brownies into 1-2 inch cubes.
Layering
- In a 9×13-inch baking dish, start with half of the brownie cubes as the bottom layer.
- Spread half of the peanut butter pudding mixture on top of the brownie layer.
- Sprinkle half of the chopped Reese’s Mini Peanut Butter Cups over the pudding layer.
- Repeat the layering process, starting with the remaining brownie cubes, followed by the rest of the peanut butter pudding mixture.
- Finish with a generous layer of Cool Whip on top.
- Sprinkle the remaining chopped Reese’s Mini Peanut Butter Cups over the Cool Whip layer.


