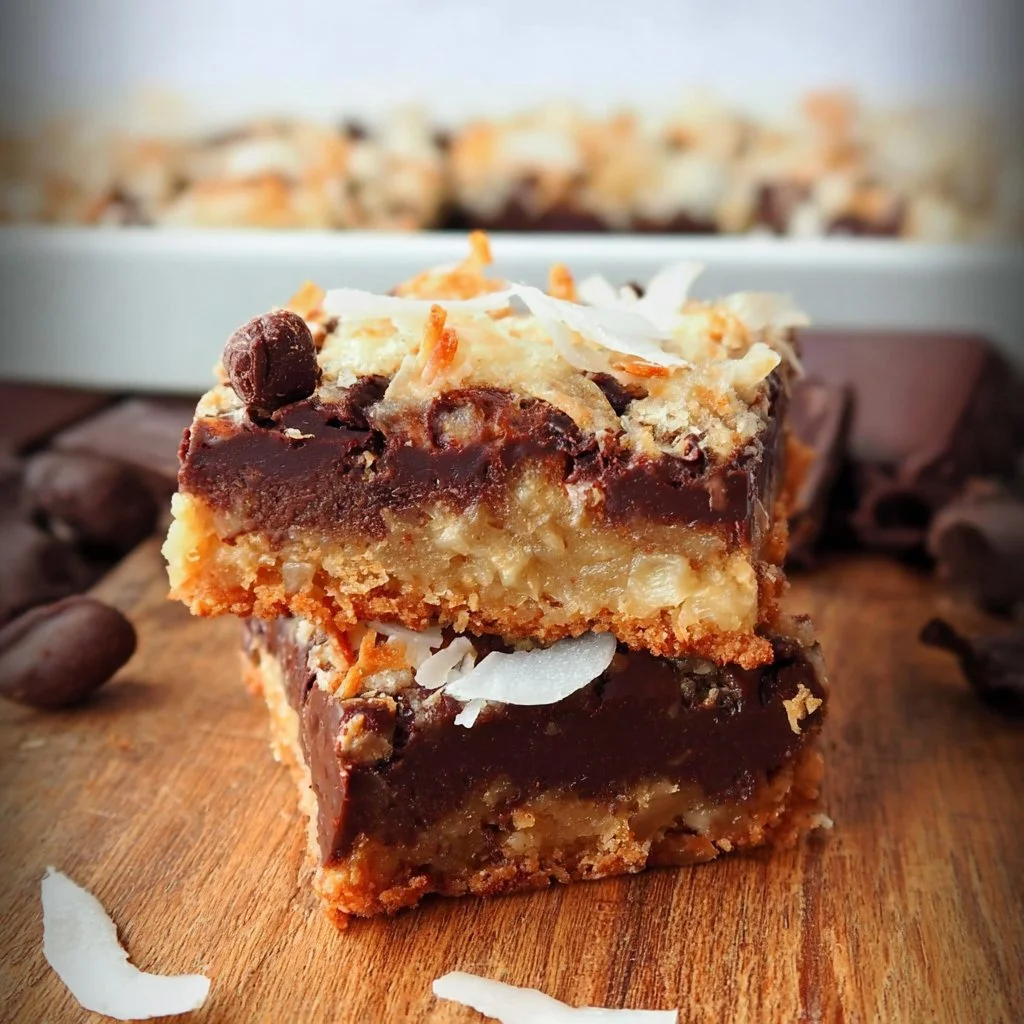
There’s something truly satisfying about preparing a simple treat that brings comfort. These bars are perfect for enjoying during quiet weekend moments, after a long workday, or at gatherings with friends and family. Their layers of chocolate and coconut come together to create a delightful combination, making them a go-to recipe for any occasion. The process is straightforward and the result is rewarding, inviting you to create your own batch.
Why You’ll Love This Chocolate Coconut Bars
Ease and reliability stand out with this recipe. The balanced flavor of chocolate and coconut brings a comforting sweetness that pairs well with everyday moments. These Chocolate Coconut Bars serve as a practical treat, whether you need a quick dessert for dinner or a sweet snack during the week. They never disappoint and quickly become a favorite in any home.
Kitchen Tools You’ll Need
- Mixing bowl
- 9×9 inch baking pan
- Rubber spatula
- Measuring cups
- Measuring spoons
Ingredients
- 1 ½ cup fine graham cracker crumbs (adds structure and slight sweetness)
- ½ cup + 2 tablespoons unsalted butter, melted (provides moisture and binds ingredients)
- ¾ teaspoon fine sea salt, separated (enhances flavor)
- 1 (14 ounce) can sweetened condensed milk (adds creaminess and sweetness)
- 1 cup semi-sweet chocolate chips (offers rich chocolate flavor)
- ¾ cup unsweetened coconut flakes (contributes texture and coconut flavor)

How to Make Chocolate Coconut Bars
Step 1. Begin by gathering your ingredients and preheating the oven to 350°F. This will ensure your bars cook evenly once prepared. It’s helpful to have everything measured out and ready to go, so that you can flow through the steps without interruption.
Step 2. In a mixing bowl, combine the fine graham cracker crumbs, melted unsalted butter, and ½ teaspoon of fine sea salt. Mix thoroughly with a rubber spatula until the crumbs are well coated in butter and the mixture resembles wet sand. This is a crucial step for ensuring that the crust holds together after baking.
Step 3. Press the graham cracker mixture firmly into the bottom of a greased 9×9 inch baking pan. Use your fingers or the back of a measuring cup to create an even layer. Look for a compact surface so that it can support the layers above it without crumbling.
Step 4. Next, in a separate bowl, combine the sweetened condensed milk with the remaining ¼ teaspoon of fine sea salt. This balancing act adds just the right amount of flavor. Stir well until the salt is fully dissolved into the milk.
Step 5. Pour the condensed milk mixture evenly over the pressed graham cracker crust. Use a spatula to spread it gently if needed, ensuring it covers the entire surface. This will create a sweet, creamy layer that complements the sandy texture of the crust.
Step 6. Sprinkle the semi-sweet chocolate chips evenly on top of the condensed milk layer. Press them down lightly into the mixture with your fingers. This ensures that they’ll sink slightly while baking, contributing to a fudgy consistency.
Step 7. Finally, top the chocolate chips with the unsweetened coconut flakes, spreading them evenly over the surface. They will add texture and a lovely coconut flavor that balances the richness of the chocolate.
Step 8. Bake in the preheated oven for about 25–30 minutes or until the edges are golden brown and the center is set. Pay attention to the top; the coconuts may start to toast nicely, which adds a wonderful aroma and visual appeal.
Step 9. Once baked, remove the pan from the oven and allow the bars to cool in the pan for at least 10 minutes. This waiting period helps them set further, making them easier to cut into squares.
Step 10. After cooling, cut the bars into squares while still in the pan. Using a sharp knife will make it easier to get clean edges. Allow them to cool completely before transferring them to a serving plate or storage to enjoy later.

Serving Suggestions
These Chocolate Coconut Bars are versatile and can be enjoyed in a variety of settings. They make a delightful snack, whether you’re grabbing one with your morning coffee or treating yourself in the afternoon. They’re also wonderful for family gatherings or casual get-togethers, served as a dessert after dinner. If you happen to have leftovers, they can be stored for later indulgence, sharing the comfort over a few days.
Pro Tips for Best Results
- Make sure to press the graham cracker crust firmly to avoid crumbling bars later.
- For a more chocolatey experience, you might want to add more chocolate chips or try a combination of milk and dark chocolate.
- Allow the bars to cool completely before cutting; this ensures cleaner edges and easier serving.
- Store bars in an airtight container to keep them fresh and prevent them from drying out.
- If your bars start to brown too quickly, cover them loosely with aluminum foil halfway through baking to protect the tops.
Common Mistakes to Avoid
- Not pressing the crust firmly enough: If the graham cracker crust isn’t compacted well, it may crumble when you cut the bars. Use even pressure to press it down securely.
- Overbaking the bars: Overcooking can lead to hard, dry bars. Keep a close eye on them and look for a golden edge to know when to take them out.
- Forgetting the salt: Omitting the salt can result in a flat flavor without the necessary balance. Always include it for best results.
- Cutting bars too soon: If you cut the bars while they’re still warm, they may fall apart. Let them cool completely in the pan for cleaner slices.
- Using old or stale graham crackers: Fresh graham crackers ensure the crust has the right texture and flavor. Check the expiration date before starting.
- Using the wrong pan size: A different-sized pan could change the baking time and result in unevenly baked bars. Stick to the recommended 9×9 inch pan for best results.
Variations & Substitutions
For a little twist, consider mixing in some chopped nuts or dried fruit with the chocolate chips and coconut flakes. If you prefer a different flavor profile, swapping the semi-sweet chocolate chips for white chocolate can create a lighter taste. You can also adjust the coconut content by adding more flakes or using flavored coconut for extra depth.
Storage & Reheating
These Chocolate Coconut Bars can be stored at room temperature for a few days in an airtight container. If you want to keep them longer, store them in the refrigerator, where they can last up to a week. They can also be frozen for extended storage; just wrap them tightly in plastic wrap and place them in a freezer-safe container. When ready to enjoy, let them thaw at room temperature or warm them briefly in the microwave for a few seconds to maintain their enjoyable texture.
Frequently Asked Questions
Can I make this recipe ahead of time?
Yes, these Chocolate Coconut Bars can be made ahead of time. They actually benefit from chilling in the refrigerator for a bit before serving, allowing the flavors to meld together nicely.
How long does it last in the fridge?
If stored properly in an airtight container, the bars can last about a week in the refrigerator. This makes them a great make-ahead treat.
Can I freeze this recipe?
Absolutely! These bars freeze well. Wrap them in plastic wrap and place them in a freezer-safe container. They can last for about three months in the freezer.
What can I substitute for one ingredient?
If you’re looking to adjust the recipe, you can substitute a blend of crushed cookies for the graham cracker crumbs for a different flavor in the crust.
Why didn’t my recipe turn out as expected?
Common issues include underbaking or overbaking the bars. Always check for a golden edge and make adjustments based on your oven’s temperament to ensure proper texture.
Final Thoughts
Making these Chocolate Coconut Bars brings a comforting, familiar experience to the kitchen. They offer a simple way to indulge in a sweet treat that feels homemade and satisfying. The straightforward process allows for a rewarding outcome, ensuring that you can enjoy these bars time and time again.

Chocolate Coconut Bars
Ingredients
For the crust
- 1.5 cup fine graham cracker crumbs adds structure and slight sweetness
- 0.5 cup unsalted butter, melted provides moisture and binds ingredients
- 0.75 teaspoon fine sea salt for enhancing flavor
For the filling
- 1 can sweetened condensed milk (14 ounce) adds creaminess and sweetness
- 1 cup semi-sweet chocolate chips offers rich chocolate flavor
- 0.75 cup unsweetened coconut flakes contributes texture and coconut flavor
Instructions
Preparation
- Gather your ingredients and preheat the oven to 350°F.
- In a mixing bowl, combine the fine graham cracker crumbs, melted unsalted butter, and ½ teaspoon of fine sea salt. Mix thoroughly with a rubber spatula until the mixture resembles wet sand.
- Press the graham cracker mixture firmly into the bottom of a greased 9×9 inch baking pan.
- In a separate bowl, combine the sweetened condensed milk with the remaining ¼ teaspoon of fine sea salt. Stir well until the salt is fully dissolved.
Assembly
- Pour the condensed milk mixture evenly over the pressed graham cracker crust.
- Sprinkle the semi-sweet chocolate chips evenly on top of the condensed milk layer and press them down lightly.
- Top the chocolate chips with the unsweetened coconut flakes, spreading them evenly.
Baking
- Bake in the preheated oven for about 25–30 minutes or until the edges are golden brown.
- Once baked, remove the pan from the oven and allow the bars to cool in the pan for at least 10 minutes.
- After cooling, cut the bars into squares while still in the pan.


