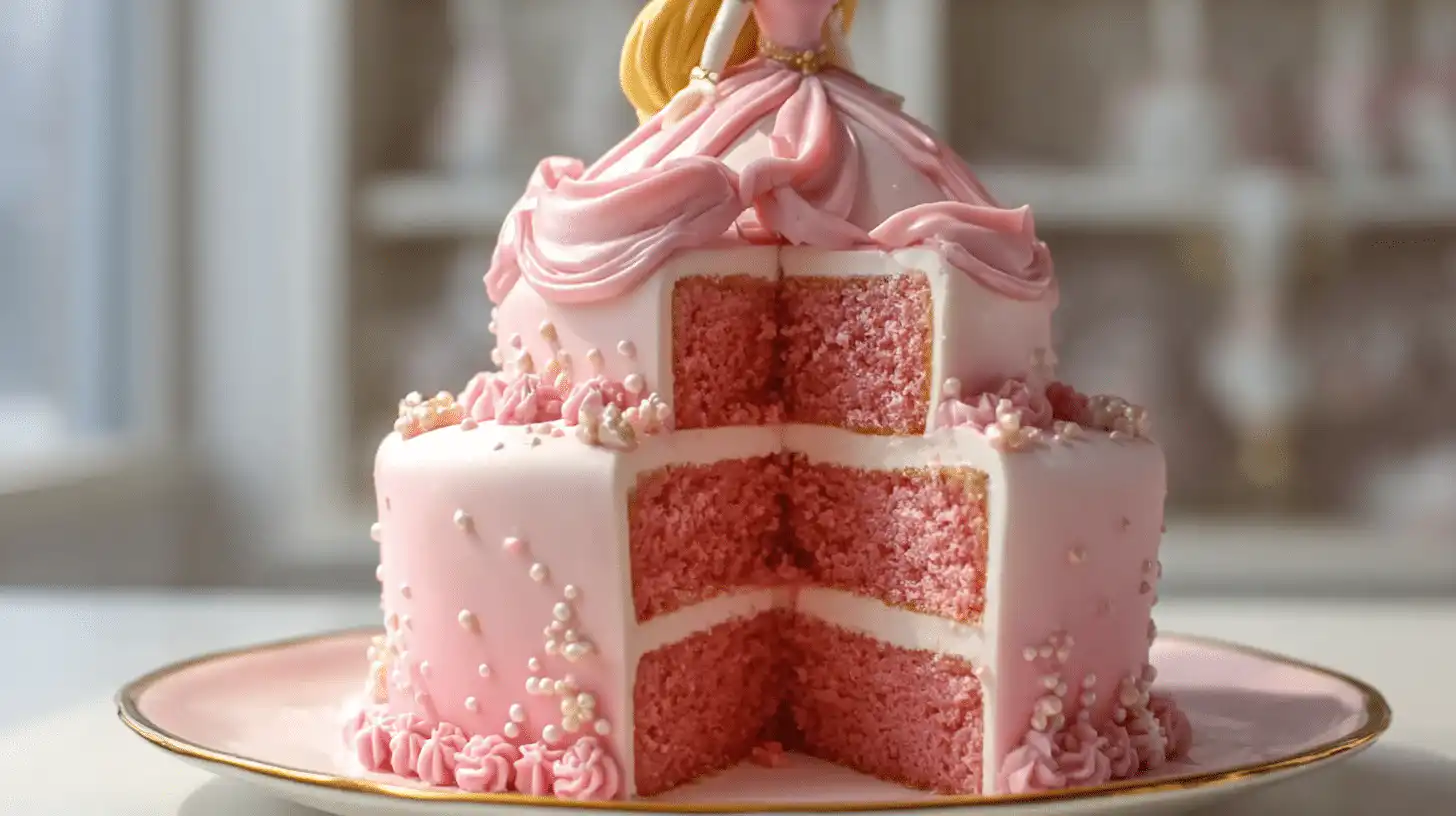
The Princess Birthday Cake holds a special place in my heart because it reminds me how magical homemade baking can be. Hi, I’m Salma — a 32-year-old home cook living in the U.S., and my love for cooking grew from pure curiosity into a lifelong passion. I wasn’t a natural at first, but through endless recipe trials and laughter-filled kitchen moments, I discovered the joy of creating something beautiful from scratch. This cake captures that spirit perfectly — soft, sweet, and made with love. It’s proof that with patience and heart, anyone can bake their own little piece of magic.
Serving Versatility
This Princess Birthday Cake fits seamlessly into any celebration theme. For a Disney princess cake idea, pair it with pastel cupcakes or glittery cake pops. If you’re going for a butterfly theme cake, add edible butterflies fluttering up the sides for a whimsical touch. You can even make it into a unicorn birthday cake by swirling pastel frosting and adding a golden horn topper. Whether served as the star of a big princess castle cake display or as part of a cozy family party, this homemade creation will shine. And the best part? It tastes just as dreamy as it looks.
🥕 Ingredients (Detailed & Humanized)
2½ cups all-purpose flour: gives the cake its soft, tender crumb and perfect structure.
2½ tsp baking powder: ensures a lovely, even rise that makes each layer light and fluffy.
½ tsp salt: enhances every sweet note and keeps flavors balanced.
1 cup unsalted butter, softened: adds richness and that melt-in-your-mouth texture.
1¾ cups granulated sugar: sweetens while helping the cake achieve a delicate golden crust.
4 large eggs, room temperature: create a stable, airy batter that bakes beautifully.
2 tsp pure vanilla extract: brings a comforting, bakery-style aroma to every slice.
1 cup whole milk: adds moisture and softness for that classic tender crumb.
Pink gel food coloring: transforms the cake into a dreamy princess shade—just a few drops make it magical.
2 cups butter (for frosting): the heart of the frosting—smooth, creamy, and perfect for decorating.
4 cups powdered sugar: adds silky sweetness and helps the frosting hold those pretty swirls.
2 tbsp heavy cream: gives the frosting a luscious, whipped texture.
Sprinkles, pearls, or edible glitter: add sparkle and royal flair fit for a celebration.
Optional: fondant crown or castle decorations — the royal touch that makes your cake party-ready.
🍳 Directions (Step-by-Step Cooking Guide)
Step 1: Preheat your oven to 350°F (175°C). Grease and line two 8-inch round cake pans with parchment paper — it’ll ensure easy release and perfect edges. You’ll thank yourself later!
Step 2: In a medium bowl, whisk together the flour, baking powder, and salt. This dry mix keeps your cake even and fluffy from the first bite to the last.
Step 3: In a large mixing bowl, cream the butter and sugar together for about 3–4 minutes until pale, fluffy, and smooth. The mixture should look almost like whipped cream — that’s your cue it’s ready.
Step 4: Add the eggs one at a time, beating well after each addition so everything stays light and cohesive. Pour in the vanilla extract — the aroma will instantly fill your kitchen with warmth and sweetness.
Step 5: Alternate adding your dry ingredients and milk, starting and ending with the dry mix. Stir gently after each addition just until combined. Don’t overmix — that’s the secret to keeping the crumb soft and tender.
Step 6: Add a few drops of pink gel food coloring and stir gently until you achieve that dreamy princess hue. Divide the batter evenly between your pans and smooth the tops with a spatula.
Step 7: Bake for 25–30 minutes, or until a toothpick inserted into the center comes out clean. Your kitchen will smell like a fairytale bakery. Let the cakes cool in the pans for 10 minutes before transferring them to a wire rack to cool completely.
Step 8: While the cakes cool, make your frosting. Beat butter in a large bowl until creamy, then gradually add powdered sugar, one cup at a time. Add the heavy cream and continue whipping until the frosting is light, fluffy, and dreamy — like pink clouds of sweetness.
Step 9: Once the cake layers are completely cool, spread a generous layer of frosting between them. Stack carefully, then cover the top and sides with a smooth, even coat. Use your spatula to create soft swirls or waves — this is where your creativity shines.
Step 10: Finally, decorate! Add sprinkles, pearls, or edible glitter for that royal sparkle. If you’re feeling fancy, place a fondant crown or small princess figurine on top. Step back and admire your creation — a Homemade Princess Birthday Cake worthy of a true celebration.
Would you like me to extend this with a short “Emma-style” sensory description — how it smells, tastes, and looks once decorated (for more storytelling warmth)?
Why You’ll Love This Recipe
✅ Quick to make — bakes in just 30 minutes with simple ingredients.
✅ Budget-friendly — no fancy bakery costs for a show-stopping centerpiece.
✅ Cozy, homemade flavor — real vanilla and butter make all the difference.
✅ Nutritious balance — moderate sweetness that’s perfect for kids.
✅ Great for meal prep — bake layers ahead and frost the day of.
✅ Family-approved — every bite feels like a warm, shared celebration.
Cultural or Technique Note
The concept of the Princess Birthday Cake draws inspiration from European celebration cakes — think of pastel sponges and buttercream roses from classic patisseries. Over time, it’s evolved into a modern American tradition, where parents craft unique, storybook-inspired cakes at home. It’s a blend of nostalgia and creativity — a homemade expression of love wrapped in pink frosting.
Serving Suggestions
Serve with a side of fresh berries for a light, elegant contrast.
Add scoops of vanilla ice cream for a classic birthday pairing.
Slice it into cubes and serve with skewers for a fun kids’ treat.
Pair with pink lemonade or fruit punch for a coordinated color theme.
Pro Tips for Success
Use room-temperature ingredients — it ensures even mixing and perfect texture.
Chill your cake layers before frosting — this prevents crumbs and gives clean edges.
Whip your frosting well — fluffy texture makes decorating easier.
Tint frosting in small batches for multi-tone princess gradients.
Decorate just before serving to keep colors bright and fresh.
Use a small offset spatula — it’s your best friend for smooth frosting.
Common Mistakes to Avoid
⚠️ Overbaking: dries out the cake — check early and remove when golden.
⚠️ Cold ingredients: cause dense texture — let butter and eggs sit out first.
⚠️ Skipping the crumb coat: leads to messy frosting — seal in crumbs before decorating.
⚠️ Using too much food coloring: can affect taste — a few drops go a long way.
⚠️ Rushing cooling: warm cakes melt frosting — patience equals perfection.
Storage & Reheating
Keep your Princess Birthday Cake covered in the fridge for up to 4 days. The frosting will stay creamy, and the layers moist. For longer storage, freeze slices individually for up to 2 months, wrapped tightly in plastic and foil. To serve, thaw at room temperature — it’ll taste as fresh and fluffy as the day you made it. Avoid reheating in the microwave; instead, let it sit at room temperature for that perfect soft texture.
Frequently Asked Questions (FAQ)
Can I use boxed cake mix?
Yes! You can enhance a mix by adding extra vanilla or a splash of milk. It’s all about that homemade touch.
Can I make this dairy-free?
Absolutely. Use dairy-free butter and almond milk — the cake will still be light and delicious.
What if I want a different color?
Go ahead! Lavender, mint, or soft yellow all look stunning for a princess theme.
Can I turn this into cupcakes?
Yes — bake in cupcake liners for about 18–20 minutes for a royal mini treat.
How can I make it look like a castle cake?
Stack two small tiers, add ice cream cones as towers, and decorate with edible pearls for a magical castle look.
Closing Paragraph
Every time I bake this Homemade Princess Birthday Cake, I’m reminded that magic doesn’t need to be complicated. With just a few simple steps, you can create something that feels straight out of a fairy tale. Whether it’s your little one’s first birthday or another special celebration, this cake is a delicious way to make her feel truly special. Let your creativity shine — sprinkle, swirl, and smile your way through the process.
Final Thoughts
Whenever I make this cake, I’m reminded that simple homemade desserts hold the most meaning. It’s not about perfection — it’s about love, laughter, and that sparkle in your child’s eyes when they see their dream come to life. Follow me on Pinterest for more cozy, quick, and nostalgic recipes.

Princess Birthday Cake
Equipment
- Two 8-inch cake pans
- Hand or Stand Mixer
- Mixing Bowls
- Offset Spatula
Ingredients
Cake
- 2.5 cups all-purpose flour
- 2.5 tsp baking powder
- 0.5 tsp salt
- 1 cup unsalted butter softened
- 1.75 cups granulated sugar
- 4 large eggs room temperature
- 2 tsp vanilla extract pure
- 1 cup whole milk
- pink gel food coloring as desired
Buttercream Frosting
- 2 cups unsalted butter softened
- 4 cups powdered sugar sifted
- 2 tbsp heavy cream
- sprinkles, edible glitter, or decorations for topping
- fondant crown or castle topper optional
Instructions
- Preheat oven to 350°F (175°C). Grease and line two 8-inch round cake pans with parchment.
- Whisk flour, baking powder, and salt in a medium bowl. Set aside.
- In a large bowl, cream butter and sugar until pale and fluffy (3–4 minutes).
- Beat in eggs one at a time, then mix in vanilla.
- Add dry ingredients in three parts, alternating with milk. Mix gently until just combined.
- Stir in pink food coloring to desired shade. Divide batter into prepared pans and smooth tops.
- Bake for 25–30 minutes, or until a toothpick inserted comes out clean. Cool completely before decorating.
- For frosting, beat butter until creamy, then slowly add powdered sugar. Add heavy cream and whip until fluffy. Frost cake and decorate as desired.


