The BEST Brownies on Earth are what everyone’s talking about on TikTok right now — and I just had to try them. Hi, I’m Salma. I’m 32 years old and living in the United States, and my love for cooking grew from simple curiosity into something that feels like a lifelong passion. So when I saw this viral brownie hack promising shiny crackly tops and fudgy centers, I couldn’t resist. The edges came out a little uneven, and the middle looked underbaked — but once I took that first bite? Absolute chocolate heaven. Perfectly imperfect, just how homemade brownies should be.
Why You’ll Love This BEST Brownies On Earth
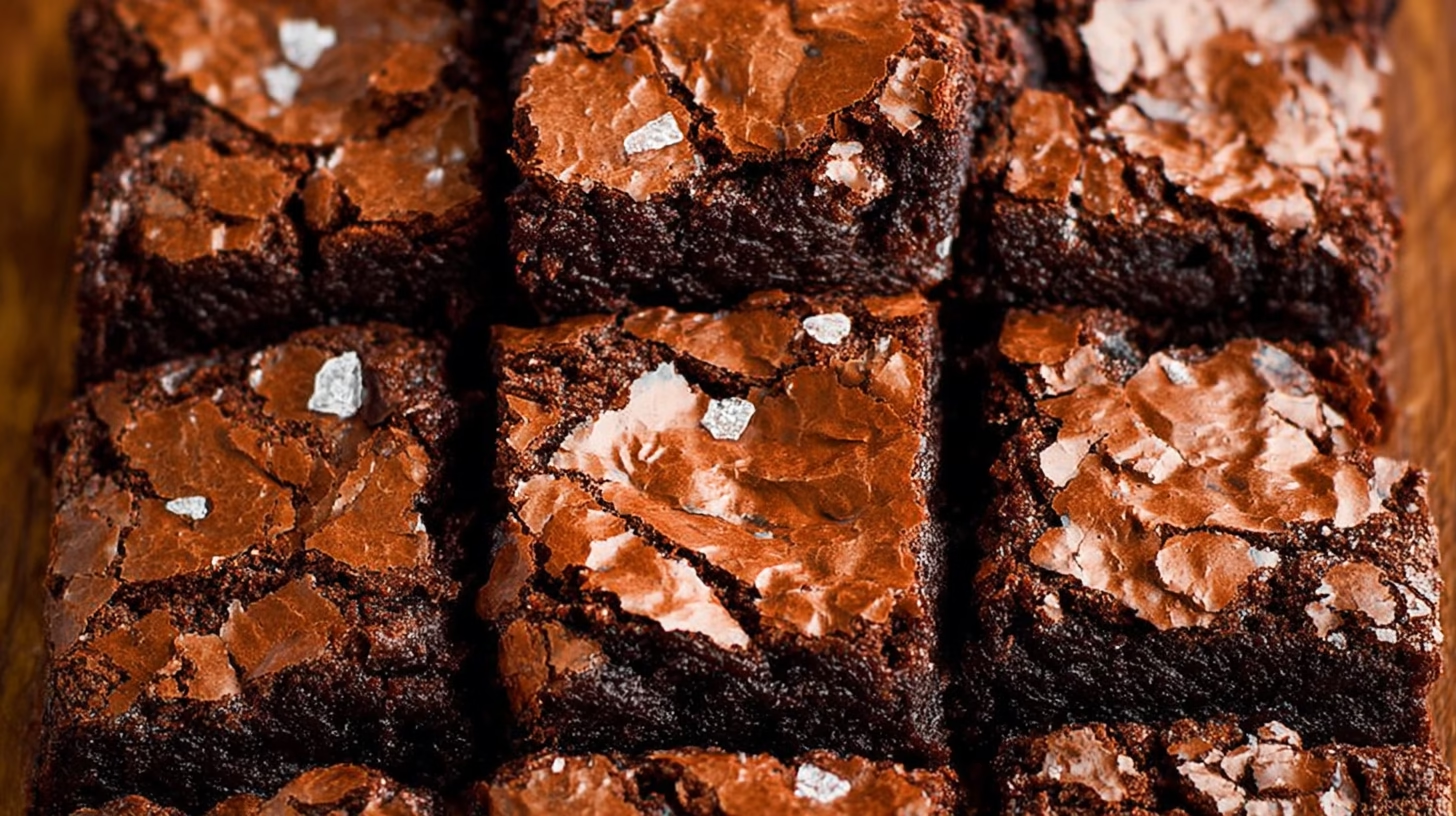
You’ll love these brownies because they’re simple, decadent, and practically impossible to mess up. They require basic pantry staples yet taste like a professional bakery treat. With a glossy top and soft, fudgy middle, they bring pure chocolate joy to any table.
They’re ideal for family gatherings, late-night cravings, or potlucks where you want to impress with minimal effort. One bowl, one pan, endless chocolate happiness.
Ingredients (Detailed & Humanized)
- 1 cup all-purpose flour: The sturdy base that gives your brownies structure.
- ½ teaspoon baking powder: Adds a gentle lift for that perfect chew.
- ½ teaspoon salt: Balances the sweetness and deepens the chocolate flavor.
- ½ cup unsweetened cocoa powder: The heart of the chocolatey goodness.
- 1 teaspoon espresso powder (optional): Deepens the chocolate flavor with subtle richness.
- ¾ cup unsalted butter: Adds flavor and creates that luscious, fudgy texture.
- 2 tablespoons oil (canola, vegetable, or coconut): Keeps the brownies soft and moist.
- 1⅓ cups granulated sugar (divided): Sweetens and helps form that signature crackly top.
- 2 large eggs + 1 egg yolk: Add richness and give structure to every bite.
- 2 teaspoons vanilla extract (optional): Enhances the chocolate flavor beautifully.
- ¾ cup chocolate chips: Melty pockets of joy that make these brownies irresistible.
Directions (Step-by-Step Cooking Guide)
- Prep your pan: Preheat the oven to 350°F and line a 9×9-inch pan with parchment paper. Lightly spray it with non-stick spray so your brownies lift out easily.
- Mix the dry ingredients: In a large bowl, sift together flour, baking powder, salt, cocoa powder, and espresso powder. This ensures a smooth, lump-free batter.
- Melt the butter mixture: In a saucepan, melt the butter with oil and ⅓ cup of sugar over medium heat until fully combined and glossy. Remove from heat — the smell will be incredible.
- Whisk the eggs: In another large bowl, whisk together the eggs, egg yolk, vanilla, and remaining sugar until creamy and slightly pale. This step is key for that crackly top.
- Combine warm and cool: Slowly drizzle the warm butter mixture into the egg mixture, whisking constantly. The contrast of hot and cold helps create a shiny top layer once baked.
- Fold in the dry mix: Gently add the dry ingredients, stirring just until combined. Don’t overmix — stop when you can barely see flour streaks.
- Add chocolate chips: Fold in the chocolate chips for extra melt-in-your-mouth texture.
- Bake to perfection: Spread the batter evenly into your pan and bake for about 28–30 minutes, until the top is set but still slightly soft in the middle.
- Cool completely: Let the brownies cool in the pan on a wire rack before slicing. Patience here gives you clean, perfect squares with gooey centers.
Cultural or Technique Note
Brownies are the epitome of classic American comfort baking — simple ingredients transformed into pure joy. The beauty lies in the technique: whisked eggs for shine, melted butter for chew, and cocoa for that intense chocolate hit. It’s a timeless recipe that bridges nostalgia with indulgence.
Serving Suggestions
- With a scoop of vanilla ice cream for the ultimate treat
- Crumbled over a warm mug of hot chocolate
- Topped with whipped cream and berries
- As the base layer for an ice cream sundae
Pro Tips for Success
- Whisk the eggs vigorously — it’s key to getting that shiny, crackly top.
- Use high-quality cocoa powder for deeper chocolate flavor.
- Don’t overmix once the flour is added — this keeps the texture fudgy, not cakey.
- Line your baking pan with parchment for easy removal.
- Cool completely before slicing for clean edges and perfect texture.
- Add a sprinkle of flaky sea salt on top before baking for a gourmet touch.
Common Mistakes to Avoid
Overmixing the Batter: This is one of the biggest mistakes when making brownies. Stirring too long after adding the flour develops gluten, which leads to dry, cake-like texture instead of that dreamy fudginess. Mix just until everything looks blended — a few streaks of flour are okay!
Overbaking: Remember, brownies continue to cook as they cool. Pull them out when the center still has a slight jiggle. If the toothpick comes out completely clean, you’ve likely gone too far. Soft and gooey centers are what make these the BEST brownies on Earth.
Using Cold Ingredients: Cold butter or eggs can cause the batter to seize and mix unevenly, giving you tough or dense brownies. Make sure everything — especially the eggs and butter — is at room temperature before starting.
Skipping the Whisking Step: Don’t underestimate this part! Whisking the eggs and sugar thoroughly creates air bubbles and dissolves sugar crystals, which help form that signature shiny, crackly crust. It’s the hallmark of bakery-quality brownies.
Not Letting Them Cool: It’s tempting to slice right into a warm pan, but patience pays off here. Cutting too early causes the brownies to crumble and lose that perfect fudgy texture. Allow them to cool completely before slicing for clean, neat squares that hold their shape.
Using the Wrong Pan Type: Glass and ceramic pans retain more heat, often overbaking the edges before the center is done. A metal pan ensures even baking and that irresistible chewy edge.
Skipping the Parchment Liner: Parchment makes it easy to lift brownies out of the pan in one piece. Without it, you risk sticking, tearing, or losing those delicious edges.
Storage & Reheating
Room Temperature: These brownies actually taste better the next day — richer and denser as the flavors meld. Store them in an airtight container for up to 3 days at room temp.
Fridge: If your kitchen is warm, refrigerate them in an airtight container for 3–4 days. The cooler air firms up the texture slightly, but a quick warm-up in the microwave restores their softness.
Freezer: For longer storage, wrap each brownie tightly in plastic wrap and place in a freezer-safe bag. They’ll keep beautifully for up to 2 months. When ready to enjoy, let them thaw at room temperature or reheat gently in the oven.
Reheating Tips: Warm brownies on low heat in the oven or 15–20 seconds in the microwave. Add a tiny splash of water or cover with a damp paper towel to preserve moisture. For a decadent twist, reheat and top with a scoop of vanilla ice cream — melty, fudgy perfection!
Frequently Asked Questions (FAQ)
Q1: Can you make brownies from a cake mix?
: You can, but the texture and flavor won’t be the same. Cake mix brownies tend to be light and fluffy, while these homemade ones are dense, chewy, and deeply chocolatey — exactly what a true brownie should be.
Q2: What’s the secret to shiny, crackly tops?
: The magic lies in whisking the eggs and sugar together until thick and pale before adding the warm butter mixture. This step dissolves the sugar, creating that glossy, paper-thin crust once baked.
Q3: Can I use Dutch-process cocoa powder?
: Absolutely! Dutch-process cocoa will give your brownies a darker color and a smoother, richer chocolate flavor. Natural cocoa, on the other hand, brings a slightly tangier, lighter taste — both are delicious.
Q4: How do I make them extra gooey?
: For ultra-fudgy brownies, slightly underbake them — about 27 minutes should do it. Once cooled, the center will set into that irresistible, chewy middle that brownie lovers dream about.
Q5: Can I add nuts or mix-ins?
Definitely! Chopped walnuts, pecans, or even a swirl of peanut butter can add amazing texture and flavor. Just don’t overload the batter — ½ to ¾ cup of mix-ins is plenty to keep the texture balanced.
Closing Paragraph
There’s something magical about a pan of freshly baked brownies cooling on the counter that mix of anticipation, aroma, and comfort. These truly are the BEST brownies on Earth, simple yet unforgettable, and perfect for sharing with anyone who loves chocolate as much as you do. Enjoy them plain, dress them up with toppings, or gift them to a friend — they’re always a hit.
Final Thoughts
Every time I bake these brownies, I’m reminded that the simplest recipes are often the ones that bring the most joy. There’s no need for fancy ingredients — just real chocolate, butter, and love. I hope this becomes your go-to brownie recipe for every celebration and craving.

Best Ever Fudgy TikTok Brownies
Equipment
- 9×9-inch Baking Pan
- Parchment Paper
- Whisk
- Mixing Bowls
- Small Saucepan
- Spatula
Ingredients
Brownies
- 1 cup all-purpose flour
- 1/2 tsp baking powder
- 1/2 tsp salt
- 1/2 cup unsweetened cocoa powder
- 1 tsp espresso powder optional, enhances chocolate flavor
- 3/4 cup unsalted butter
- 2 tbsp oil canola, vegetable, or coconut
- 1 1/3 cups granulated sugar divided
- 2 large eggs room temperature
- 1 egg yolk room temperature
- 2 tsp vanilla extract optional
- 3/4 cup chocolate chips semi-sweet or dark
Instructions
- Preheat oven to 350°F (175°C). Line a 9×9-inch pan with parchment paper and lightly spray with non-stick spray.
- In a large bowl, sift together flour, baking powder, salt, cocoa powder, and espresso powder. Set aside.
- In a small saucepan, melt butter, oil, and 1/3 cup of sugar over medium heat until melted and glossy. Remove from heat.
- In another bowl, whisk together eggs, egg yolk, vanilla, and the remaining sugar until pale and creamy (about 1–2 minutes).
- Slowly drizzle the warm butter mixture into the egg mixture while whisking constantly to combine.
- Gently fold in the dry ingredients using a spatula until just combined. Do not overmix.
- Fold in chocolate chips and spread the batter evenly in the prepared pan.
- Bake for 28–30 minutes, or until the top looks set and the center is slightly soft. Let cool completely before slicing.


