Delicious Easy Mini Cheesecakes Bite Sized Bliss are the perfect bite-sized dessert for any occasion. These creamy, rich treats feature a buttery graham cracker crust and smooth cheesecake filling that melts in your mouth. Ideal for parties, brunches, or weddings, they’re elegant yet incredibly simple to make. With endless topping options, these Delicious Easy Mini Cheesecakes Bite Sized Bliss bring sweetness, charm, and joy to every celebration.
Why You’ll Love This Delicious Easy Mini Cheesecakes Bite Sized Bliss
You’ll fall in love with these mini cheesecakes because they combine convenience with sophistication. They look like something from a boutique bakery but come together with basic pantry ingredients. Each one is portioned just right — no cutting, no crumbs, no mess.
They’re also endlessly customizable. Whether you go for classic vanilla, fruity swirls, or a chocolatey twist, these cheesecakes adapt beautifully to any theme or celebration. Think of them as your go-to small wedding desserts or bridal shower brunch desserts — always elegant, always a hit.
Ingredients
For the Buttery Graham Cracker Crust
- 1 ½ cups graham cracker crumbs – warm, toasty base with a gentle crunch.
- ⅓ cup unsalted butter, melted – binds everything together and adds richness.
- 2 tablespoons granulated sugar – balances the buttery flavor with a hint of sweetness.
For the Rich & Creamy Cheesecake Filling
- 2 packages (8 ounces each) cream cheese, softened – the star ingredient for a smooth, silky filling.
- ¾ cup granulated sugar – adds just the right sweetness.
- ¼ cup sour cream, room temperature – gives a subtle tang and creamy texture.
- 1 teaspoon vanilla extract – for that warm, comforting aroma.
- 2 large eggs, room temperature – ensures a smooth, cohesive mixture.
Directions
Step 1: Get Crumby
Preheat your oven to 350°F (175°C). Line a 12-cup muffin tin with paper liners. In a small bowl, mix the graham cracker crumbs, melted butter, and sugar until fully combined. Press about 1½ tablespoons of this mixture firmly into each liner to form the crust. Bake for 5 minutes to set, then cool slightly.
Step 2: Whip Up the Creamy Filling
In a large bowl, beat the softened cream cheese until smooth and lump-free. Gradually add the sugar and mix until well blended. Beat in the sour cream and vanilla for that irresistible creamy touch. Add eggs one at a time on low speed — just until combined. (Overmixing can cause cracks.)
Step 3: Fill ‘Em Up
Spoon the cheesecake filling evenly into the liners, filling them nearly to the top. Each one will rise slightly and settle into perfect mini rounds as they bake.
Step 4: Bake It ‘Til Golden (Almost!)
Bake for 17–20 minutes, or until the centers are mostly set with a slight jiggle. They’ll continue firming as they cool — trust the process!
Step 5: Cool and Chill
Let the cheesecakes cool completely in the muffin tin at room temperature. Once cool, refrigerate for at least 2 hours (or overnight for best results). Chilling gives them their signature dense, creamy texture.
Cultural or Technique Note
Mini cheesecakes are a modern twist on the classic American cheesecake — a dessert that’s been loved for generations. Their bite-sized form brings the same comfort and indulgence but with easier serving and presentation. They’re especially popular at weddings, brunches, and festive gatherings, where guests can enjoy a little sweetness without a big commitment.
Serving Suggestions
These Delicious Easy Mini Cheesecakes are wonderfully versatile, making them a beautiful addition to any dessert spread. You can keep them classic or dress them up to match your event theme. Here are a few ways to serve and style them:
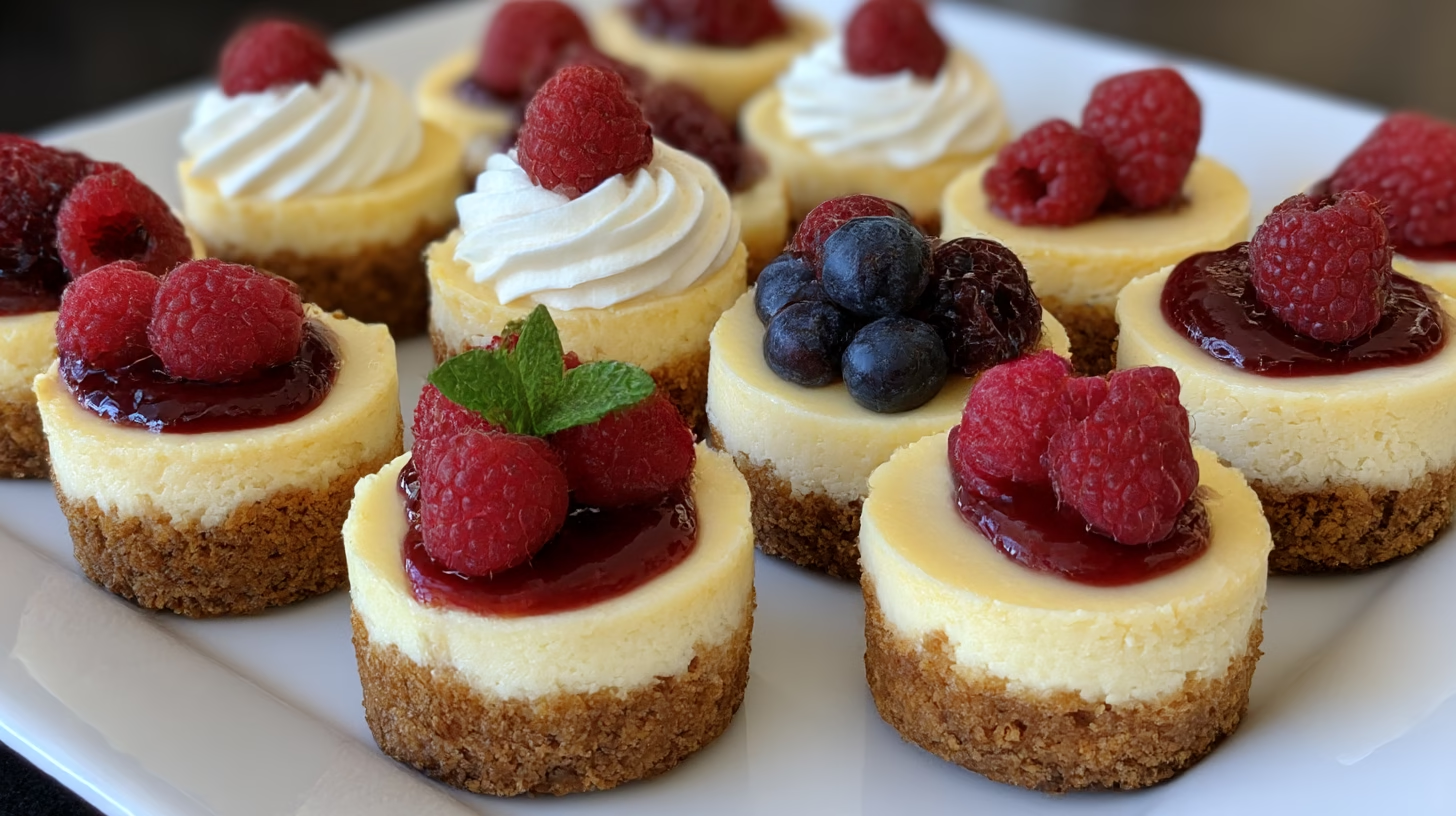
- Topped with fresh berries and whipped cream: Add a pop of color and natural sweetness — perfect for spring and summer gatherings.
- Drizzled with chocolate or caramel sauce: A luxurious touch that turns each bite into pure indulgence.
- Garnished with crushed cookies or nuts: Adds texture and crunch, making every mini cheesecake feel extra special.
- Served alongside coffee or champagne: Elegant, effortless, and ideal for weddings, brunches, or evening parties.
- Create a cheesecake bar: Let guests choose their toppings — fruit, sauces, nuts, and sprinkles make for interactive fun.
- Pair with mini pastries or truffles: A charming way to complete a dessert table with bite-sized treats.
Pro Tips for Success
Make every batch of mini cheesecakes a success with these easy, practical tips:
- Soft cream cheese is key: Always let it come fully to room temperature before mixing for a velvety, lump-free filling.
- Don’t overmix: Keeps the texture silky and helps prevent cracks. Gentle mixing is your secret weapon.
- Use room temperature eggs and sour cream: They incorporate smoothly, giving you that signature creamy texture.
- Experiment with crusts: Swap graham crackers for Oreos, vanilla wafers, or gingersnaps to add a fun flavor twist.
- Chill thoroughly: Letting the cheesecakes rest in the fridge deepens the flavor and firms up the texture beautifully.
- Make ahead: These store perfectly overnight, making them a stress-free option for parties or special occasions.
- Top just before serving: Keeps fruits and sauces fresh and prevents sogginess.
- Mini liners or silicone cups: Make cleanup and serving effortless while keeping each cheesecake picture-perfect.
Common Mistakes to Avoid
Avoid these easy-to-make errors to ensure your cheesecakes turn out creamy and flawless every time:
⚠️ Overbaking: Leads to dryness — remove when centers still have a gentle jiggle.
⚠️ Skipping the chill time: The cheesecakes won’t set properly without cooling.
⚠️ Cold ingredients: Can cause lumps and uneven texture — always bring to room temperature first.
⚠️ Overmixing: Adds too much air, resulting in cracks during baking.
⚠️ Not using liners: Makes removal messy and can cause crumbling.
⚠️ Opening the oven too early: Sudden temperature changes can cause sinking or cracking.
Storage & Reheating
These mini cheesecakes store beautifully, making them perfect for preparing in advance or saving leftovers:
- Fridge: Store airtight for 3–4 days. They taste even better after a night of chilling.
- Freezer: Keep airtight for up to 2 months. For best results, freeze uncovered on a tray first, then transfer to a sealed container.
- Reheat: They’re best enjoyed chilled, but if frozen, thaw overnight in the fridge. You can serve slightly cool or at room temperature for a creamier bite.
Frequently Asked Questions
Q1: Can I make these mini cheesecakes ahead of time?
: Yes! They’re perfect for making a day or two in advance. Keep them refrigerated in an airtight container until you’re ready to serve.
Q2: What toppings work best?
: Fresh berries, caramel drizzle, chocolate ganache, fruit preserves, or even crushed cookies — each one adds a unique touch of flavor and beauty.
Q3: How do I prevent cracks?
: Avoid overmixing and bake only until the centers are slightly set. Let them cool gradually and chill fully before serving for the smoothest texture.
Q4: Can I freeze mini cheesecakes?
: Absolutely. Freeze them on a baking tray until solid, then store in a freezer-safe container. Thaw overnight in the refrigerator for the best consistency.
Q5: Can I make these without paper liners?
: You can, but liners make removing and serving much easier — plus, they give your cheesecakes a professional finish.
Closing Paragraph
These Delicious Easy Mini Cheesecakes bring big flavor in the smallest, most charming packages. They’re elegant enough for a wedding dessert table yet simple enough for a weekend treat. Serve them chilled, topped with your favorite fruits or sauces, and watch as guests come back for seconds (and thirds). However you enjoy them, each creamy bite is pure happiness.
Final Thoughts
Every time I make these, I’m reminded that joy often comes in small portions. There’s something so satisfying about a dessert that looks fancy but feels easy and comforting. Whether you’re celebrating love, friendship, or just a sweet moment, these mini cheesecakes are little bites of bliss.

Delicious Easy Mini Cheesecakes Bite Sized Bliss
Equipment
- Muffin Tin
- Paper liners or silicone cups
- Mixing Bowls
- Hand Mixer or Stand Mixer
- Measuring spoons and cups
- Spatula
- Oven
Ingredients
Buttery Graham Cracker Crust
- 1 1/2 cups graham cracker crumbs
- 1/3 cup unsalted butter melted
- 2 tbsp granulated sugar
Rich & Creamy Cheesecake Filling
- 16 oz cream cheese softened (2 packages)
- 3/4 cup granulated sugar
- 1/4 cup sour cream room temperature
- 1 tsp vanilla extract
- 2 large eggs room temperature
Instructions
- Preheat oven to 350°F (175°C). Line a 12-cup muffin tin with paper liners.
- Mix graham cracker crumbs, melted butter, and sugar in a bowl. Press about 1½ tablespoons into each liner. Bake for 5 minutes, then cool slightly.
- In a large bowl, beat softened cream cheese until smooth. Add sugar gradually and mix until well blended. Mix in sour cream and vanilla. Add eggs one at a time on low speed, mixing just until combined.
- Fill liners nearly to the top with the cheesecake mixture. Bake for 17–20 minutes until centers are set with a slight jiggle.
- Cool completely in the tin at room temperature. Chill in the fridge for at least 2 hours or overnight before serving.


