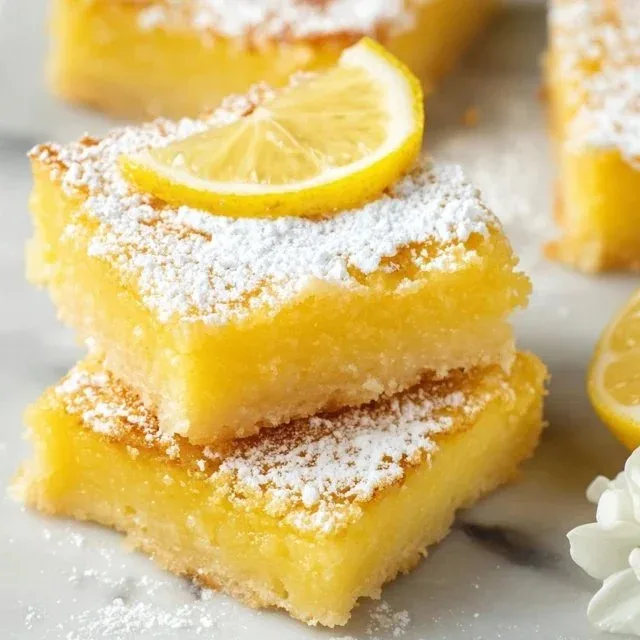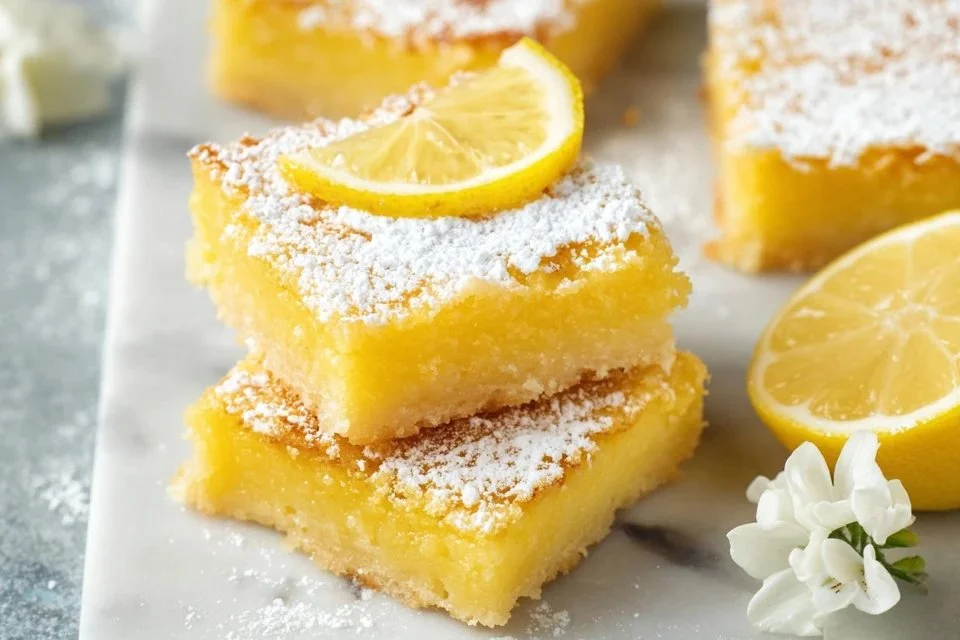
There’s something wonderfully comforting about preparing a classic treat that everyone can enjoy, especially when it’s gluten-free. These lemon bars are a delightful combination of tangy and sweet, transforming simple ingredients into something special. Perfect for weeknight desserts, weekend gatherings, or those quiet moments when you crave a bite of brightness, they offer a slice of sunshine anytime. The satisfaction of making them in your kitchen adds to the experience, inviting you to savor each step along the way.
Why You’ll Love This Best Gluten-Free Lemon Bars
These gluten-free lemon bars are incredibly easy to prepare, making them a reliable choice for any occasion. The combination of tangy lemon and sweet sugar creates a balanced flavor that is both comforting and refreshing. You’ll appreciate their practical versatility, whether you’re serving them as a light dessert after dinner or enjoying them as a midday snack.
Kitchen Tools You’ll Need
- Mixing bowls
- Electric mixer or whisk
- Measuring cups
- Measuring spoons
- Baking dish
Ingredients
- 1 Cup Gluten Free 1-to-1 Flour Blend (provides structure)
- ½ Cup Vegan Butter (cold & cut into cubes; adds richness)
- ½ Cup Powdered Sugar (contributes sweetness and smooth texture)
- ½ teaspoon Salt (enhances flavor)
- 3 Eggs (binds ingredients and adds moisture)
- 1 ¼ Cup Sugar (sweetness and balance)
- 1 Tablespoon Lemon Zest (for bright flavor)
- ½ Cup Lemon Juice (from 2-3 lemons; adds tartness)
- ½ Cup Gluten Free 1-to-1 Flour Blend (for filling, provides thickness)
- Powdered Sugar (for serving, adds a sweet finish)
How to Make Gluten Free Lemon Bars
Step 1. Start by preheating your oven so that it’s warm and ready for baking. This helps ensure that your lemon bars cook evenly and develop a nice texture.
Step 2. In a mixing bowl, combine the gluten-free flour blend, cold vegan butter, powdered sugar, and salt. Use a pastry cutter or your fingers to blend the mixture until it resembles coarse crumbs. This will form the crust, which should feel slightly crumbly but still hold together when pressed.
Step 3. Transfer the crust mixture into a baking dish and press it evenly across the bottom. It’s crucial to create a uniform base for your lemon bars. Bake the crust until it is lightly golden, giving it a firm texture that will hold the filling well.
Step 4. While the crust bakes, prepare the lemon filling. In another bowl, whisk together the eggs and granulated sugar until they are smoothly combined. Some air bubbles are okay, as they help with the texture of the filling.
Step 5. Add the lemon zest and lemon juice to the egg mixture, stirring well to blend everything together. The lemon will add a fresh, vibrant flavor to the filling, making it bright and tangy.
Step 6. Gradually mix in the gluten-free flour blend to the lemon mixture. This step ensures a smooth consistency, and you want to be careful not to overmix, as it can alter the texture.
Step 7. Once the crust has finished baking and cooled slightly, pour the lemon filling over the crust. Make sure it’s evenly distributed to ensure that each bar has the same delicious filling.
Step 8. Return the baking dish to the oven and bake until the filling is set. It should have a slight jiggle when you gently shake the dish, which indicates it’s ready to cool to room temperature.
Step 9. After baking, let the lemon bars cool completely in the pan before slicing. This cooling time helps the filling firm up a bit more. Once cooled, dust them with powdered sugar for a pleasant finish and an extra touch of sweetness.

Serving Suggestions
These gluten-free lemon bars make for a delightful breakfast option, paired alongside a hot cup of tea or coffee. They’re also an ideal treat for snacks, offering a refreshing flavor that can brighten up any moment. At family meals, they stand out as a lovely way to end dinner, appealing to both kids and adults alike. If you happen to have any leftovers, they store well in the fridge and can be enjoyed throughout the week.
Pro Tips for Best Results
- Ensure your butter is cold when making the crust to achieve a flaky texture.
- Allow the lemon bars to cool completely before slicing to maintain clean edges.
- Fresh lemons yield the best flavor, so opt for bright, juicy ones.
- Use a sharp knife for cutting the bars to avoid tearing the filling.
- Dust the powdered sugar right before serving to keep it looking fresh.
- Store in an airtight container to maintain moisture and flavor.
Common Mistakes to Avoid
- Using warm butter: If the butter is too warm, the crust may become too greasy and not hold its shape. Ensure it’s properly cold for the best result.
- Overbaking the crust: Baking too long will dry out the crust. It should be just lightly golden, indicating it’s ready for the filling.
- Not cooling completely: Slicing the lemon bars before they are fully cooled can lead to a messy cut. Be patient for the best presentation.
- Skipping the fresh lemon juice: Bottled lemon juice lacks the brightness of fresh lemons, which can dull the flavor of your filling.
- Not evenly distributing the filling: Pouring the filling unevenly might cause some bars to be overly tart while others are too sweet. Take the time to spread it out.
- Using too much lemon zest: While zest adds flavor, too much can make the filling overly bitter. Stick to the recommended amount for balance.
Variations & Substitutions
If you want to experiment a bit, consider adding a hint of fresh herbs like basil or mint to the filling for a unique twist. Alternatively, you could enhance the filling with a dash of vanilla extract to give it a warm depth of flavor. If you find you need a sweeter option, adding a bit more sugar can also elevate the taste.
Storage & Reheating
To store, place the lemon bars in an airtight container at room temperature for short-term use or refrigerate for longer freshness. If you prefer, you can freeze them for up to a month. For best results when reheating, simply let them come to room temperature. If desired, a quick warm-up in the microwave makes a lovely treat without compromising texture.
Frequently Asked Questions
Can I make this recipe ahead of time?
Absolutely! These lemon bars store well and can be made a day or two in advance. They taste even better after chilling in the fridge, as the flavors have more time to meld.
How long does it last in the fridge?
If stored properly in an airtight container, the lemon bars can last in the fridge for up to a week. Just be sure to keep them well-covered to maintain freshness.
Can I freeze this recipe?
Yes, these lemon bars freeze well! Cut them into squares, wrap them tightly in plastic wrap, and then store them in a freezer-safe bag or container. They can be kept frozen for about a month.
What can I substitute for one ingredient?
If you need to replace the vegan butter, you can use regular unsalted butter instead if you’re not strictly dairy-free. The flavor and texture would remain similar.
Why didn’t my recipe turn out as expected?
There could be a few reasons — perhaps the oven temperature was off, or the mixing wasn’t thorough enough. Double-check your measurements and allow time for cooling before cutting to ensure the best outcome.
Final Thoughts
Making these gluten-free lemon bars is a straightforward process that delivers delightful results. Whether served for breakfast, as an afternoon treat, or at gatherings, their bright flavor and comforting texture make them a reliable choice. The simple act of preparing something with your hands can be very satisfying, and enjoying these bars brings a moment of joy in your day. As you share them with others or savor them solo, their familiar taste brings warmth and comfort to any occasion.

Gluten Free Lemon Bars
Ingredients
For the crust
- 1 Cup Gluten Free 1-to-1 Flour Blend Provides structure
- ½ Cup Vegan Butter Cold & cut into cubes; adds richness
- ½ Cup Powdered Sugar Contributes sweetness and smooth texture
- ½ teaspoon Salt Enhances flavor
For the filling
- 3 Eggs Binds ingredients and adds moisture
- 1 ¼ Cup Sugar Sweetness and balance
- 1 Tablespoon Lemon Zest For bright flavor
- ½ Cup Lemon Juice From 2-3 lemons; adds tartness
- ½ Cup Gluten Free 1-to-1 Flour Blend For filling, provides thickness
For serving
- to taste Powdered Sugar Adds a sweet finish
Instructions
Preparation
- Start by preheating your oven.
- In a mixing bowl, combine the gluten-free flour blend, cold vegan butter, powdered sugar, and salt. Blend until it resembles coarse crumbs.
- Transfer the crust mixture into a baking dish and press it evenly across the bottom.
- Bake the crust until lightly golden.
Filling
- In another bowl, whisk together the eggs and granulated sugar until smoothly combined.
- Add the lemon zest and lemon juice, and stir well.
- Gradually mix in the gluten-free flour blend, ensuring a smooth consistency.
Assembly
- Once the crust has cooled slightly, pour the lemon filling over it.
- Return to the oven and bake until the filling is set.
- Let the lemon bars cool completely before slicing and dusting with powdered sugar.