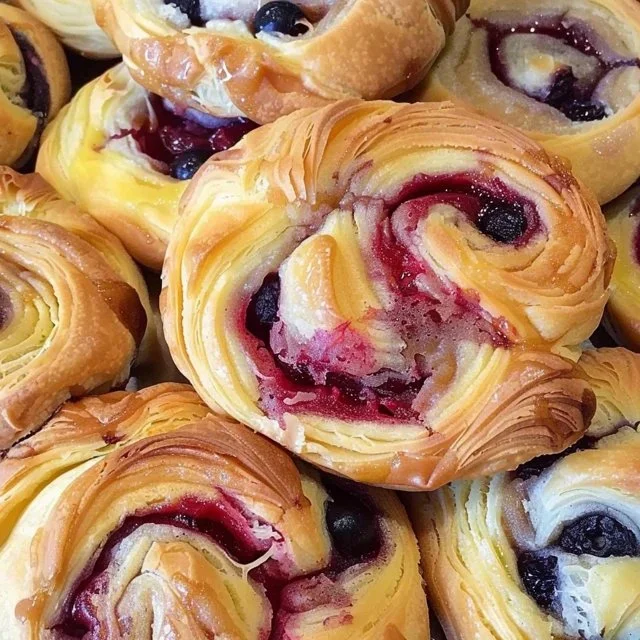
Making a Cherry Cheese Danish brings a comforting blend of textures and flavors into your kitchen. This delightful pastry is perfect for quiet moments, weekend brunches, or when you want to treat friends and family during gatherings. Its simplicity makes it an approachable recipe, allowing you to enjoy the process without feeling overwhelmed. Whether you’re winding down after a long day or enjoying a leisurely morning, this recipe invites you to indulge in a homemade treat that balances sweetness with a creamy, satisfying filling.
Why You’ll Love This Cherry Cheese Danish a Flaky Creamy Bakery-Style Pastry
This Cherry Cheese Danish is both easy to prepare and consistently reliable, making it a go-to for any occasion. The balance of sweet cherry and creamy cheese offers comforting flavors that are sure to please. With practical preparation steps and everyday ingredients, it’s a delightful addition to breakfast or a simple snack that your family will appreciate.
Kitchen Tools You’ll Need
- Mixing bowls
- Rolling pin
- Baking sheet
- Parchment paper
- Whisk
- Spatula
Ingredients
- 2 1/4 cups all-purpose flour (for structure)
- 1/2 teaspoon baking soda (for leavening)
- 1 teaspoon cornstarch (for texture)
- 1/2 teaspoon salt (for flavor)
- 1/2 cup unsalted butter (for richness)
- 4 oz cream cheese (for creaminess)
- 3/4 cup granulated sugar (for sweetness)
- 1/2 cup brown sugar (for depth of flavor)
- 1 large egg (for binding)
- 2 teaspoons vanilla extract (for flavor)
- 1 teaspoon lemon zest (for brightness)
- 1 cup blueberries (for natural sweetness)
- 4 oz cream cheese (for frosting, for creaminess)
- 1/4 cup powdered sugar (for sweetness)
- 1/2 teaspoon vanilla extract (for frosting, for flavor)

How to Make Cherry Cheese Danish a Flaky Creamy Bakery-Style Pastry
Step 1. Begin by combining the all-purpose flour, baking soda, cornstarch, and salt in a mixing bowl. Stir these dry ingredients together until well blended. You want to ensure even distribution of the baking soda and salt throughout the flour. This step is crucial as it sets the foundation for the texture of your Danish.
Step 2. In a separate bowl, cream together the unsalted butter and cream cheese until the mixture is smooth and well combined. This process should take a couple of minutes. You’re looking for a fluffy texture that will help incorporate air into the dough, contributing to its lightness when baked.
Step 3. Gradually add the granulated sugar and brown sugar to the creamed mixture, mixing until everything is well incorporated. As the sugars dissolve, the mixture should become softer and lighter in color. This step enhances the overall flavor and sweetness of your pastry.
Step 4. Beat in the large egg and the vanilla extract, mixing until fully combined. You should notice a shiny, homogeneous mixture as the egg incorporates fully with the other ingredients, yielding a creamy consistency that is essential for the filling.
Step 5. Gently fold in the lemon zest and blueberries. Stir carefully, so the blueberries don’t break apart too much—this prevents the filling from becoming overly watery. The zest adds a lovely brightness that balances the sweetness of the fruit.
Step 6. Gradually incorporate the dry ingredients into the wet mixture, folding gently until just combined. Avoid overmixing at this stage. The dough should be cohesive but still slightly tacky to the touch. This creates a tender texture for your Danish.
Step 7. Lightly flour a clean surface and transfer the dough onto it. Roll the dough out into a rectangular shape that’s about 1/4 inch thick. Be careful to maintain an even thickness for even baking. The rolling process also helps develop the layers in the pastry.
Step 8. Cut the rolled dough into smaller squares, making sure they’re of adequate size to hold the filling. You’ll want to create a shape that will encase your cream cheese and fruit mixture. These squares act as the base for your Danish and should be of uniform size for even cooking.
Step 9. Prepare the filling by mixing the additional cream cheese, powdered sugar, and vanilla extract in a small bowl. Beat until smooth and creamy. This step creates a sweet, velvety filling that contrasts beautifully with the tartness of the blueberries.
Step 10. Place a dollop of the cream cheese filling on the center of each dough square, then top it with a spoonful of the blueberry mixture. This combination of flavors will bring a delightful sweetness to each bite. Make sure not to overfill to avoid spillage during baking.
Step 11. Fold the corners of each dough square towards the center to create a bundle around the filling. Pinch the edges securely to prevent the filling from leaking during baking. This step is crucial for maintaining the shape of the Danish while ensuring the filling remains enclosed and intact.
Step 12. Arrange the filled dough on a parchment-lined baking sheet. Give them a little space, as they will spread slightly during baking. The parchment paper helps prevent sticking and ensures easier cleanup afterward.
Step 13. Preheat your oven while the pastries rest, allowing the dough to slightly rise. This ensures they bake evenly and attain a lovely golden color while providing a soft texture on the inside.
Step 14. As the oven reaches the desired temperature, place the baking sheet in and bake until the Danishes are golden brown and puffed up. This visual cue indicates that the pastries are fully baked and ready to be taken out, showcasing a satisfying finish.
Step 15. Once baked, let the Danishes cool slightly on the baking sheet before removing them to a wire rack. This cooling step helps to set the filling while preventing sogginess from steam.
Step 16. While they cool, prepare the frosting by mixing the remaining cream cheese, powdered sugar, and vanilla extract until smooth. This simple frosting adds a creamy touch that complements the Danish beautifully.
Step 17. Drizzle the cream cheese frosting over the cooled pastries, allowing it to slightly set. This final touch enhances the sweetness and adds an appealing appearance to your finished Cherry Cheese Danishes.
Serving Suggestions
Cherry Cheese Danishes can make an inviting addition to breakfast, perfectly paired with coffee or tea. They also serve wonderfully as a mid-afternoon snack when craving something sweet. Sharing these pastries during family meals can be a real delight, bringing everyone together over comforting flavors. If there are leftovers, they can still be enjoyed the next day, making them a practical choice for a sweet treat.
Pro Tips for Best Results
- Ensure the butter and cream cheese are at room temperature for easier mixing and a smoother texture.
- Avoid overbaking the Danishes, as this can lead to a dry texture. Watch for a golden color.
- Let the Danishes cool slightly before frosting to prevent the icing from melting.
- If your pastry dough feels too sticky, a light dusting of flour while rolling can help.
- Use fresh blueberries for the best flavor; frozen blueberries might add extra moisture.
- Mix the frosting well to ensure it is creamy and easy to drizzle without being too runny.
Common Mistakes to Avoid
- Overmixing the Dough
- Overmixing can lead to tough pastries instead of tender ones. Mixing should be just enough to combine ingredients without developing gluten.
- Not Using Room Temperature Ingredients
- Chilled butter and cream cheese can make mixing difficult and result in a denser dough. Allowing them to warm up creates a better texture.
- Incorrect Oven Temperature
- Baking at the wrong temperature can result in unevenly cooked pastries. Always preheat your oven properly for consistent baking.
- Overfilling the Danishes
- Adding too much filling can cause the pastries to leak during baking. Stick to the recommended amount to keep them contained.
- Not Allowing Enough Cooling Time
- Frosting too soon can melt and run off instead of resting atop the Danish. Allow cooling for a more appealing presentation.
- Skipping the Frosting
- The cream cheese frosting adds another layer of flavor that complements the filling. Don’t skip it, as it enhances the overall enjoyment of the Danish.
Variations & Substitutions
For a variation, consider using different fruits, such as strawberries or raspberries, to change the flavor profile. You can also experiment with flavored cream cheese, like almond or cinnamon, to add a unique twist to the filling. Adjust the frosting by incorporating citrus zest or a hint of almond extract for a delightful alternative.
Storage & Reheating
Cherry Cheese Danishes can be stored at room temperature for up to two days if covered. If you want to keep them longer, refrigerate in an airtight container for up to a week. For freezing, wrap them tightly in plastic wrap and store in a freezer bag for up to three months. When reheating, use an oven to preserve the texture; place them in a preheated oven at 350°F for about 10-15 minutes to warm through and regain some crispness.
Nutrition Information
- Calories: 320
- Total Fat: 18g
- Saturated Fat: 10g
- Carbohydrates: 36g
- Fiber: 1g
- Sugar: 17g
- Protein: 4g
- Sodium: 150mg
Frequently Asked Questions
Can I make this recipe ahead of time?
Yes, you can prepare the dough and filling ahead of time and store them separately in the refrigerator. Just assemble and bake when you’re ready to enjoy.
How long does it last in the fridge?
In the refrigerator, Cherry Cheese Danishes will last for about a week when stored in an airtight container to prevent them from drying out.
Can I freeze this recipe?
Yes, these Danishes freeze well. Freeze them individually after baking, wrapped tightly. Thaw in the refrigerator and reheat before serving.
What can I substitute for one ingredient?
If you want to substitute the cream cheese, ricotta cheese can work as a filling alternative, though it will alter the flavor slightly.
Why didn’t my recipe turn out as expected?
Common issues like temperature inconsistencies, overmixing, or improper measuring can affect the outcome. Stay precise with measurements and baking times for best results.
Final Thoughts
Creating Cherry Cheese Danishes in your kitchen can be a delightful experience filled with comforting aromas and satisfying textures. Whether you’re sharing them with loved ones or enjoying them solo, they offer a sweet escape any time of day. With a straightforward process, you’ll find this recipe a reliable favorite that you’ll return to often, bringing warmth and joy into your home.

Cherry Cheese Danish
Ingredients
Dough
- 2 1/4 cups all-purpose flour for structure
- 1/2 teaspoon baking soda for leavening
- 1 teaspoon cornstarch for texture
- 1/2 teaspoon salt for flavor
- 1/2 cup unsalted butter for richness
- 4 oz cream cheese for creaminess
- 3/4 cup granulated sugar for sweetness
- 1/2 cup brown sugar for depth of flavor
- 1 large egg for binding
- 2 teaspoons vanilla extract for flavor
- 1 teaspoon lemon zest for brightness
- 1 cup blueberries for natural sweetness
Frosting
- 4 oz cream cheese for frosting
- 1/4 cup powdered sugar for sweetness
- 1/2 teaspoon vanilla extract for flavor
Instructions
Preparation
- Combine the all-purpose flour, baking soda, cornstarch, and salt in a mixing bowl. Stir until well blended.
- In a separate bowl, cream together the unsalted butter and cream cheese until smooth and fluffy.
- Gradually add the granulated sugar and brown sugar to the creamed mixture, mixing until well incorporated.
- Beat in the egg and vanilla extract until fully combined.
- Gently fold in the lemon zest and blueberries.
- Gradually incorporate the dry ingredients into the wet mixture, folding gently until just combined.
Shaping
- Lightly flour a clean surface and roll out the dough into a rectangular shape about 1/4 inch thick.
- Cut the rolled dough into smaller squares for the filling.
- Prepare the filling by mixing the remaining cream cheese, powdered sugar, and vanilla extract until smooth.
- Place a dollop of the cream cheese filling on each dough square, then top with a spoonful of the blueberry mixture.
- Fold the corners of each dough square towards the center to create a bundle around the filling.
Baking
- Arrange the filled dough on a parchment-lined baking sheet.
- Preheat your oven while the pastries rest.
- Bake until the Danishes are golden brown and puffed up.
- Let the Danishes cool slightly on the baking sheet before transferring to a wire rack.
Frosting
- Mix the remaining cream cheese, powdered sugar, and vanilla extract until smooth.
- Drizzle the cream cheese frosting over the cooled pastries.


