
Freshly baked bread has a way of bringing comfort to any day. The satisfying, warm texture and incredible aroma fill your home with a sense of welcoming familiarity, making it perfect for quiet moments or bustling weekends alike. There’s nothing quite like enjoying a warm slice with a bit of butter or using it to create your favorite sandwich for a family meal. This Dutch Oven Sourdough Bread is a straightforward recipe that showcases the beauty of simple ingredients. Let’s get started!
Why You’ll Love This Dutch Oven Sourdough Bread
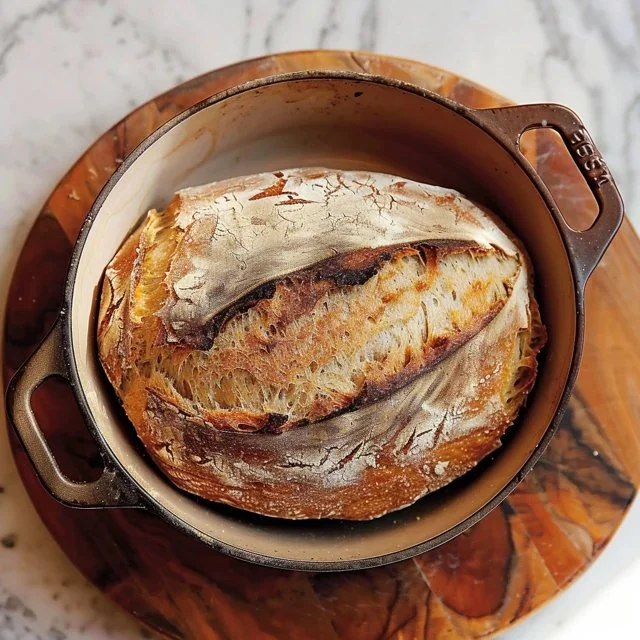
This Dutch Oven Sourdough Bread is truly accessible, offering ease and reliability in its preparation. The combination of flour, water, sourdough starter, and salt results in a balanced flavor that’s comforting and satisfying. With its crusty exterior and chewy interior, this bread is a practical addition to any table, whether you’re enjoying it during breakfast or sharing it at gatherings.
Kitchen Tools You’ll Need
- Dutch oven
- Mixing bowl
- Kitchen scale
- Wooden spoon or dough scraper
- Clean kitchen towel
Ingredients
- 500 grams Organic Bread Flour (provides structure and chew)
- 300 grams Water (hydrates the dough and activates the starter)
- 100 grams Sourdough Starter (leavening agent for rising)
- 10–15 grams Sea Salt (enhances flavor and controls fermentation)

How to Make Dutch Oven Sourdough Bread
Step 1. Begin by combining the organic bread flour, water, and sourdough starter in a large mixing bowl. Use a wooden spoon or a dough scraper to mix until all the ingredients are well incorporated. The dough should be quite shaggy and sticky, which is a good sign that the water is fully absorbed.
Step 2. Once the initial mixture is combined, cover the bowl with a clean kitchen towel. Let it rest for approximately 30 minutes. This rest period, known as autolyse, allows the flour to fully hydrate and begin gluten development, making it easier to knead later.
Step 3. After the autolyse, add the sea salt to the dough. Wet your hands to prevent sticking and then pinch and fold the dough over itself in the bowl, fully incorporating the salt. It’s important to ensure the salt is evenly distributed since it plays a key role in flavor and fermentation.
Step 4. Now it’s time for bulk fermentation, which typically lasts about 4 to 5 hours at room temperature. During this time, gently stretch and fold the dough every 30 minutes for the first two hours. This technique helps build strength in the dough without extensive kneading. You can tell it’s ready when it has visibly increased in size and appears bubbly.
Step 5. After bulk fermentation, turn the dough out onto a lightly floured surface. Shape it into a round loaf by folding the edges toward the center and gently tightening its surface by rolling it on the countertop. Let it rest for about 20 to 30 minutes, covered with the kitchen towel.
Step 6. After resting, it’s time to shape the dough again. Flip the dough seam-side up and gently shape it into a tighter round loaf. Use your hands to form it, making sure to promote tension on the surface. Transfer it to a well-floured proofing basket or bowl, seam side up, for the final proofing.
Step 7. Cover the loaf with the towel and allow it to rise at room temperature for about 1 to 2 hours, until it has noticeably puffed up. You’re looking for a slight indentation when you gently poke it with your finger—this indicates it’s ready for baking.
Step 8. Preheat your oven to the desired temperature while your loaf completes its final rise. Once preheated, carefully place your Dutch oven on the stovetop to heat up even more.
Step 9. Once the oven is ready, carefully remove the hot Dutch oven. Gently flip the loaf out of the proofing basket onto a piece of parchment paper. Dust the top with flour if desired.
Step 10. Using the parchment paper, lift the loaf and place it directly into the hot Dutch oven. Cover with the lid and return to the oven. The steam created inside the pot will help develop the crust and keep the loaf moist.
Step 11. Bake the bread with the lid on for about 30 minutes. This step allows the dough to rise fully, creating that wonderful, airy interior. After 30 minutes, remove the lid and continue baking for another 15 to 20 minutes, until the crust is a deep, golden brown.
Step 12. Once baked, carefully remove the bread from the Dutch oven and transfer it to a wire rack to cool completely. This cooling stage is crucial as it allows the crumb to set.

Serving Suggestions
This delightful sourdough bread can be enjoyed in a multitude of ways. Slice it for breakfast alongside some butter and your favorite jam, or use it to make hearty toast topped with avocado and a sprinkle of salt. It’s also excellent as a base for sandwiches, pairing well with anything from deli meats to cheese. Leftovers can be stored and sliced for easy lunch options or even transformed into croutons for a salad.
Pro Tips for Best Results
- Ensure your sourdough starter is bubbly and active before use for optimal rising.
- Use a kitchen scale for precise measurements, enhancing the recipe’s reliability.
- Adjust the proofing environment’s temperature to encourage fermentation; a slightly warmed area aids the dough’s rise.
- Don’t skip the resting periods; these are essential for the texture and flavor development.
- Be patient with the cooking process to allow flavors to deepen and texture to develop fully.
Common Mistakes to Avoid
- Using an inactive starter: If your sourdough starter isn’t bubbly or has been neglected, the bread won’t rise well. Always ensure it’s fed and active before starting your dough.
- Not allowing enough time for bulk fermentation: Rushing the fermentation can lead to dense bread. Allow adequate bulk rising time to develop flavor and texture.
- Skipping the autolyse step: Failing to let the flour and water rest can result in a less cohesive dough. This crucial step helps create extensibility in the dough.
- Poor shaping techniques: Mishandling the dough during shaping can lead to a flat loaf. Be gentle yet deliberate in tightening the surface to develop structure.
- Baking at the wrong temperature: An oven that’s not hot enough can prevent crust formation. Preheating your Dutch oven is vital for achieving a beautiful crisp crust.
- Not cooling the bread properly: Cutting into the bread too soon can lead to a gummy texture. Always let it cool completely on a rack for the best results.
Variations & Substitutions
Experiment with this basic recipe by incorporating whole grains into the flour mixture for added nutrition. You might also consider adding a small amount of your favorite seeds to the dough for extra flavor and texture. Alternatively, try using this sourdough recipe as a base for creating flavorful focaccia by adding herbs and olive oil before baking.
Storage & Reheating
Store your bread at room temperature in a paper bag or wrapped in a clean kitchen towel to maintain its crust. For longer freshness, you can refrigerate it, but note this may affect the texture. To freeze, slice the bread and place it in a freezer-safe bag. When ready to eat, reheat slices in a toaster or warm whole loaves in the oven, wrapped in foil, to preserve the crust.
Frequently Asked Questions
Can I make this recipe ahead of time?
Yes, you can prepare the dough in advance. After bulk fermentation, you can refrigerate the dough for up to 24 hours before shaping. Allow it to come to room temperature before proceeding with the final proof and baking steps.
How long does it last in the fridge?
When stored properly in an airtight container or bag, the sourdough can last about a week in the fridge. However, its texture may change as it stales more quickly than bread stored at room temperature.
Can I freeze this recipe?
Yes, this bread freezes well. Allow it to cool completely, slice it, and wrap it tightly in plastic wrap or aluminum foil before placing it in a freezer-safe bag. It can last for about three months in the freezer.
What can I substitute for one ingredient?
The main ingredients have specific roles, but if you’re out of sea salt, you can use regular table salt in the same amount. Just keep in mind that the flavor might be slightly different.
Why didn’t my recipe turn out as expected?
Various factors could contribute to unexpected results, such as using an inactive starter, not allowing enough rising time, or baking at inconsistent temperatures. Ensure your ingredients are active and fresh, and follow the steps closely for better outcomes.
Final Thoughts
Making Dutch Oven Sourdough Bread is a rewarding experience that fills your kitchen with delicious aromas and inviting textures. Each step offers an opportunity to connect with the ingredients and the process, resulting in a loaf that is not only satisfying to create but also to share. Enjoy the delightful flavors and consider this recipe a simple yet fulfilling addition to your cooking repertoire.

Dutch Oven Sourdough Bread
Ingredients
For the Bread
- 500 grams Organic Bread Flour Provides structure and chew
- 300 grams Water Hydrates the dough and activates the starter
- 100 grams Sourdough Starter Leavening agent for rising
- 10-15 grams Sea Salt Enhances flavor and controls fermentation
Instructions
Preparation
- Combine the organic bread flour, water, and sourdough starter in a large mixing bowl and mix until well incorporated.
- Cover with a clean kitchen towel and let it rest for approximately 30 minutes.
- Add the sea salt to the dough and mix by pinching and folding the dough over itself.
Bulk Fermentation
- Allow the dough to undergo bulk fermentation for 4 to 5 hours at room temperature, stretching and folding every 30 minutes for the first two hours.
Shaping
- Turn the dough out onto a lightly floured surface and shape it into a round loaf.
- Let it rest for 20 to 30 minutes, covered with a towel.
- Shape the dough again, flipping seam-side up and tightening the surface.
- Transfer to a well-floured proofing basket or bowl, seam side up for final proofing.
Final Rise and Baking
- Let it rise for 1 to 2 hours until noticeably puffed up.
- Preheat the oven and heat up the Dutch oven on stovetop.
- Flip the loaf onto parchment paper, dust with flour, and place it into the hot Dutch oven.
- Bake with the lid on for 30 minutes, then remove the lid and bake for another 15 to 20 minutes until the crust is golden brown.
- Remove the bread from the Dutch oven and cool on a wire rack completely.


