There’s something satisfying about making a sweet treat from scratch. Gluten-free lemon bars offer a perfect balance of tangy and sweet, making them a delightful addition to any occasion. Whether you enjoy them on a quiet weekend afternoon or as a light dessert after a family meal, these bars provide comfort and a taste of brightness. Their simplicity makes them accessible for both novice and experienced cooks alike. Let’s get right into how to prepare these zesty delights.
Why You’ll Love This Gluten-Free Lemon Bars
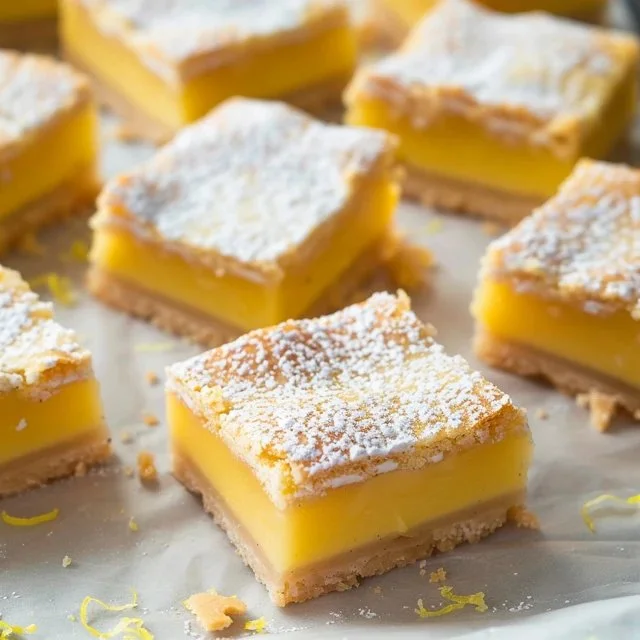
These gluten-free lemon bars are easy to make and deliver reliable results every time. They provide a comforting flavor combination that balances tangy lemon with a touch of sweetness. Perfect for everyday desserts or special gatherings, this recipe offers practical value that makes it a great addition to any baker’s repertoire.
Kitchen Tools You’ll Need
- Mixing bowls
- Whisk
- Baking pan
- Spatula
- Measuring cups and spoons
Ingredients
- 1 cup unsalted butter, melted (adds richness and moisture)
- 1/2 cup granulated sugar (provides sweetness and structure)
- 1 teaspoon pure vanilla extract (enhances overall flavor)
- 1/2 teaspoon salt (balances sweetness)
- 2 cups gluten-free all-purpose flour with xanthan gum (gives structure and texture)
- 6 large eggs (provides stability and moisture)
- 2 cups granulated sugar (adds sweetness for the filling)
- 1 cup lemon juice (about 4 lemons) (gives a fresh, tangy flavor)
- 1/2 teaspoon pure vanilla extract (adds depth to the filling)
- 1/2 cup gluten-free all-purpose flour with xanthan gum (thickens filling)
- Powdered sugar for dusting (adds sweetness and visual appeal)

How to Make Gluten-Free Lemon Bars
Step 1. Begin by preheating your oven. You’ll want the environment to be ready for baking while you prepare the batter. It’s important to ensure that your baking pan is ready as well, typically greased or lined with parchment paper to prevent sticking.
Step 2. In a mixing bowl, combine the melted butter with 1/2 cup of granulated sugar. This mixture needs to be whisked until smooth. The texture should become glossy and slightly thick as the sugar incorporates fully into the butter, indicating you’re ready for the next step.
Step 3. Stir in the vanilla extract and salt into the butter-sugar mixture. Keep mixing until well combined. The vanilla will add a hint of warmth to the overall flavor, while the salt ensures a balanced sweetness.
Step 4. Gradually add the gluten-free all-purpose flour to the mixture. Using a spatula, gently combine the ingredients until they form a cohesive dough. You’ll know it’s ready when no flour streaks remain and it holds together without being sticky.
Step 5. Press the crust mixture evenly into the bottom of your prepared baking pan. Aim for a smooth, flat layer that covers the base completely. This crust will serve as the foundation for your lemon filling, so make sure it’s compact.
Step 6. Bake the crust in the preheated oven until it is lightly golden, which should take about 20–25 minutes. Keep an eye on it as it cooks; the edges should look firm and slightly browned, indicating the crust is done but not overcooked.
Step 7. While the crust is baking, prepare the lemon filling. In a clean mixing bowl, whisk together the eggs until they are well combined and frothy. This step is crucial, as aerating the eggs will contribute to the filling’s texture.
Step 8. Add the 2 cups of granulated sugar to the eggs, whisking until everything is smoothly blended. The mixture will become thicker and more voluminous as the sugar dissolves, adding to the overall texture of the filling.
Step 9. Stir in the lemon juice and the additional vanilla extract. This is where the brightness of the lemon truly comes through. Mix well until the liquid is fully integrated, creating a tangy, sweet blend.
Step 10. Gradually mix in the 1/2 cup of gluten-free all-purpose flour until combined. The flour will help thicken the filling, giving it a nice, custardy consistency. The filling should be smooth and glossy when it’s ready to be poured onto the crust.
Step 11. Once the crust is finished baking and is slightly cooled, pour the lemon filling over it. Carefully spread it out with a spatula to ensure even coverage. The filling will bake into the crust, creating that lovely layered effect.
Step 12. Return the pan to the oven and bake until the filling is set and only jiggles slightly in the center, which should be around another 20–25 minutes. You want a firm texture that signals the filling is fully cooked but still creamy.
Step 13. After baking, allow the lemon bars to cool to room temperature in the pan. This step helps the filling to set completely, which makes for cleaner cuts when you slice them up into portions.
Step 14. Once cool, dust the top of the bars with powdered sugar for a lovely finish. The sugar adds a nice touch of sweetness and visual appeal without overwhelming the tartness of the lemon.

Serving Suggestions
These gluten-free lemon bars excel as a light dessert following family meals or as a sweet treat during weekend gatherings. They make a great breakfast option when paired with a cup of tea or coffee, offering a bright start to your day. Enjoy them as an afternoon snack, or share leftovers with friends for a delightful surprise. Their refreshing flavor can brighten any moment.
Pro Tips for Best Results
- Let the crust cool slightly before adding the filling for better texture.
- Use freshly squeezed lemon juice for the best flavor; bottled juice may lack the same brightness.
- Ensure eggs are at room temperature for better emulsification in the filling.
- Slice the lemon bars using a sharp knife for cleaner edges; wiping the knife between cuts can help.
- Dust powdered sugar just before serving to keep it from absorbing moisture and losing its appearance.
- Store leftover bars in the refrigerator to maintain freshness.
Common Mistakes to Avoid
- Not cooling the crust: If you pour filling onto a hot crust, it can result in a soggy bottom. Let it cool slightly before adding the lemon mixture.
- Using bottled lemon juice: While convenient, pre-packaged juice can taste stale compared to fresh juice. Always opt for fresh lemons for the best flavor.
- Overbaking the filling: This can lead to a dry texture. Keep an eye on the bars and remove them as soon as the filling is set and barely jiggly.
- Skipping the dusting of powdered sugar: Not dusting the bars can make them look flat and uninviting. This final touch enhances their appearance and adds a sweet finish.
- Not pressing the crust firmly enough: If the crust isn’t compact, it may crumble when sliced. Ensure it’s evenly pressed into the pan for stability.
- Cutting too soon: Allow the bars to cool fully before cutting to ensure clean slices and that the filling sets properly.
Variations & Substitutions
Feel free to add a hint of lemon zest to the filling for an extra burst of flavor. You could experiment with different citrus, such as lime or orange, to create your own twist on the classic lemon bar. If you’re looking for a different texture, consider adding a layer of fruit preserves on the crust before the lemon filling.
Storage & Reheating
Store any leftover lemon bars at room temperature for a day, but for longer storage, place them in the refrigerator. They’ll keep well in an airtight container for up to a week. If you want to freeze them, wrap individual bars tightly in plastic wrap and place them in an airtight container for up to two months. For best texture, thaw in the refrigerator and enjoy them cold or at room temperature.
Frequently Asked Questions
Can I make this recipe ahead of time?
Yes, this recipe can be made in advance. Once the bars are baked and cooled, you can store them in the refrigerator for up to a week. This makes them a great option for parties or family gatherings.
How long does it last in the fridge?
Gluten-free lemon bars typically last about 5 to 7 days in the refrigerator when stored in an airtight container. Make sure to let them cool fully before storing.
Can I freeze this recipe?
Absolutely. Lemon bars can be frozen for up to two months. Wrap them in plastic wrap, then place them in a freezer-safe bag or container to protect against freezer burn.
What can I substitute for one ingredient?
If you need to replace the gluten-free all-purpose flour, you could try using almond flour, which will slightly alter texture and taste. However, the xanthan gum is important for consistency, so be mindful of that.
Why didn’t my recipe turn out as expected?
Common issues may arise from inaccurate measurements, especially with gluten-free flours. Ensure you’re using correct measuring techniques and carefully monitoring baking times to achieve desirable results.
Final Thoughts
Making gluten-free lemon bars can be a fulfilling process, bringing a taste of sunshine to your kitchen. The refreshing tang of lemon paired with a sweet, buttery crust creates a delightful treat that’s satisfying to eat. They’re warm and inviting, perfect for sharing with family or enjoying during quiet moments. No matter the occasion, these bars are sure to bring a little brightness to your day.

Gluten-Free Lemon Bars
Ingredients
Crust Ingredients
- 1 cup unsalted butter, melted adds richness and moisture
- 1/2 cup granulated sugar provides sweetness and structure
- 1 teaspoon pure vanilla extract enhances overall flavor
- 1/2 teaspoon salt balances sweetness
- 2 cups gluten-free all-purpose flour with xanthan gum gives structure and texture
Filling Ingredients
- 6 large eggs provides stability and moisture
- 2 cups granulated sugar adds sweetness for the filling
- 1 cup lemon juice (about 4 lemons) gives a fresh, tangy flavor
- 1/2 teaspoon pure vanilla extract adds depth to the filling
- 1/2 cup gluten-free all-purpose flour with xanthan gum thickens filling
- powdered sugar for dusting adds sweetness and visual appeal
Instructions
Preparation
- Preheat your oven and prepare the baking pan (greased or lined with parchment paper).
- In a mixing bowl, combine the melted butter with 1/2 cup of granulated sugar, whisking until smooth.
- Stir in the vanilla extract and salt until well combined.
- Gradually add 2 cups of gluten-free all-purpose flour, gently combining until a cohesive dough forms.
- Press the crust mixture evenly into the bottom of your prepared baking pan.
- Bake the crust in the preheated oven for about 20–25 minutes until lightly golden.
Filling Preparation
- While the crust is baking, whisk together the eggs in a clean mixing bowl until frothy.
- Add 2 cups of granulated sugar to the eggs, whisking until smooth.
- Stir in the lemon juice and the additional vanilla extract until well mixed.
- Gradually mix in the 1/2 cup of gluten-free all-purpose flour until fully combined.
Final Baking
- Once the crust is done and slightly cooled, pour the lemon filling over it.
- Return the pan to the oven and bake for another 20–25 minutes until the filling is set but slightly jiggles in the center.
- Cool the lemon bars to room temperature in the pan before slicing.
- Dust with powdered sugar before serving.


