Making homemade peanut butter cups is a delightful way to enjoy a comforting treat that feels indulgent yet is surprisingly simple to prepare. Perfect for weeknights, weekend gatherings, or those quiet moments when you need a little pick-me-up, this recipe embodies practicality and ease. The balance of flavors and textures—from rich chocolate to creamy peanut butter—comes together to create a satisfying snack or dessert. Let’s dive into this easy recipe that’s sure to bring a smile.
Why You’ll Love This Recipe easy Homemade Peanut Butter Cups recipe
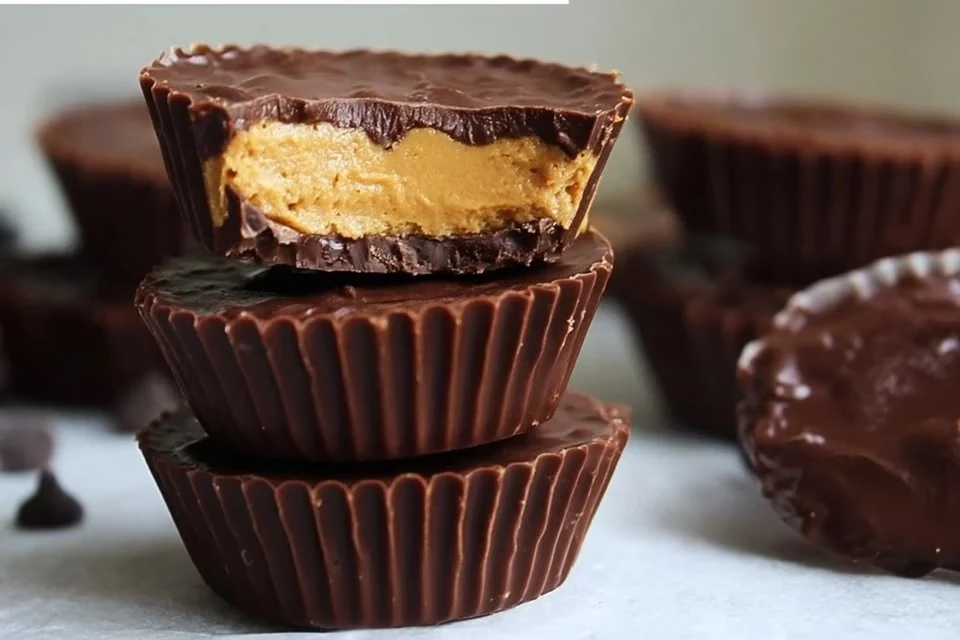
This recipe is reliable and easy to follow, making it perfect for cooks of all skill levels. The comforting combination of rich dark chocolate and the creamy, slightly salty peanut butter flavor provides a balanced treat that satisfies cravings. Plus, the practical nature of this dessert means it can be enjoyed any time, whether as a quick snack or a sweet ending to a family meal.
Kitchen Tools You’ll Need
- Mixing bowl
- Measuring cups
- Spoon or spatula
- Microwave-safe bowl
- Baking tray or a dish for setting
Ingredients
- ½ cup Powdered Peanut Butter (dry, easy to mix)
- 1 scoop Protein Powder (adds structure and nutrition)
- ½ cup Water (moisture for mixing)
- 1 cup Dark Chocolate Chips (rich flavor and smooth texture)
- 1 tablespoon Coconut Oil (helps to thin chocolate and adds moisture)
How to Make Homemade Peanut Butter Cups
Step 1. Start by combining the powdered peanut butter and protein powder in a mixing bowl. Slowly add the water while stirring. Continue mixing until you achieve a smooth and creamy consistency. Make sure there are no lumps, as this ensures a deliciously silky filling later on.
Step 2. Next, take a microwave-safe bowl and add the dark chocolate chips along with the coconut oil. Microwave in short intervals, stirring in between, until fully melted and smooth. This careful heating prevents burning, and the added coconut oil will help create a glossy finish.
Step 3. Once the chocolate mixture is smooth, prepare your baking tray or dish by lining it with parchment paper. This step is essential to prevent the cups from sticking. Pour a layer of the melted chocolate into the bottom of each cup, ensuring it covers the base evenly.
Step 4. After you’ve poured the first layer, place the tray in the fridge for about 10-15 minutes, or until the chocolate has set. Be attentive to this step, as a well-set layer is crucial for the structure of your peanut butter cups.
Step 5. Remove the tray from the fridge and spoon a portion of the peanut butter mixture over the set chocolate layer. Try to keep the filling centered and avoid touching the edges. Spreading it evenly will help maintain a nice balance of flavors in each bite.
Step 6. Lastly, pour the remaining melted chocolate on top of the peanut butter filling until it’s completely covered. Spread it out gently to ensure the filling is sealed within the chocolate. Return the tray to the fridge to let everything set completely, which typically takes around 30 minutes.
Serving Suggestions
These homemade peanut butter cups make a fantastic snack for any time of the day. They can be enjoyed as a sweet breakfast option paired with a cup of coffee or as an after-dinner treat. They’re great for sharing at family gatherings, providing a delightful dessert that pleases everyone. Also, if you have leftovers, simply store them in an airtight container for a quick grab-and-go option throughout the week.
Pro Tips for Best Results
- Use high-quality dark chocolate for a richer flavor.
- Ensure the peanut butter mixture is well-combined for a smooth texture.
- Allow both the chocolate and the filling to cool slightly before layering to maintain integrity.
- Don’t overheat the chocolate; stirring in intervals helps prevent it from seizing.
Common Mistakes to Avoid
- Not mixing the powders thoroughly: Failing to blend the powdered peanut butter with the protein powder can result in a lumpy filling. This affects texture, making the cups less enjoyable. Always ensure a smooth mixture before proceeding.
- Overheating chocolate: Chocolate can quickly burn in the microwave, leading to a grainy texture that ruins the cups. Always use short bursts of heat, stirring in between, until just melted.
- Skipping the chilling step: If you don’t allow the first chocolate layer to set properly, the filling may collapse into it, creating a mess. Make sure it’s completely firm before adding the filling.
- Uneven distribution of filling: Not centering or evenly distributing the peanut butter filling can lead to unbalanced flavors. Be careful to spread it evenly and keep it away from the edges.
- Using low-quality ingredients: Subpar chocolate or peanut butter can diminish the overall taste. Invest in good quality products for the best outcome in flavor and texture.
- Improper storage: Storing the cups improperly can lead to them becoming too soft or sticky. Always keep them in an airtight container and refrigerate to preserve firmness.
Variations & Substitutions
For a unique twist, consider adding a pinch of sea salt on top before the chocolate sets for a salted caramel flavor. You could also blend in a bit of vanilla extract to enrich the peanut butter flavor. For chocolate lovers, try using milk chocolate instead of dark for a sweeter treat.
Storage & Reheating
Store any leftover peanut butter cups at room temperature for a short period, but it’s best to refrigerate them to maintain texture. They can easily last in the fridge for about a week. If you would like to enjoy them later, they can be frozen for up to three months. To reheat, simply let them sit at room temperature for a few minutes; avoid microwaving to preserve their lovely texture.
Nutrition Information
- Calories: 250
- Total Fat: 15g
- Saturated Fat: 7g
- Carbohydrates: 25g
- Fiber: 3g
- Sugar: 15g
- Protein: 8g
- Sodium: 25mg
Frequently Asked Questions
Can I make this recipe ahead of time?
Yes, you can prepare these peanut butter cups ahead of time. They store well in the refrigerator or freezer, making them convenient for quick snacks or desserts throughout the week.
How long does it last in the fridge?
When stored properly in an airtight container, these homemade peanut butter cups will last about one week in the refrigerator, maintaining their texture and flavor.
Can I freeze this recipe?
Absolutely. You can freeze the peanut butter cups for up to three months. Just make sure they are well wrapped or stored in an airtight container to prevent freezer burn.
What can I substitute for one ingredient?
If you don’t have powdered peanut butter, you can substitute it with regular peanut butter. However, this may change the texture and moisture of the filling, making it slightly less firm.
Why didn’t my recipe turn out as expected?
Common issues include overheating the chocolate, not allowing layers to set properly, or uneven mixing of ingredients. Following the steps carefully can help avoid these pitfalls and ensure a better result.
Final Thoughts
Making homemade peanut butter cups is a rewarding experience that combines simplicity with delicious flavor. Each bite offers a satisfying blend of sweetness and creaminess that can be enjoyed anytime. With a little preparation and attention to detail, you can create these delightful treats that bring comfort and joy. Enjoy your time in the kitchen, and trust that your effort will yield delightful results.

Homemade Peanut Butter Cups
Ingredients
Peanut Butter Filling
- ½ cup Powdered Peanut Butter dry, easy to mix
- 1 scoop Protein Powder adds structure and nutrition
- ½ cup Water moisture for mixing
Chocolate Coating
- 1 cup Dark Chocolate Chips rich flavor and smooth texture
- 1 tablespoon Coconut Oil helps to thin chocolate and adds moisture
Instructions
Preparation of Filling
- Combine the powdered peanut butter and protein powder in a mixing bowl.
- Slowly add the water while stirring until you achieve a smooth and creamy consistency.
Melting Chocolate
- In a microwave-safe bowl, add the dark chocolate chips and coconut oil.
- Microwave in short intervals, stirring in between, until fully melted and smooth.
Assembling Cups
- Line a baking tray with parchment paper.
- Pour a layer of melted chocolate into the bottom of each cup.
- Chill in the fridge for about 10-15 minutes or until the chocolate has set.
- Spoon a portion of the peanut butter mixture over the set chocolate layer.
- Pour the remaining melted chocolate on top until completely covered.
- Return to the fridge and let everything set completely, around 30 minutes.


