
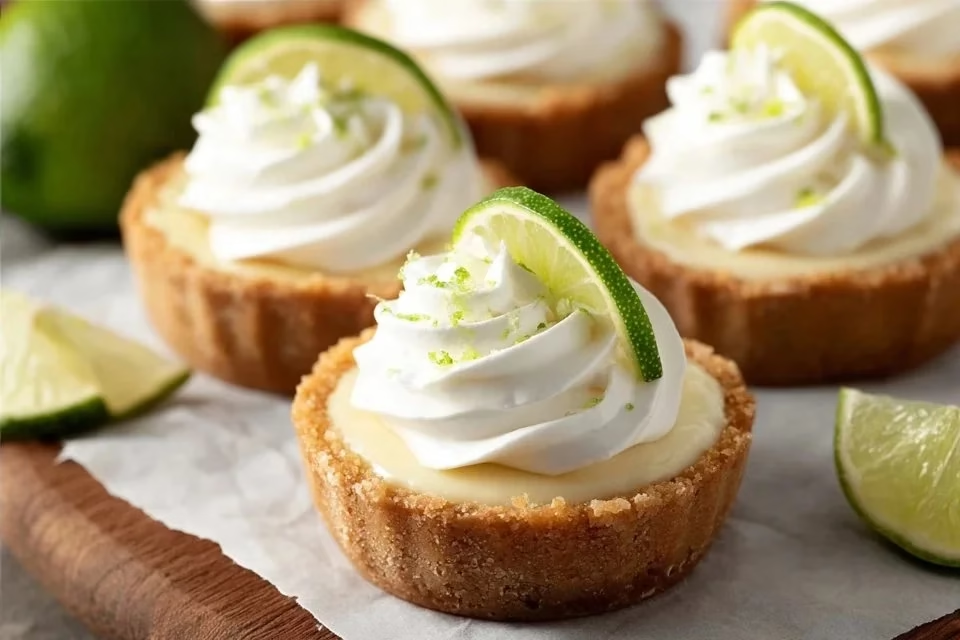
There’s something special about crafting a sweet treat that feels both indulgent and simple. These Mini Key Lime Pies are delightful to whip up for a weeknight dessert or during leisurely weekend gatherings. With a satisfyingly creamy filling nestled in a buttery graham cracker crust, they strike a perfect balance that can bring comfort in quiet moments or as part of a festive spread. They are about enjoying a gentle process and sharing something homemade. Let’s dive into how to make these little delights.
Why You’ll Love This The BEST Mini Key Lime Pies
This recipe showcases the ease and reliability of preparing a comforting dessert that balances bright flavors with creamy textures. The BEST Mini Key Lime Pies bring practical everyday value, making them a go-to for any occasion. Their simple steps lead to satisfying results that can bring a smile to family and friends without requiring extensive downtime in the kitchen.
Kitchen Tools You’ll Need
- Mixing bowl
- Measuring cups
- Spoon or spatula
- 12-cup muffin tin
- Oven
Ingredients
- 1 ½ cups graham cracker crumbs (180 grams)
- ⅓ cup granulated sugar (70 grams)
- 6 tablespoons unsalted butter, melted (85 grams)
- 1 cup key lime juice (240 ml)
- 2 (14-ounce) cans sweetened condensed milk
- 4 large egg yolks at room temperature
- Homemade whipped cream (optional)

How to Make The BEST Mini Key Lime Pies
Step 1. Begin by preheating your oven to 350°F. It’s important to have it warmed up so that the crust can bake evenly, giving you that good toasted flavor that pairs beautifully with the filling.
Step 2. In a mixing bowl, combine the graham cracker crumbs and granulated sugar. Use a spoon to mix them well; you want to evenly distribute the sugar throughout the crumbs, as this will add sweetness to the crust.
Step 3. Pour in the melted unsalted butter and mix until the crumbs are evenly coated. The mixture should have a sandy texture that holds together when pressed. This will form your crust, so ensure it’s mixed thoroughly but not overly soggy.
Step 4. Grease your muffin tin lightly to prevent sticking. Evenly distribute the crumb mixture into the muffin cups, pressing it down firmly with the back of a spoon to create compact bases. This compactness helps the crust hold its shape when baked.
Step 5. Bake the crusts in the preheated oven for about 8-10 minutes or until they turn a light golden brown. Keep an eye on them; the edges should be firm, and the center will begin to set slightly. This baking step is key to achieving a perfect texture.
Step 6. While the crusts are cooling, prepare the filling. In a separate bowl, whisk together the sweetened condensed milk and key lime juice until smooth. The acidity of the lime juice will enhance the creaminess of the condensed milk, creating a flavorful base.
Step 7. Next, add the egg yolks to the mixture. Whisk until fully incorporated, creating a silky consistency. The egg yolks will help set the filling, giving it a luscious texture when baked.
Step 8. Carefully pour the filling into the pre-baked crusts, filling each one nearly to the top. It’s okay if they are not perfectly even, as they will expand and settle a bit while baking.
Step 9. Return the muffin tin to the oven and bake for an additional 15-17 minutes. The filling should just set — it might have a slight jiggle but should not look wet. This is key for achieving that creamy texture.
Step 10. Once they’re done, remove the mini pies from the oven and let them cool completely at room temperature. Cooling is essential to allow the filling to set fully, which enhances the final texture.
Step 11. After cooling, you can chill the pies in the refrigerator for a bit, which makes them even more refreshing. If desired, top with homemade whipped cream before serving for extra indulgence.

Serving Suggestions
These delightful Mini Key Lime Pies are versatile. They can be enjoyed as a light dessert after family meals or served as a refreshing snack on warmer days. Perfectly portable, they make great contributions to potlucks or picnics. If you have leftovers, they also work well for breakfast — a sweet, tangy start to the day that feels special yet approachable.
Pro Tips for Best Results
- Use fresh key lime juice if you can find it, as it adds a more vibrant flavor than bottled.
- Allow the egg yolks to come to room temperature to ensure they blend more smoothly into the filling.
- Pack the graham cracker crust firmly for better structure and texture.
- Taste the filling before baking to check the sweetness; you can adjust with a little more sugar if desired.
- Chill the mini pies in the refrigerator for a firmer filling if you prefer a dessert that can hold its shape well.
Common Mistakes to Avoid
- Not baking the crust long enough: A crust that isn’t baked thoroughly will be too soft and may crumble. Bake until lightly golden for better texture.
- Overmixing the filling: Whisk just until combined — overmixing can introduce air which may lead to a less smooth filling once baked.
- Using cold egg yolks: Cold yolks don’t incorporate well. Let them reach room temperature to help achieve a smooth consistency in your filling.
- Skipping the cooling step: If you try to serve them warm, the filling may be too loose and messy. Cooling is essential for a firmer texture.
- Pouring filling into hot crusts: If the crust is too hot, it can affect the setting of the filling. Allow the crust to cool before filling.
- Not tasting the filling: Always taste the filling before baking. Adjusting sweetness after baking is much more challenging.
Variations & Substitutions
For a twist, consider adding a bit of coconut extract to the filling for a tropical flair. Alternatively, you can vary the crust by incorporating finely crushed nuts into the graham cracker mixture for added flavor and texture. If you want an even lighter dessert, serve the mini pies with a sprinkle of zest from key limes for an extra pop.
Storage & Reheating
Store any leftovers at room temperature for a short time, but they are best kept in the refrigerator if not consumed within a few hours. In the fridge, they can last up to three days. While freezing is possible, it may alter the texture of the filling. If you choose to freeze them, ensure they are well covered. To eat, simply thaw in the refrigerator overnight for best results.
Frequently Asked Questions
Can I make this recipe ahead of time?
Yes, these mini key lime pies can be made ahead of time. Prepare them a day or two in advance and store them in the refrigerator until you are ready to serve them.
How long does it last in the fridge?
These pies can be kept in the refrigerator for up to three days. Just ensure they are covered to prevent drying out or absorbing other flavors.
Can I freeze this recipe?
While you can freeze them, doing so might change the texture of the filling. If you freeze them, ensure they are well-wrapped and thaw them in the refrigerator overnight when ready to eat.
What can I substitute for one ingredient?
If you need to swap an ingredient, try using lime juice instead of key lime juice for a slightly different taste, keeping the flavor profile similar, though it will be less authentic.
Why didn’t my recipe turn out as expected?
There could be a few reasons, such as not baking the crust long enough or overmixing the filling. Always make sure to follow each step carefully, especially regarding the baking time and temperature.
Final Thoughts
Making Mini Key Lime Pies is an enjoyable experience that offers comforting flavors in a manageable format. The simplicity of their preparation encourages a relaxed approach to baking. Whether you savor one after dinner or share them with loved ones, they have a way of brightening any occasion. Enjoy the process and the little joys these pies bring to your table.

Mini Key Lime Pies
Ingredients
For the crust
- 1.5 cups 1 ½ cups graham cracker crumbs 180 grams
- ⅓ cup ⅓ cup granulated sugar 70 grams
- 6 tablespoons 6 tablespoons unsalted butter, melted 85 grams
For the filling
- 1 cup 1 cup key lime juice 240 ml
- 2 cans 2 (14-ounce) cans sweetened condensed milk
- 4 4 large egg yolks at room temperature
Optional topping
- to taste Homemade whipped cream Optional
Instructions
Preparation
- Preheat your oven to 350°F.
- In a mixing bowl, combine the graham cracker crumbs and granulated sugar. Mix well.
- Pour in the melted butter and mix until crumbs are evenly coated with a sandy texture.
- Grease your muffin tin lightly. Distribute the crumb mixture into the muffin cups, pressing firmly.
- Bake the crusts for about 8-10 minutes or until light golden brown.
Filling
- In a separate bowl, whisk together the sweetened condensed milk and key lime juice until smooth.
- Add the egg yolks to the mixture and whisk until fully incorporated.
- Carefully pour the filling into the pre-baked crusts, filling each nearly to the top.
- Return to oven and bake for an additional 15-17 minutes until just set.
Cooling
- Remove from the oven and let cool completely at room temperature.
- Chill in the refrigerator before serving, optionally topping with whipped cream.


