Making a sweet treat can feel rewarding, especially when it comes together as simply as this recipe. These mini fruit tarts are a delightful way to enjoy fresh fruit on a flaky crust. Whether it’s a weeknight dessert, a weekend snack, or a special addition to gatherings, these tarts bring a touch of charm and joy. Their balanced flavors and customizable nature make them a practical choice for anyone looking to create a bit of comfort in the kitchen. Let’s dive into this easy recipe.
Why You’ll Love This Fresh Mini Fruit Tarts
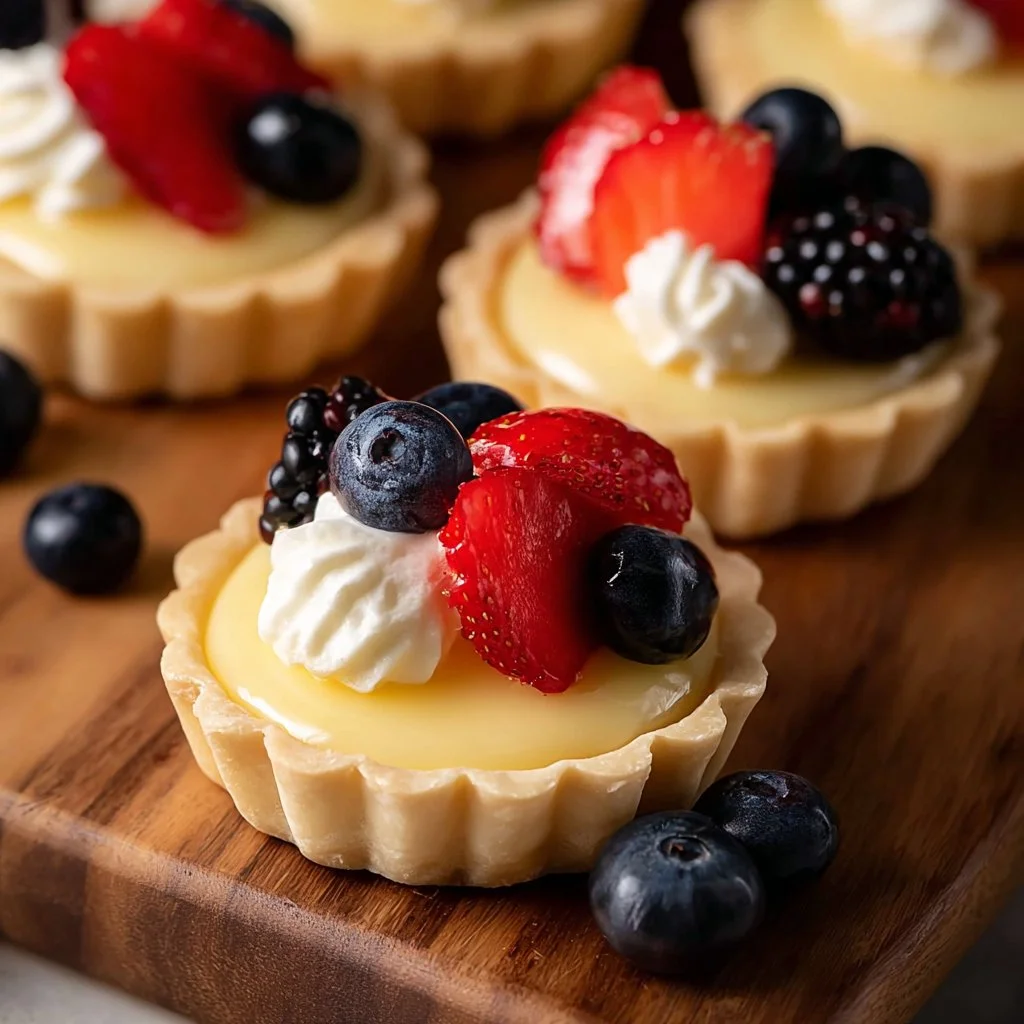
These Fresh Mini Fruit Tarts are incredibly easy to make, providing a comforting experience for any occasion. The combination of buttery crust, creamy filling, and vibrant fruit offers a well-rounded flavor profile. They are perfect for enjoying with family or friends, making them a reliable addition to your everyday cooking. Their balance of flavors is sure to please, making this recipe both enjoyable and practical.
Kitchen Tools You’ll Need
- Mixing bowl
- Rolling pin
- Tartlet pans or muffin tin
- Electric mixer or whisk
- Baking sheet
Ingredients
- All-purpose flour (structure and texture)
- Powdered sugar (sweetness and smoothness)
- Unsalted butter (richness and moisture)
- Salt (enhances flavor)
- Cream cheese (creaminess and tang)
- Vanilla extract (flavor depth)
- Whipped cream (lightness and softness)
- Mixed fresh fruit (strawberries, blueberries, kiwi, raspberries) (freshness and color)

How to Make Fresh Mini Fruit Tarts
Step 1. Begin by preheating your oven as you prepare the crust. In a mixing bowl, combine the all-purpose flour, powdered sugar, and salt. This mixture will form the base of your tarts. Mixing the dry ingredients first helps ensure an even distribution of flavor throughout the crust.
Step 2. Add the unsalted butter to the dry ingredients. Using your fingers or a pastry cutter, blend the butter into the flour mixture until it resembles coarse crumbs. The goal is to create a mixture with small, pea-sized pieces of butter, which will help achieve a flaky texture in the crust once baked.
Step 3. Incorporate a few tablespoons of cold water into the mixture, a little at a time, while mixing until the dough comes together. You want to stop mixing as soon as it forms a cohesive ball; overmixing could lead to a denser texture, so be mindful of how you handle the dough.
Step 4. Lightly flour your work surface and roll out the dough to about 1/8 inch thick. Take care not to roll it too thin, as you’ll need enough dough to hold the filling and fruit toppings without breaking. The dough should be pliable and easy to work with at this stage.
Step 5. Cut the rolled dough into circles to fit your tartlet pans or muffin tin. Gently press each circle into the pans, ensuring the dough rises slightly above the edges. This will help contain the creamy filling and fruits later on.
Step 6. Place the filled pans on a baking sheet and bake in the preheated oven until the edges are lightly golden. Keep an eye on them, as they should be firm yet not overly browned. Once baked, allow the crusts to cool completely before adding the filling.
Step 7. In a clean mixing bowl, beat together the cream cheese and vanilla extract until smooth and creamy. This mixture will serve as the dessert’s rich filling. Scrape the sides of the bowl as needed to ensure everything is well combined.
Step 8. Once the crusts have cooled, gently fold the whipped cream into the cream cheese mixture. This adds an airy lightness to the filling while keeping it rich and flavorful. Blend until the mixture is uniformly smooth, just before you fill the tarts.
Step 9. Spoon or pipe the cream cheese filling into each cooled tart shell, filling them generously. You want to create a nice base for the fresh fruit. This creamy layer enhances the overall flavor and adds a pleasing texture contrast to the fruit.
Step 10. Finally, arrange your mixed fresh fruit on top of the filled tarts. The colorful assortment of strawberries, blueberries, kiwis, and raspberries not only adds sweetness but also brings a fresh burst of color to your dessert. This step can be as creative as you like!

Serving Suggestions
These mini fruit tarts can brighten up breakfast, be enjoyed as an afternoon snack, or served at family meals. They make lovely treats for gatherings and special occasions, providing bite-sized comfort that’s easy to share. They are also a great way to use up leftover fruits from the week, inviting flexibility to create your own unique combinations.
Pro Tips for Best Results
- Ensure your butter is cold when making the dough; this helps create a flakier crust.
- Avoid overworking the dough to maintain a tender texture.
- Allow the crusts to cool completely before adding the filling to prevent it from becoming runny.
- Use seasonal fruits for the best flavor and freshness.
- Consider mixing a little extra whipped cream into the filling for a lighter texture.
- Store any leftovers in the refrigerator to keep the fruit fresh.
Common Mistakes to Avoid
- Not chilling the dough: Failing to chill the dough can result in a tough crust. Chill after mixing to allow time for the gluten to relax.
- Overbaking the crust: If baked too long, the crust can become dry. Watch for just a light golden color for perfect results.
- Skipping the cream cheese beating step: Not properly mixing the cream cheese can lead to lumps in your filling, which affects texture. Beat until completely smooth for best results.
- Using too much filling: Overfilling the tarts may cause them to overflow, making a mess. Fill gently to avoid spillage when topping the fruit.
- Cutting the fruit too early: Prepare fruit right before serving to avoid browning or becoming soggy, ensuring a fresh presentation.
- Ignoring variations: Sticking to the same fruits each time can limit flavor. Experiment with different fruits based on what’s available for new tastes.
Variations & Substitutions
For a different flavor profile, consider making a chocolate ganache filling in place of the cream cheese. You can also switch the fruits for whatever is in season—stone fruits like peaches in summer or citrus in winter can be lovely choices.
Storage & Reheating
Store any remaining mini fruit tarts in the refrigerator for up to two days. Keep the fruit tarts covered to prevent drying out and maintaining the freshness of the fruit. While freezing isn’t recommended due to texture changes, you can freeze the baked crusts separately and fill them fresh when ready to serve for optimal taste.
Frequently Asked Questions
Can I make this recipe ahead of time?
Yes, you can prepare the crusts ahead of time and store them in an airtight container. The filling can be made a few hours in advance, but it’s best to add the fruit just before serving for freshness.
How long does it last in the fridge?
The mini fruit tarts will stay fresh in the refrigerator for about two days. After that, the crust may become soggy from the filling and fruit.
Can I freeze this recipe?
Freezing is not recommended for the assembled tarts, as the fruit and whipped cream can change texture. However, you can freeze the baked tart shells and fill them fresh when needed.
What can I substitute for one ingredient?
If you don’t have powdered sugar, granulated sugar can be ground to a fine powder using a blender, though the texture may differ slightly in the crust.
Why didn’t my recipe turn out as expected?
Variations in oven temperature, ingredient measurements, or dough handling can impact results. Make sure to accurately measure and watch baking closely for the best outcomes.
Final Thoughts
Making Fresh Mini Fruit Tarts is an enjoyable experience that brings a warm, rewarding touch to any table. With their delightful flavors and textures, these tarts make for a lovely treat at any time. Creating them offers not just a culinary joy but a celebration of fresh, vibrant ingredients. Embrace this simple recipe, and you’ll find that it brings satisfaction to both cooking and sharing.

Fresh Mini Fruit Tarts
Ingredients
Crust ingredients
- 1 cup All-purpose flour Provides structure and texture.
- 1/4 cup Powdered sugar Adds sweetness and smoothness.
- 1/2 cup Unsalted butter Adds richness and moisture.
- 1/4 teaspoon Salt Enhances flavor.
Filling ingredients
- 8 oz Cream cheese Provides creaminess and tang.
- 1 teaspoon Vanilla extract Depth of flavor.
- 1 cup Whipped cream Adds lightness and softness.
Topping ingredients
- 2 cups Mixed fresh fruit (strawberries, blueberries, kiwi, raspberries) Provides freshness and color.
Instructions
Preparation of Crust
- Preheat your oven.
- In a mixing bowl, combine the all-purpose flour, powdered sugar, and salt.
- Add the unsalted butter to the dry ingredients and blend until it resembles coarse crumbs.
- Incorporate cold water a few tablespoons at a time until the dough comes together.
- Lightly flour your work surface and roll out the dough to about 1/8 inch thick.
- Cut the rolled dough into circles and press them into tartlet pans or muffin tin.
Baking the Crust
- Place the filled pans on a baking sheet and bake until the edges are lightly golden.
- Allow the crusts to cool completely before adding the filling.
Preparing the Filling
- In a clean mixing bowl, beat together the cream cheese and vanilla extract until smooth.
- Gently fold in the whipped cream until the mixture is uniform.
Assembly
- Spoon or pipe the cream cheese filling into each cooled tart shell.
- Arrange the mixed fresh fruit on top of the filled tarts.


