Hi, I’m Salma. I’m 32 years old and living in the United States, and my love for cooking grew from simple curiosity into something that feels like a lifelong passion. My sister and I tested this recipe together — I followed every step carefully while she improvised with wild confidence. There was laughter, a little mess, and a lot of taste-testing. Somehow, both versions worked out perfectly. Cook it and tell me — who’s the better cook in your family?
Why You’ll Love This Recipe
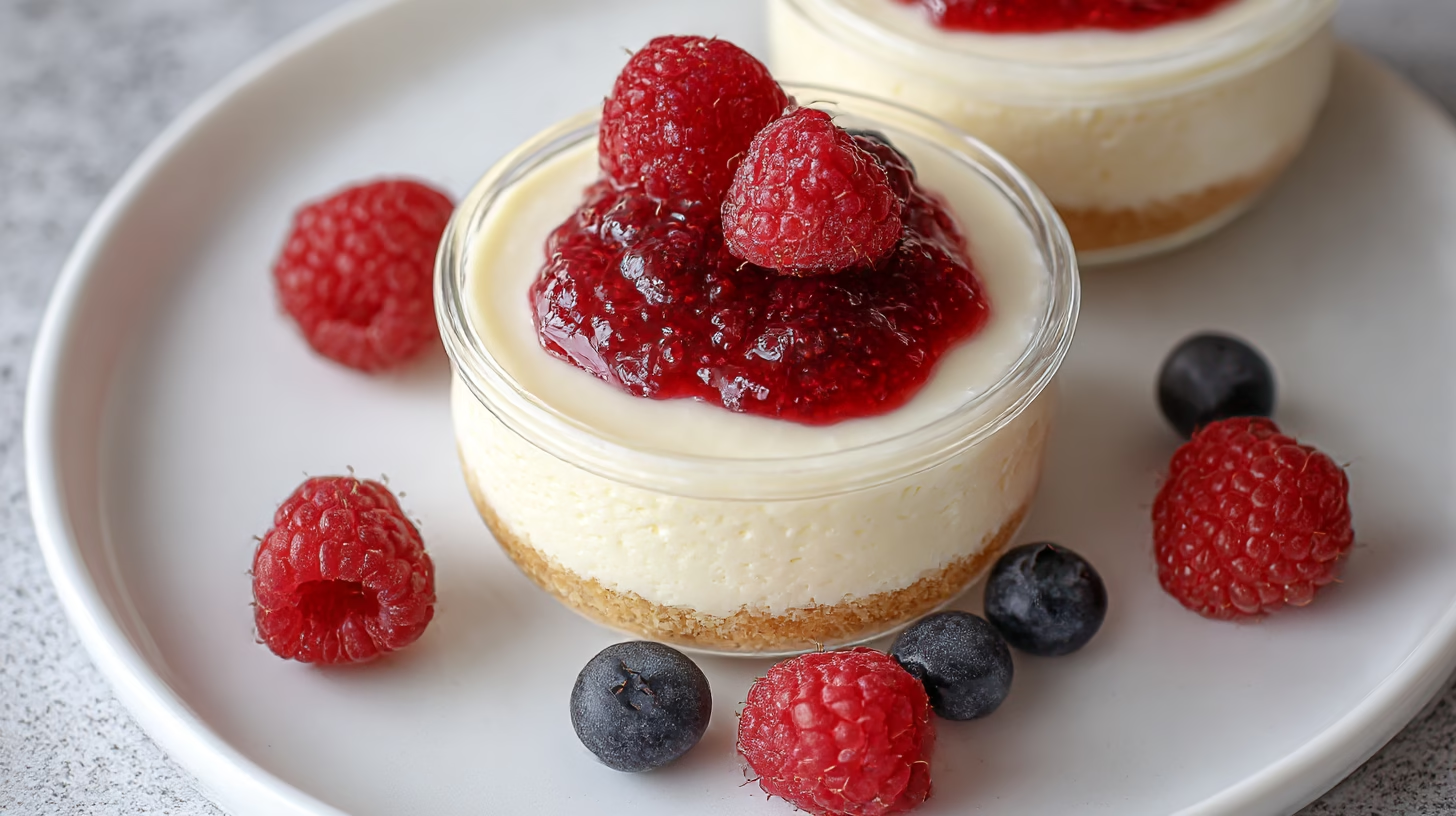
You’ll fall in love with this no-bake cheesecake for so many reasons. It’s quick, light, and full of creamy goodness. The combination of Greek yogurt and pudding mix gives it a luscious texture without the heaviness of traditional cheesecake. Whether you’re making it for a summer party or a cozy weeknight treat, it’s easy, refreshing, and guaranteed to satisfy.
- Lightning-fast prep: This dessert comes together in just 10 minutes.
- Health-conscious treat: Packed with protein and low in fat, it’s a smart indulgence.
- Only three ingredients: Simple, familiar, and easy to find.
- No oven required: Perfect for hot days or beginner cooks.
Ingredients Detailed
- 1 cup vanilla Greek yogurt – creamy and slightly tangy, the base of our cheesecake.
- 2 tablespoons almond milk – helps smooth out the texture and add lightness.
- 1 tablespoon cheesecake pudding mix (Jell-O brand recommended) – gives it that signature cheesecake flavor and thick, silky finish.
Directions (Step-by-Step Cooking Guide)
Step 1: Combine Greek Yogurt and Cheesecake Pudding
In a medium mixing bowl, whisk together the Greek yogurt and cheesecake pudding mix until smooth and well combined. The mixture should look creamy and thick with no visible lumps. Take your time—whisking for an extra minute ensures the pudding mix fully dissolves.
Step 2: Adjust Texture (Optional)
If the mixture feels too thick, stir in a splash of almond milk. This helps create a light, mousse-like consistency that’s easy to spoon and even easier to eat.
Step 3: Chill the Mixture
Spoon the mixture into small cups, ramekins, or a pie dish. Cover and refrigerate for at least 2–4 hours, or until the texture is firm and sliceable.
Step 4: Add Toppings and Serve
Before serving, top with your favorite fresh fruit—berries, banana slices, or mango chunks add a lovely burst of color and freshness. Sprinkle with crushed nuts like almonds or pecans for a crunchy contrast.
Step 5: Enjoy Immediately
Once chilled and topped, your no-bake Greek yogurt cheesecake is ready to serve. Each bite is cool, creamy, and lightly tangy—a perfect balance of flavor and texture.
Cultural or Technique Note
This recipe blends the creamy richness of American-style cheesecake with the light, protein-packed feel of Greek yogurt desserts. The no-bake method, popular in modern kitchens, skips the oven entirely—making it ideal for quick, healthy desserts that still feel special.
Estimated Nutrition
Calories: 150–200
Protein: 5–8g
Fat: 0–3g
Carbohydrates: 30–35g
Serving Suggestions
This No-Bake Greek Yogurt Jello Cheesecake is incredibly versatile — it’s one of those desserts that can look elegant or feel fun depending on how you serve it. Here are a few cozy ways to enjoy it:
- Serve chilled in small glass cups topped with berries. The cool, creamy texture paired with fresh fruit feels refreshing and light.
- Spread over a graham cracker crust for that classic cheesecake feel — no oven required and still just as satisfying.
- Layer with granola for a breakfast-style parfait that’s both indulgent and nourishing.
- Pipe into mini tart shells or small jars for a cute party-friendly version that guests will love.
- Add a drizzle of honey or melted dark chocolate if you want a touch of sweetness or richness.
Pro Tips for Success
- Whisk the pudding mix thoroughly — take your time to eliminate lumps and get a silky finish.
- Chill for at least 4 hours to allow it to set perfectly; overnight is even better.
- Use full-fat Greek yogurt for the richest flavor and creamiest texture.
- Avoid over-thinning with milk; add just enough to reach your desired consistency.
- Garnish just before serving to keep fruit bright and fresh.
- Add a sprinkle of lemon zest if you want a pop of citrus that complements the creamy base beautifully.
Common Mistakes to Avoid
⚠️ Overmixing after adding milk: This can make the mixture too runny — stir gently until smooth.
⚠️ Using regular yogurt: It won’t hold shape; Greek yogurt gives you the thick, cheesecake-like consistency.
⚠️ Skipping the chill time: Patience is key — it won’t set properly if you rush it.
⚠️ Freezing leftovers: The texture will separate and turn grainy — always keep it refrigerated.
⚠️ Adding toppings too early: Moisture from fruit can make the top watery; decorate just before serving.
Storage & Reheating
Fridge: Store in an airtight container for up to 3 days. It’s best within the first two days when the flavor is at its peak.
Freezer: Not recommended, as the yogurt base can become icy and lose its creamy texture.
Reheat: No reheating needed — it’s meant to be enjoyed chilled straight from the fridge.
Frequently Asked Questions (FAQ)
Q1: Why does my cheesecake mixture look lumpy after mixing?
The pudding mix can clump up at first. Whisk vigorously for 1–2 minutes, rest for 5 minutes, then whisk again — it’ll smooth out beautifully.
Q2: Can I add food coloring to this recipe?
: Absolutely! Gel food coloring works best because it won’t thin out the mixture. Try pastel shades for spring or bright colors for parties.
Q3: Why isn’t my cheesecake setting up as firm as regular cheesecake?
: This no-bake version naturally has a softer, mousse-like texture. For a firmer set, chill longer or mix in an extra half tablespoon of pudding mix.
Q4: Can I make it ahead of time?
: Yes! You can prepare it a day before serving — just keep it covered in the fridge and garnish right before serving for the freshest look and taste.
Q5: What toppings pair best with it?
: Fresh berries, crushed graham crackers, a drizzle of honey, or a sprinkle of toasted coconut all complement the tangy, creamy flavor beautifully.
Closing Paragraph
This No-Bake Greek Yogurt Jello Cheesecake proves that you don’t need fancy equipment or long bake times to enjoy something indulgent. It’s light, protein-rich, and so simple to prepare that you’ll find yourself making it again and again. Share it with family, take it to a picnic, or keep a few cups in the fridge for a quick treat that feels like dessert but fits into your healthy routine.
Final Thoughts
There’s something so satisfying about creating a dessert that feels luxurious yet takes almost no effort. This no-bake cheesecake reminds me that simplicity can be delicious, and health doesn’t have to mean sacrifice. I hope it brings you the same cozy joy it brings me every time I make it.

No-Bake Greek Yogurt Cheesecake
Equipment
- Mixing Bowl
- Whisk
- Measuring Spoons
- Serving Cups or Ramekins
- Refrigerator
Ingredients
Base
- 1 cup vanilla Greek yogurt use full-fat for best texture
- 2 tbsp almond milk optional, to adjust texture
- 1 tbsp cheesecake pudding mix Jell-O brand recommended
Optional Toppings
- fresh fruit e.g., berries, mango, or banana
- crushed nuts e.g., almonds or pecans, optional
Instructions
- In a mixing bowl, whisk the Greek yogurt and cheesecake pudding mix until smooth and creamy. Mix thoroughly for 1–2 minutes to dissolve any lumps.
- If needed, stir in almond milk a tablespoon at a time to achieve a light, mousse-like texture.
- Spoon the mixture into ramekins or cups. Cover and refrigerate for 2–4 hours, or until firm and sliceable.
- Top with fresh fruit and a sprinkle of crushed nuts just before serving for added color and crunch.
- Serve chilled and enjoy every cool, creamy spoonful!


