No Bake Peanut Butter Oat Cups are the kind of treat that makes any day feel special. Hi, I’m Anna. Cooking has always been my way of connecting with people I care about—it’s where love and food come together. I pinned this recipe months ago and finally made it one rainy afternoon. The smell of warm peanut butter and chocolate filled my kitchen, and the first bite was pure bliss. If you’ve saved this one too, make it today — it’s pure comfort in every bite.
Why You’ll Love This Recipe
It’s easy, quick, and made with ingredients you probably already have. There’s no baking, no fuss — just a little stirring, pouring, and chilling.
These No Bake Peanut Butter Oat Cups are everything you want in a snack: creamy, rich, sweet but not too sweet, and full of satisfying texture. They’re perfect for peanut butter lovers, and they make a wholesome addition to your “healthy but sweet snacks” list.
Ingredients
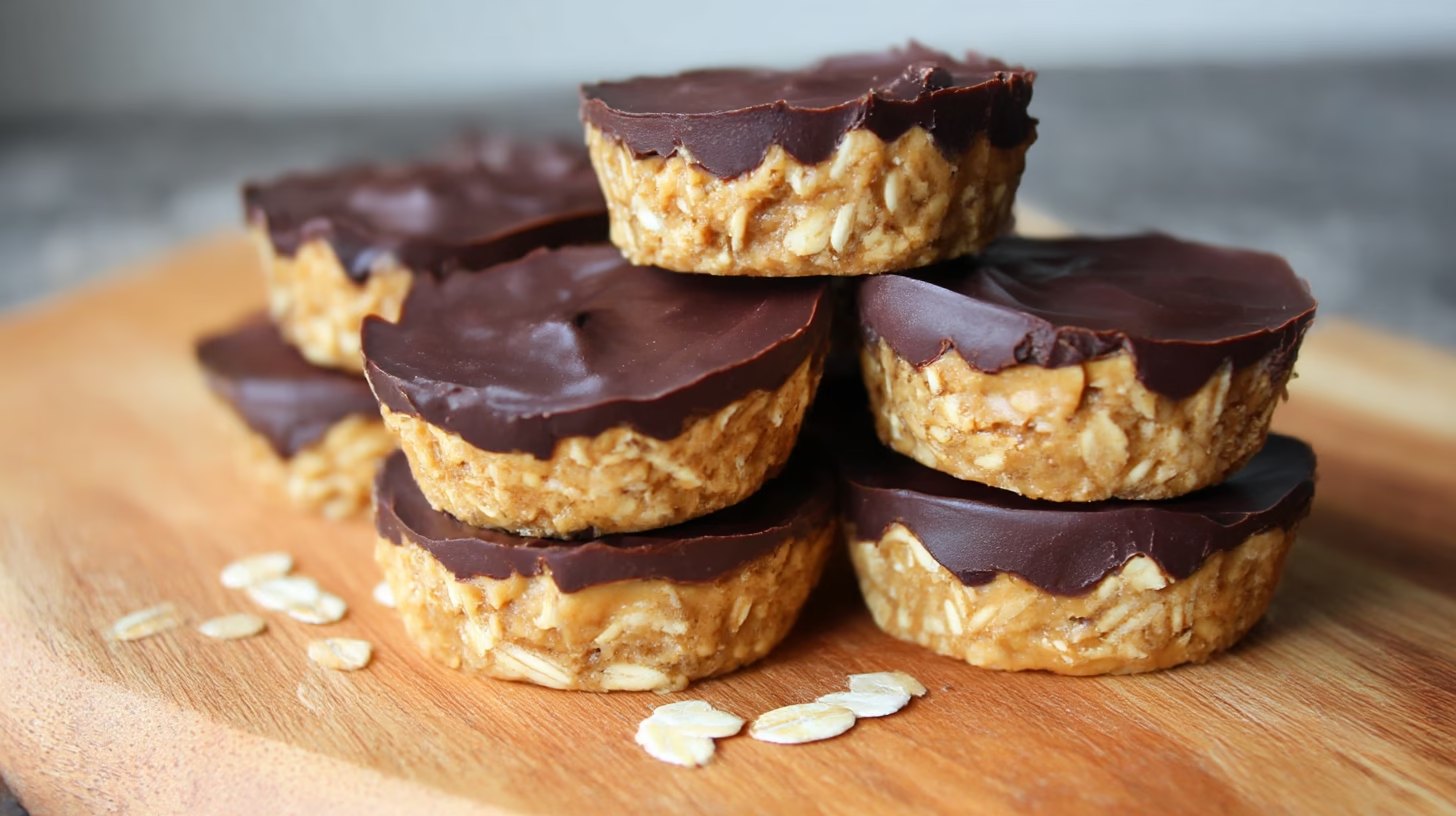
- Oat flour – gives body and a subtle nutty flavor. You can make it by blending rolled oats until fine.
- Peanut butter – creamy, comforting, and full of healthy fats.
- Pure maple syrup – adds natural sweetness and a hint of caramel flavor.
- Chocolate chips – melt into a silky, decadent top layer.
- Coconut oil (optional) – helps the chocolate melt smoothly and set beautifully.
Directions
- Make the base mixture. In a medium microwave-safe bowl, combine peanut butter and maple syrup. Warm for 40–60 seconds until slightly runny, then stir well until completely blended and glossy.
- Add the oats. Slowly mix in the oat flour until the dough becomes thick and moldable. It should feel dense but easy to press with your fingers.
- Prepare your cups. Line a muffin tin with paper or silicone liners. Scoop the peanut butter mixture evenly into each cup and press down gently with your fingers to create a flat, even base.
- Melt the chocolate. In a small bowl, microwave chocolate chips (and coconut oil if using) in 30-second intervals, stirring between each, until smooth and melted.
- Layer and smooth. Spoon the melted chocolate over each peanut butter base. Use the back of a spoon to spread it evenly across the top.
- Optional flair. Before the chocolate sets, sprinkle flaky salt, crushed nuts, or mini chocolate chips on top for a little extra texture.
- Chill to set. Refrigerate the cups for about 2–3 hours or until firm. Once set, remove them from the liners and enjoy!
Cultural or Technique Note
This recipe takes inspiration from classic American no-bake desserts — quick, comforting, and easy enough for any home cook. It’s all about simplicity: combining everyday ingredients into something that feels special. The no-bake method keeps the texture soft and chewy while the chocolate layer gives that nostalgic peanut butter cup finish.
Serving Suggestions
There are so many ways to enjoy these No Bake Peanut Butter Oat Cups, whether you’re craving something sweet after dinner or need a quick snack between meals. Here are some of my favorite ways to serve them:
- Enjoy straight from the fridge as a chilled, satisfying snack. The chocolate layer firms up perfectly, giving that irresistible snap when you bite in.
- Crumble one over Greek yogurt for a breakfast that feels like dessert but is secretly packed with protein and fiber. Add a drizzle of honey or a few berries on top — perfection!
- Pack in a lunchbox or your work bag for an energy-boosting mid-day bite. They travel well and feel like a treat without being too heavy.
- Serve with a cup of coffee or tea for an afternoon pick-me-up. The creamy peanut butter and smooth chocolate taste especially cozy alongside something warm to sip.
- Slice into small pieces and mix into homemade trail mix or sprinkle over smoothie bowls for a fun crunch.
- Gift them in small boxes or jars for holidays or birthdays — everyone loves a homemade peanut butter treat!
Pro Tips for Success
Making No Bake Peanut Butter Oat Cups couldn’t be easier, but a few small tips will help you nail the texture and flavor every time:
- Mix the oat flour slowly. Adding it in stages helps control the dough’s consistency and prevents it from becoming crumbly or too dense.
- Adjust for moisture. If the mixture feels dry or crumbly, stir in an extra teaspoon of peanut butter or maple syrup until it’s smooth and moldable.
- Use silicone muffin pans. They make removing the cups effortless — no sticking or tearing!
- Chill thoroughly. Let the cups set completely before removing them from the pan. This helps the chocolate layer stay glossy and firm.
- Sprinkle a pinch of sea salt on top before chilling. It enhances the chocolate flavor and adds that perfect sweet-salty contrast.
- Store them cold. These taste best straight from the fridge — slightly firm on the outside, creamy in the middle.
- Make it your own. Try adding crushed nuts, shredded coconut, or a drizzle of white chocolate for a fun twist.
Common Mistakes to Avoid
Using too much flour: Makes the cups dry and crumbly — add flour gradually until the dough holds together smoothly.
Skipping liners: Metal muffin tins can cause sticking — always use paper or silicone liners for easy removal.
Overheating the chocolate: Melt in 30-second bursts and stir often. Chocolate can scorch easily, changing both the flavor and texture.
Not chilling long enough: Give them at least 2–3 hours to set fully. If removed too early, the layers may separate or feel too soft.
Leaving uncovered in the fridge: Always store in an airtight container to keep the texture fresh and prevent absorbing fridge odors.
Using natural peanut butter without stirring: The oil separation can cause uneven texture. Stir your jar well before using.
Storage & Reheating
Fridge: Store in an airtight container for 3–4 days. They’ll stay perfectly firm and fresh — ideal for quick snacks throughout the week.
Freezer: These freeze beautifully! Store for up to 2 months in a freezer-safe container. When ready to eat, let one sit at room temperature for 5–10 minutes until slightly softened.
Reheat: No need to heat — these are best enjoyed chilled or just lightly softened at room temperature.
For longer freshness, place parchment paper between layers to prevent the chocolate tops from sticking together.
Frequently Asked Questions
Q1: Can I use almond butter instead?
A1: Definitely! Almond butter, sunflower butter, or cashew butter all make great swaps. Each brings its own subtle flavor — almond butter tastes slightly nutty and mild, while sunflower butter gives an earthy richness.
Q2: How do I make oat flour?
: Super simple — just blend rolled oats in a food processor or high-speed blender until they become a fine, flour-like powder. It takes less than a minute and gives the freshest flavor. Bonus: you can make extra and store it in a jar for future no-bake recipes.
Q3: Can I use regular flour?
: Not unless it’s heat-treated first, since raw wheat flour isn’t safe to eat. Stick to oat or almond flour for this recipe — both are safe to consume raw and add great texture. Oat flour gives a soft, chewy base, while almond flour adds a rich, nutty taste.
Closing Paragraph
These No Bake Peanut Butter Oat Cups are everything you love about a peanut butter cup creamy, chocolatey, and melt-in-your-mouth — but made with wholesome, real ingredients. They’re perfect for prepping ahead, sharing with family, or sneaking as a quick sweet treat for one. You’ll love how easy they are to make and how satisfying they taste every single time.
Final Thoughts
I’ve made these countless times, and they never last long in my kitchen. They remind me that simple ingredients can create the most comforting moments. Whether you’re craving something sweet or need a grab-and-go snack, these little cups are pure peanut butter joy.

No Bake Peanut Butter Oat Cups
Equipment
- Microwave-safe bowl
- Muffin Tin
- Paper or silicone liners
- Spoon or spatula
Ingredients
Base
- 3/4 cup peanut butter creamy
- 1/4 cup maple syrup pure
- 3/4 cup oat flour store-bought or homemade from oats
Chocolate Topping
- 1/2 cup chocolate chips semi-sweet or dark
- 1 tbsp coconut oil optional, helps chocolate set smoothly
Optional Toppings
- flaky sea salt for topping
- crushed nuts or mini chocolate chips for topping
Instructions
- In a microwave-safe bowl, warm peanut butter and maple syrup for 40–60 seconds. Stir until smooth and glossy.
- Add oat flour slowly to the bowl. Stir until the dough becomes thick and moldable.
- Line a muffin tin with liners. Divide the mixture evenly and press into the bottom of each cup.
- Melt chocolate chips and coconut oil in a bowl in 30-second microwave intervals, stirring in between until smooth.
- Spoon chocolate over the peanut butter base and smooth the top. Add toppings if desired.
- Chill in the refrigerator for 2–3 hours until set. Remove from liners and enjoy!