
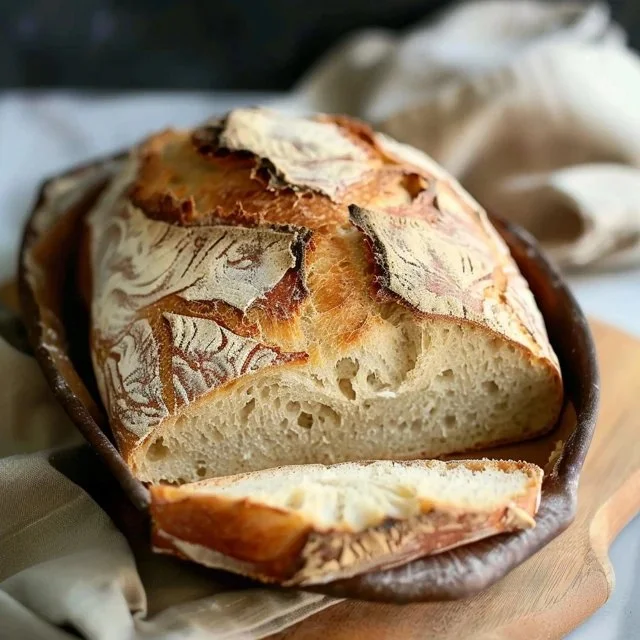
Making bread can feel like an intimidating task, but this recipe turns that notion on its head. Imagine a warm loaf of French bread fresh from the oven on a quiet weekend morning or a weeknight dinner. This is a straightforward and flexible recipe perfect for various occasions—whether it’s breakfast with jam, sandwiches for lunch, or just enjoying a slice on its own. With simple ingredients and a calm process, you’ll find comfort in making this bread in your own kitchen. Let’s dive into the recipe.
Why You’ll Love This Recipe Quick Sourdough Discard French Bread
This recipe stands out for its ease and reliability. Using sourdough discard not only reduces waste but also adds a delightful flavor to the bread. The balanced sweetness from honey combined with the heartiness of bread flour creates a comforting loaf perfect for everyday meals. Quick Sourdough Discard French Bread is a practical addition to your kitchen repertoire that you’ll reach for time and again.
Kitchen Tools You’ll Need
- Mixing bowl
- Whisk
- Spatula or wooden spoon
- Baking sheet
- Parchment paper (optional)
Ingredients
- 200g sourdough discard (contributes flavor and moisture)
- 430g warm water (around 95-105°F) (helps activate the yeast)
- 10g instant yeast (leavening agent for rise)
- 40g honey (adds sweetness and a hint of flavor)
- 70g coconut oil (melted and cooled) (provides moisture and richness)
- 860g bread flour (structural base for bread)
- 20g salt (enhances flavor and controls fermentation)
- Melted butter (for brushing, optional) (adds shine and flavor)

How to Make Quick Sourdough Discard French Bread
Step 1. Begin by measuring out your warm water into a mixing bowl. The temperature should be around 95-105°F to properly activate the yeast. Stir in the instant yeast and let it dissolve for a minute or two, creating a bubbly mixture that indicates the yeast is activating.
Step 2. Once the yeast is dissolved, add the sourdough discard to the bowl. Mix it in gently with a spatula or wooden spoon. The discard adds texture and a slightly tangy flavor to the bread, so take your time to incorporate it well.
Step 3. Next, incorporate the honey into the mixture. Use your spoon to stir until the honey is thoroughly blended in. This sweet addition not only complements the sourdough flavor but also aids in the browning of the crust.
Step 4. Gradually drizzle in the cooled, melted coconut oil while continuing to mix. This step helps to ensure that the oil doesn’t solidify, keeping the mixture smooth. The oil contributes to the moisture and tenderness of the finished bread.
Step 5. Now it’s time to add the bread flour to your mixture. Sprinkle it over the wet ingredients, followed by the salt. Using your spatula or spoon, carefully fold the flour in until it starts to combine. It’s okay if there are a few lumps; you’ll be kneading it shortly.
Step 6. When the mixture starts to pull together, turn it out onto a clean, lightly floured surface. Begin to knead the dough, using the heel of your hand to push it away from you, then fold it back over itself. Continue this for about 8-10 minutes until the dough becomes more elastic and smooth.
Step 7. After kneading, shape the dough into a ball and place it in a lightly greased bowl. Cover the bowl with a clean cloth or plastic wrap to keep moisture in. Let it rise in a warm spot until it has doubled in size. This might take around an hour, depending on your kitchen temperature.
Step 8. Once the dough has risen, gently punch it down to release the air. Turn it out onto a floured surface for shaping. You can choose to shape it into a round loaf, baguette, or whatever form you prefer. Just handle the dough carefully to maintain some airiness.
Step 9. After shaping, let the loaves rise again on a lined baking sheet for about 30 minutes. This second rise helps improve the texture and makes the bread lighter. Cover them lightly with a towel to keep them warm.
Step 10. Preheat the oven while the loaves rise, ensuring it’s hot enough to bake the bread evenly. Just before baking, you can brush the tops with melted butter if desired, which adds a lovely sheen to the crust.
Step 11. Bake the bread until it’s golden brown and sounds hollow when tapped on the bottom. This usually takes about 25-30 minutes, but watch for that nice golden color. Once done, take it out and let it cool on a wire rack before slicing.

Serving Suggestions
This French bread is versatile and can fit into a variety of meals and occasions. Enjoy it warm for breakfast with a spread of butter or jam. Slice it up for sandwiches that will please the whole family at lunch. It also works well as a side for soups or stews during dinner. If you have leftovers, they can be toasted for a delicious snack or breakfast treat the next day.
Pro Tips for Best Results
- Ensure the water temperature is accurate to activate the yeast effectively.
- When kneading, use a little flour on your surface to prevent sticking; but don’t overdo it, as this can dry out the dough.
- Keep the dough covered during the rising periods to retain moisture.
- Avoid over-kneading; the dough should be smooth but still slightly tacky.
- Experiment with different shapes or sizes to make loaves that fit your needs.
- Allow the bread to cool completely before slicing, which helps set the texture.
Common Mistakes to Avoid
1. Using water that’s too hot: If the water is too hot, it can kill the yeast. This prevents the bread from rising. Always check the temperature before adding it.
2. Not measuring ingredients accurately: Using incorrect amounts of flour or water can lead to a dough that’s too dry or too wet. Use a kitchen scale for precise measurements for best results.
3. Ignoring the first rise: Skipping or shortening the first rise can result in dense bread. Be patient and allow the dough to double in size to achieve a light, airy loaf.
4. Over-kneading the dough: Kneading too long can make the bread tough. Knead just until smooth and elastic to ensure a tender loaf.
5. Not letting the dough rise again: For good texture, allow the shaped dough to rise again before baking. This final rise contributes to achieving the desired lightness.
6. Cutting the bread while it’s hot: Cutting into the loaf before it has cooled can lead to gummy bread. Wait until it’s fully cooled on a wire rack for best slicing.
Variations & Substitutions
You can easily adjust this recipe by incorporating herbs or spices into the dough for added flavor. Experimenting with different types of flours, such as whole wheat, can also provide a different texture and taste. Adjusting the honey for a bit more or less sweetness is another simple alteration. Just keep the main structure the same for the best results.
Storage & Reheating
Store the bread at room temperature in a sealed bag or container for up to three days. If you need longer storage, keep it in the refrigerator, but note that this may alter the texture. You can also freeze the bread for up to three months. To reheat, wrap it in foil and place it in a low oven until warmed through, which helps maintain its texture.
Frequently Asked Questions
Can I make this recipe ahead of time?
You can make the dough ahead of time and refrigerate it after the first rise. This allows for a slow fermentation that can enhance flavor. Just remember to bring it back to room temperature before shaping and the final rise.
How long does it last in the fridge?
Freshly baked bread can last for about three days in the fridge, though its texture may change. It’s best enjoyed within the first couple of days for optimal flavor and freshness.
Can I freeze this recipe?
Yes, you can freeze the bread. Just wrap it tightly in plastic wrap or aluminum foil and store it in an airtight container. It will keep for about three months.
What can I substitute for one ingredient?
If you need to substitute the coconut oil, you could use another neutral oil or melted unsalted butter for similar moisture and flavor.
Why didn’t my recipe turn out as expected?
There could be several reasons, such as using expired yeast, not allowing adequate rising time, or incorrect ingredient measurements. Always check your supplies and follow the steps closely to optimize your results.
Final Thoughts
Making Quick Sourdough Discard French Bread can be a delightful experience, blending the satisfying process of kneading and shaping with the simple pleasure of enjoying a homemade loaf. This recipe is straightforward and allows for plenty of opportunities to adapt and experiment. Embrace making bread at home, and enjoy the comforting outcomes that await. Whether you savor it warm from the oven or toasted the next day, this bread can easily become a staple in your kitchen.

Quick Sourdough Discard French Bread
Ingredients
Main Ingredients
- 200 g sourdough discard Contributes flavor and moisture
- 430 g warm water Around 95-105°F, helps activate the yeast
- 10 g instant yeast Leavening agent for rise
- 40 g honey Adds sweetness and a hint of flavor
- 70 g coconut oil Melted and cooled, provides moisture and richness
- 860 g bread flour Structural base for bread
- 20 g salt Enhances flavor and controls fermentation
- 1 tbsp melted butter For brushing, optional; adds shine and flavor
Instructions
Preparation
- Begin by measuring warm water into a mixing bowl. The temperature should be around 95-105°F to properly activate the yeast.
- Stir in the instant yeast and let it dissolve for a minute or two, creating a bubbly mixture that indicates the yeast is activating.
- Add the sourdough discard to the bowl and mix gently using a spatula or wooden spoon.
- Incorporate the honey into the mixture, stirring until thoroughly blended.
- Gradually drizzle in the cooled, melted coconut oil while continuing to mix.
- Sprinkle the bread flour over the wet ingredients, followed by the salt, and carefully fold the flour in until it starts to combine.
- Turn the mixture out onto a clean, lightly floured surface and knead the dough for about 8-10 minutes until it becomes elastic and smooth.
- Shape the dough into a ball and place it in a lightly greased bowl. Cover to let it rise in a warm spot until doubled in size.
- Once risen, gently punch it down and shape it into a loaf on a floured surface.
- Let the shaped dough rise again on a lined baking sheet for about 30 minutes.
- Preheat the oven while the loaves rise.
- Brush the tops with melted butter before baking if desired.
- Bake until golden brown and sounds hollow when tapped, about 25-30 minutes. Cool on a wire rack before slicing.


