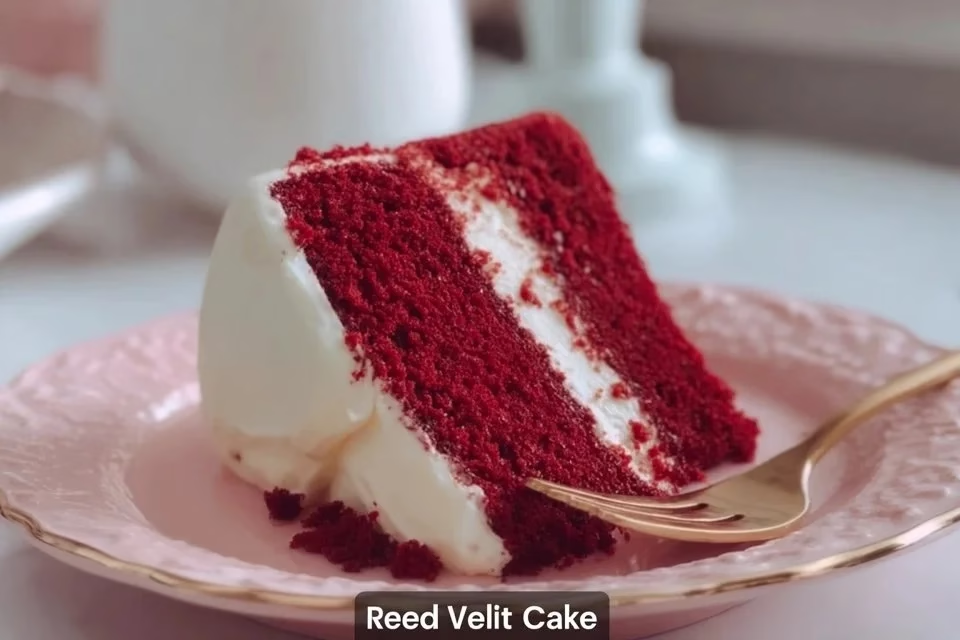
Homemade red velvet cake is a delightful treat that strikes a balance between sweet and subtle cocoa flavor. It has a tender crumb and a distinctive red hue, making it a perfect dessert for various occasions, from casual weeknight dinners to special gatherings. The recipe is straightforward, allowing you the flexibility to whip it up when the mood strikes or when unexpected guests arrive. It’s all about comfort and familiarity in the kitchen. Let’s walk through how to create this comforting classic.
Why You’ll Love This Recipe Red Velvet Cake
This red velvet cake embodies ease and reliability, making it a go-to dessert for many. Its flavors are comforting, offering a delightful blend of sweet and chocolate undertones. With its practical approach, this recipe provides a dependable way to indulge in something special without overly complicated steps. You’ll find it a valuable addition to your baking repertoire.
Kitchen Tools You’ll Need
- Mixing bowls
- Measuring cups
- Measuring spoons
- Whisk
- Rubber spatula
- Cake pan
Ingredients
- 2 1/2 cups all-purpose flour (structure)
- 1 1/2 cups granulated sugar (sweetness)
- 1 cup vegetable oil (moisture)
- 1 cup buttermilk, room temperature (tenderness)
- 2 large eggs, room temperature (binding)
- 2 tablespoons red food coloring (color)
- 1 teaspoon vanilla extract (flavor)
- 1 teaspoon baking soda (leavening)
- 1 teaspoon salt (enhances flavor)
- 1 teaspoon vinegar (reacts with baking soda)

How to Make Red Velvet Cake
Step 1. Start by preheating your oven as only the right temperature can ensure proper baking. Prepare your cake pan by greasing it lightly, which will help the cake release easily once it’s baked. A well-greased pan will create a smooth exterior that you’ll appreciate when serving.
Step 2. In a large mixing bowl, combine the dry ingredients: flour, sugar, baking soda, and salt. Mixing these together ensures that the leavening agent and salt evenly distribute throughout the flour, affecting the cake’s texture and flavor. This fundamental step is key in achieving a consistent taste.
Step 3. In another bowl, whisk together the wet ingredients, which include the vegetable oil, buttermilk, eggs, red food coloring, and vanilla extract. The oil brings moistness, while the buttermilk adds a slight tang. This mixture will help create a tender crumb and vibrant color, contributing to the cake’s unique character.
Step 4. Gradually incorporate the wet mixture into the dry ingredients, stirring gently. It’s important to mix until just combined, as overmixing could lead to a denser texture. The batter should be smooth and well-blended without any lumps, providing a lovely consistency.
Step 5. After the batter is ready, transfer it to the prepared cake pan, spreading it evenly. Ensure that the batter reaches the edges to promote uniform baking. This will help the cake rise evenly, resulting in a beautiful shape.
Step 6. Place the pan in the oven, letting the cake bake until a toothpick inserted into the center comes out clean. You’ll know it’s done when the edges slightly pull away from the sides of the pan and the top has a springy texture.
Step 7. Once baked, remove the cake from the oven and allow it to cool in the pan for a short time. This step prevents it from breaking apart; subsequently, transfer it to a wire rack for complete cooling. Cooling thoroughly is essential for a level surface if frosting is desired.
After cooling, your red velvet cake is ready to be served or frosted, depending on your preference. It’s a rewarding experience to slice into the soft, velvety texture and see that beautiful red color.

Serving Suggestions
This red velvet cake is versatile and suitable for various occasions. It can be enjoyed as a sweet breakfast treat alongside coffee or tea. As an afternoon snack, it pairs well with a scoop of ice cream. For family meals, a slice of this cake rounds off a hearty dinner, and the leftovers, if any, can be wrapped up for later enjoyment. This cake remains a delightful staple that offers comfort and joy, perfect for many everyday moments.
Pro Tips for Best Results
- Use room temperature ingredients for better mixing—cold eggs and buttermilk can affect the incorporation.
- Don’t skip the vinegar, as it interacts with the baking soda to create a lighter cake.
- Measure your flour correctly by spooning it into the measuring cup and leveling it off to avoid a dense batter.
- Let the baked cake cool completely before frosting to prevent the icing from melting.
- Adjust the baking time based on your oven’s specificity as individual ovens can vary.
Common Mistakes to Avoid
- Overmixing the Batter: This can create a tough texture instead of a light, fluffy cake. Mix until just combined to keep the gluten from developing too much.
- Using Cold Ingredients: Starting with ingredients that are too cold can lead to a batter that doesn’t mix well, resulting in uneven flavors and textures. Always use room temperature eggs and buttermilk.
- Not Measuring Ingredients Correctly: Doing so may lead to too much flour or sugar, affecting the cake’s structure or sweetness. Use a kitchen scale when possible or the correct measuring techniques.
- Skipping the Cooling Period: Frosting a warm cake can lead to a melted mess. Allow the cake to cool in the pan slightly before transferring it to a rack to cool completely.
- Baking at the Wrong Temperature: Inconsistent oven temperatures can cause the cake to rise unevenly or even collapse. Ensure your oven is accurately preheated before baking.
- Incorrect Storage: Not storing the cake properly can lead to dryness or spoilage. Keep it covered at room temperature or in the refrigerator to maintain freshness.
Variations & Substitutions
Consider layering your red velvet cake with cream cheese frosting for additional flavor. You might enjoy incorporating chocolate chips into the batter or turning it into cupcakes. If you want a less sweet option, reducing the sugar slightly can make a difference, without altering much of the texture. Each of these variations provides simple ways to personalize this classic recipe.
Storage & Reheating
At room temperature, the cake can be stored for a few days if kept covered to maintain moisture. For longer preservation, refrigerate the cake, where it can last up to a week. If you wish to keep it longer, freezing is also an option; wrap slices tightly in plastic wrap and place them in freezer bags. When ready to enjoy, let them thaw in the refrigerator or at room temperature, ensuring that the texture remains intact.
Frequently Asked Questions
Can I make this recipe ahead of time?
Absolutely! You can bake the cake a day in advance. Allow it to cool completely, then store it wrapped at room temperature. Frost it just before serving for the best flavor and presentation.
How long does it last in the fridge?
In the fridge, red velvet cake lasts about a week if kept covered to prevent it from drying out. It’s best enjoyed within the first few days for optimal flavor.
Can I freeze this recipe?
Yes, you can freeze the cake. Wrap individual slices tightly and place them in a freezer bag. They can be frozen for up to three months. Thaw in the refrigerator when you’re ready to enjoy.
What can I substitute for one ingredient?
If you don’t have buttermilk, a common substitute is regular milk mixed with a tablespoon of vinegar or lemon juice, allowing it to sit for a few minutes. This can replicate the tangy flavor that buttermilk provides.
Why didn’t my recipe turn out as expected?
If your cake didn’t rise or has an odd texture, it may have been caused by overmixing, incorrect oven temperature, or not measuring ingredients precisely. Rechecking measurements and mixing gently can help in future attempts.
Final Thoughts
Making red velvet cake is a rewarding experience, one that fills your kitchen with warmth and invokes a sense of accomplishment. Each slice pairs well with everyday moments, whether shared with loved ones or enjoyed during quiet time alone. This recipe invites you to find comfort in the process, reassuring you that a delicious cake is just a few steps away.

Red Velvet Cake
Ingredients
Dry Ingredients
- 2 1/2 cups all-purpose flour structure
- 1 1/2 cups granulated sugar sweetness
- 1 teaspoon baking soda leavening
- 1 teaspoon salt enhances flavor
Wet Ingredients
- 1 cup vegetable oil moisture
- 1 cup buttermilk, room temperature tenderness
- 2 large eggs, room temperature binding
- 2 tablespoons red food coloring color
- 1 teaspoon vanilla extract flavor
- 1 teaspoon vinegar reacts with baking soda
Instructions
Preparation
- Preheat your oven and grease your cake pan.
- In a large mixing bowl, combine the dry ingredients: flour, sugar, baking soda, and salt.
- In another bowl, whisk together the wet ingredients: vegetable oil, buttermilk, eggs, red food coloring, and vanilla extract.
Mixing
- Gradually incorporate the wet mixture into the dry ingredients, stirring gently until just combined.
Baking
- Transfer the batter to the prepared cake pan, spreading it evenly.
- Bake until a toothpick inserted into the center comes out clean and the edges pull away from the pan.
- Allow the cake to cool in the pan for a short time, and then transfer it to a wire rack to cool completely.