After a long week, indulging in a decadent treat can be a simple yet satisfying way to unwind. These Red Velvet Cheesecake Brownies come together effortlessly, perfect for a cozy weekend gathering or a quiet evening at home. They seamlessly blend the rich, familiar flavor of red velvet with the creamy texture of cheesecake, creating a delightful balance. The best part is how approachable the recipe is, allowing you to savor homemade goodness without fuss. Let’s dive into the recipe and enjoy the process of creating something special.
Why You’ll Love This Red Velvet Cheesecake Brownies
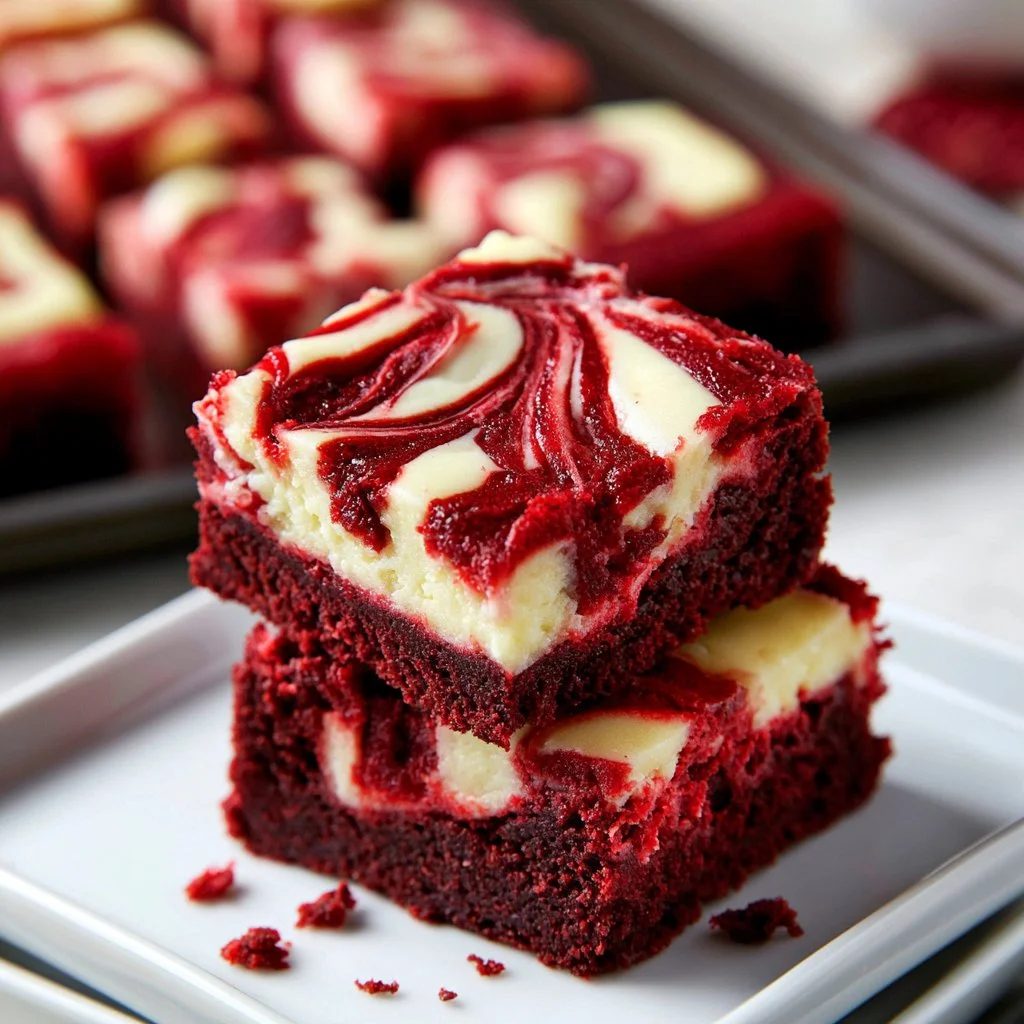
These Red Velvet Cheesecake Brownies are appreciated for their ease and reliable results. The combination of comforting flavors and textures makes them a delightful treat for any occasion. The chocolatey richness, coupled with the smooth cheesecake layer, creates a balanced sweetness that is enjoyable throughout the week. Simple to prepare, this recipe brings practical value to your everyday baking, allowing you to share delicious moments with family and friends.
Kitchen Tools You’ll Need
- 8×8-inch baking pan
- Parchment paper
- Mixing bowls
- Whisk
- Spatula
- Knife for swirling
Ingredients
- ½ cup unsalted butter, melted (provides moisture and richness)
- 1 cup granulated sugar (adds sweetness and structure)
- ¼ cup unsweetened cocoa powder (brings chocolate flavor)
- ¼ tsp salt (enhances sweetness)
- 1 Tbsp red food coloring (for color)
- 1 tsp vanilla extract (adds flavor)
- ½ tsp distilled white vinegar (supports leavening)
- 2 large eggs (binds ingredients and provides structure)
- ¾ cup all-purpose flour (gives structure and texture)
- 8 oz block-style cream cheese, room temperature (for creaminess)
- ¼ cup granulated sugar (adds sweetness to the cheesecake layer)
- ½ tsp vanilla extract (adds flavor to the cheesecake)
- 1 large egg, room temperature (binds cheesecake mixture)
How to Make Red Velvet Cheesecake Brownies
Step 1. Preheat your oven to 350℉. While the oven is warming up, prepare your baking pan by lining it with parchment paper, allowing some overhang for easy lifting later. Make sure to grease the sides that aren’t covered with parchment to prevent sticking. This step ensures your brownies will come out smoothly when they’re finished baking.
Step 2. In a large mixing bowl, combine the melted butter, granulated sugar, cocoa powder, salt, red food coloring, vanilla extract, and distilled white vinegar. Stir these ingredients together until everything is well blended. The mixture should be smooth and slightly glossy, indicating that the sugar is dissolving properly, and the red coloring is evenly distributed.
Step 3. Incorporate the eggs into the mixture one at a time, stirring thoroughly after each addition. This gradual approach allows the eggs to mix in smoothly, creating a consistent batter. Pay attention to the texture, and ensure there are no streaks of egg remaining before moving on.
Step 4. Add the all-purpose flour to the batter and mix until just combined, being careful not to overmix. The batter should be thick and smooth, without any dry patches of flour visible. This will ensure that your brownies have a good structure once baked.
Step 5. Set aside half a cup of the red batter for later use. This reserved batter will be used as a topping for a lovely swirl effect. The rest of the batter should now be poured into the prepared baking pan, creating a base layer that is ready for the cheesecake.
Step 6. In another bowl, beat the block-style cream cheese until smooth. This requires some elbow grease or an electric mixer on low speed, aiming for a creamy consistency. Once smooth, add the granulated sugar and vanilla extract, continuing to beat until well combined.
Step 7. Add the remaining egg into the cream cheese mixture and blend until fully incorporated. The mixture should be creamy and uniform, without lumps. It’s crucial for the cheesecake layer to be smooth to achieve that velvety texture in the final brownie.
Step 8. Spoon the cheesecake batter over the red velvet brownie layer in the baking pan, spreading it evenly across the surface. This layered approach gives you a beautiful visual contrast and a rich flavor profile.
Step 9. Finally, dollop the reserved red batter over the cheesecake layer. With a knife, gently swirl the two batters together. This creates a lovely marbled effect, ensuring that each bite has a mix of both flavors. You don’t need to overdo the swirling; a few gentle strokes should suffice.
Step 10. Place the pan in the preheated oven and bake for about 30 minutes. You’ll know the brownies are done when a toothpick inserted in the center comes out with moist crumbs rather than wet batter. This indicates that the brownies are cooked through while remaining moist.
Step 11. Allow the brownies to cool completely in the pan. Once cooled, use the parchment overhang to lift the entire block out of the pan. This makes cutting the brownies into squares simple and clean without damaging them.

Serving Suggestions
These Red Velvet Cheesecake Brownies make for a delightful treat at breakfast or as a quick snack throughout the day. Bring them out during family meals as a sweet finish or serve alongside coffee for a comforting afternoon break. If you find yourself with leftovers, these brownies hold up well in the refrigerator, making them perfect for enjoying over several days. Their rich flavor only improves as the layers meld together.
Pro Tips for Best Results
- Use room-temperature ingredients for smoother mixing, especially the cream cheese and egg.
- Don’t overmix the brownie batter; overmixing can lead to tough brownies.
- Allow the brownies to cool completely before lifting them from the pan, as this helps maintain their shape.
- Keep an eye on the baking time; ovens can vary, so trust your toothpick test for doneness.
- Store leftovers in an airtight container to keep them fresh.
Common Mistakes to Avoid
- Not using room-temperature cream cheese: Cold cream cheese can create lumps in your batter, resulting in an uneven texture. To avoid this, allow the cream cheese to sit at room temperature for about 30 minutes before using it.
- Overmixing the batter: This can lead to dense brownies instead of light and fluffy ones. Mix just until the flour is incorporated to keep them tender.
- Using too much cocoa powder: Using too much cocoa can make the brownies dry. Stick to the specified measurement for balanced flavor and moisture.
- Skipping the cooling step: Cutting brownies while they’re warm can lead to messy squares. Allow them to cool completely for cleaner cuts.
- Not greasing the pan properly: If you skip this step, your brownies may stick to the pan, making them difficult to remove. Always grease the sides not covered by parchment for smooth removal.
- Ignoring the toothpick test: Baking time can vary, so not testing for doneness can leave you with undercooked brownies. Check for moist crumbs, not wet batter, to ensure perfect texture.
Variations & Substitutions
For a unique twist, consider adding chocolate chips or walnuts to the brownie batter for added texture and richness. If you prefer a lighter flavor, you could replace the red food coloring with a natural coloring alternative. Swapping out part of the cream cheese for ricotta could also create a different flavor profile. Just remember, avoid any substitutions that significantly change the structural integrity of the recipe.
Storage & Reheating
These brownies can be stored at room temperature for up to two days or in the refrigerator for about a week. If you want to keep them longer, consider freezing them for up to three months. Wrap individual brownies in plastic wrap and place them in an airtight container to preserve their texture. To reheat, warm them in the microwave for a few seconds, just until they’re cozy but not hot.
Nutrition Information
- Calories: 320
- Total Fat: 18g
- Saturated Fat: 10g
- Carbohydrates: 34g
- Fiber: 1g
- Sugar: 20g
- Protein: 4g
- Sodium: 200mg
Frequently Asked Questions
Can I make this recipe ahead of time?
Yes, you can prepare these brownies a day or two in advance. Just allow them to cool completely, and then store them in an airtight container.
How long does it last in the fridge?
These brownies will last up to a week in the refrigerator. Ensure they are stored in an airtight container to maintain freshness.
Can I freeze this recipe?
Absolutely! These brownies freeze well for up to three months. Wrap each piece tightly in plastic wrap before placing them in an airtight container.
What can I substitute for one ingredient?
If you need a substitute for unsalted butter, you can use an equal amount of coconut oil or margarine. Just make sure it is melted if the recipe calls for melted butter.
Why didn’t my recipe turn out as expected?
There are a few reasons this can happen, such as using cold ingredients, overmixing, or not measuring accurately. Following measurements and letting ingredients come to room temperature can help achieve a better result.
Final Thoughts
Making these Red Velvet Cheesecake Brownies is both enjoyable and rewarding. The balance of rich brownie and creamy cheesecake creates a comforting dessert perfect for sharing or savoring on your own. Trust the steps, and enjoy the process of baking and tasting what you’ve created. Each batch will bring warmth to your day, offering a familiar flavor that comforts without complication.

Red Velvet Cheesecake Brownies
Ingredients
Brownie Base
- ½ cup unsalted butter, melted provides moisture and richness
- 1 cup granulated sugar adds sweetness and structure
- ¼ cup unsweetened cocoa powder brings chocolate flavor
- ¼ tsp salt enhances sweetness
- 1 Tbsp red food coloring for color
- 1 tsp vanilla extract adds flavor
- ½ tsp distilled white vinegar supports leavening
- 2 large eggs binds ingredients and provides structure
- ¾ cup all-purpose flour gives structure and texture
Cheesecake Layer
- 8 oz block-style cream cheese, room temperature for creaminess
- ¼ cup granulated sugar adds sweetness to the cheesecake layer
- ½ tsp vanilla extract adds flavor to the cheesecake
- 1 large egg, room temperature binds cheesecake mixture
Instructions
Preparation
- Preheat your oven to 350℉ and prepare your baking pan by lining it with parchment paper, greasing the exposed sides.
- In a large mixing bowl, combine the melted butter, granulated sugar, cocoa powder, salt, red food coloring, vanilla extract, and white vinegar until well blended.
- Incorporate the eggs one at a time, ensuring smooth mixing after each addition.
- Add the flour and mix until just combined, then set aside half a cup of this batter for later use.
Cheesecake Layer
- In another bowl, beat the cream cheese until smooth, then add the sugar and vanilla extract; mix until combined.
- Blend in the additional egg until the mixture is creamy and uniform.
Layering and Baking
- Pour the brownie batter into the prepared baking pan, then spoon the cheesecake batter over it and spread evenly.
- Dollop the reserved red batter over the cheesecake layer and swirl gently with a knife.
- Bake for about 30 minutes, testing with a toothpick for doneness—look for moist crumbs.
- Allow the brownies to cool completely in the pan before lifting them out using the parchment overhang.


