There’s something undeniably comforting about preparing a simple treat that brings a little sweetness into everyday life. These chocolate date truffles are perfect for those quiet moments, an afternoon snack, or even as a little indulgence on the weekends. They come together quickly without fuss, and their rich chocolatey flavor paired with the natural sweetness of dates makes them a delightful choice for gatherings or a calm evening at home. Let’s get started on this straightforward recipe that invites a cozy vibe into your kitchen.
Why You’ll Love This Chocolate Date Truffles
These Chocolate Date Truffles are easy to make and come together with minimal effort. They provide a comforting treat with a wonderful balance of sweet and rich flavors. The everyday nature of this recipe makes it a practical choice for various occasions, ensuring that you can whip up something delicious anytime.
Kitchen Tools You’ll Need
- Food processor
- Mixing bowl
- Baking sheet
- Parchment paper (optional)
Ingredients
- cocoa powder (adds a rich chocolate flavor)
- Medjool dates (provides natural sweetness and moisture)
- nuts (optional) (adds crunch and nutty flavor)
- coconut flakes (optional) (contributes texture and mild sweetness)
- vanilla extract (optional) (enhances overall flavor)

How to Make Chocolate Date Truffles
Step 1. Start by pitting the Medjool dates. If your dates have pits, remove them carefully to ensure a smooth texture in your truffles. A good, soft Medjool date will help bind your mixture together, providing the right moisture and natural sweetness.
Step 2. Next, place the pitted dates in a food processor. Process them until they create a sticky, cohesive mixture. This step is crucial, as the dates are the main binding agent for your truffles, so watch for a smooth consistency.
Step 3. Afterward, add the cocoa powder into the food processor with the dates. Pulse the mixture until the cocoa is fully incorporated and the texture is uniform. This will give the truffles their rich chocolate flavor, so be sure to mix it well.
Step 4. If you’re using nuts, certainly add them after the cocoa mixture is combined. Pulse a few times to incorporate, being mindful not to over-process. The nuts will provide extra texture and flavor, making the truffles more interesting.
Step 5. Once everything is combined, taste your mixture and adjust if needed, perhaps adding a touch of vanilla extract for extra flavor. The vanilla is optional, but it can enhance the overall sweetness and depth of the truffles.
Step 6. With the mixture ready, use your hands to shape it into small balls. Each truffle should be about one inch in diameter. The final texture should be firm enough to hold its shape but soft enough to feel pleasant when eaten.
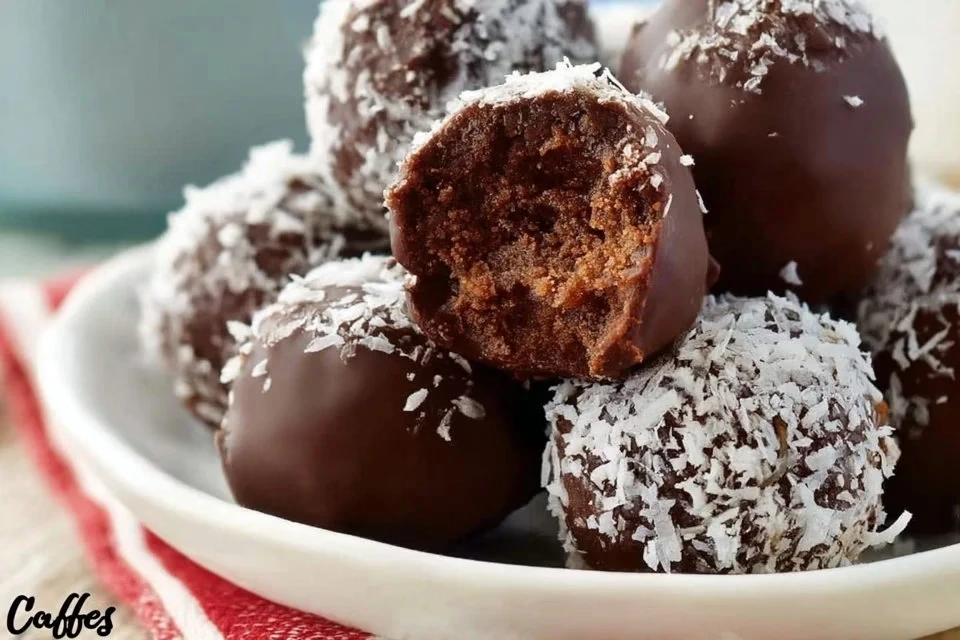
Step 7. For finishing touches, roll the truffles in coconut flakes or cocoa powder if you choose. This adds a final texture layer and complements the chocolate flavors, giving a nice visual appeal to the truffles.
Step 8. Place your finished truffles on a parchment-lined baking sheet. This will keep them from sticking and make for easier storage later. Once they’re all shaped and rolled, let them chill in the refrigerator for about 30 minutes to help them firm up.

Serving Suggestions
These truffles make for a versatile snack or dessert. You can enjoy them as a sweet breakfast treat alongside your morning coffee or tea. They serve well as an afternoon snack, offering a quick energy boost without being overly indulgent. They also make for a great addition to family meals or gatherings, where individual treats are fun to share. If you find yourself with leftovers, they can remain a delightful standby in the fridge for your next craving.
Pro Tips for Best Results
- Ensure your dates are fresh and moist; this will make blending easier and yield a better texture.
- If the mixture feels too dry, consider adding a teaspoon of water or coconut oil to help bind it better.
- Taste your mixture as you go to achieve a flavor balance you enjoy.
- Use a cookie scoop for evenly sized truffles; this keeps them consistent and easy to roll.
- Don’t skip refrigerating the truffles; this step helps firm them up for a better bite.
- Customize your rolling choice; feel free to use ground nuts or seeds for a different texture.
Common Mistakes to Avoid
- Using dried dates: Dried dates will not bind well and can result in a crumbly truffle. Always opt for fresh Medjool dates for the best results.
- Over-processing the nuts: If you process nuts too much, you may end up with nut butter instead of chunks. Pulse just enough to maintain some texture.
- Not chilling the truffles: Skipping the chilling step can leave truffles too soft. Chilling firms them up, making them easier to handle and eat.
- Adding too much cocoa: It’s tempting to add more cocoa for a stronger flavor, but too much can make the mixture dry. Stick to the amount for balance.
- Ignoring the taste test: Failing to taste and adjust the mixture before rolling can lead to improperly flavored truffles. A quick taste check ensures satisfaction.
- Forgetting to pit the dates: Be diligent about removing the date pits, as biting into one can ruin your experience with these otherwise delightful treats.
Variations & Substitutions
If you want to switch up your truffles, consider rolling them in finely chopped nuts or seeds instead of coconut. You can also experiment by adding a pinch of sea salt to the mixture for a wonderful contrast to the sweetness. For added texture, mix in some crispy rice or use flavored extracts like almond instead of vanilla for a different but delightful twist.
Storage & Reheating
These Chocolate Date Truffles should be stored in an airtight container at room temperature for a short period. For longer storage, place them in the refrigerator, where they’ll stay fresh for about a week. They can also be frozen if needed; just ensure they’re in a suitable container to avoid freezer burn. When ready to enjoy, let them sit at room temperature for a few minutes to soften slightly before eating.
Frequently Asked Questions
Can I make this recipe ahead of time?
Absolutely! These truffles can be made a day in advance and stored in the refrigerator. This actually allows the flavors to meld a bit more.
How long does it last in the fridge?
In the refrigerator, Chocolate Date Truffles remain fresh for about a week. Just make sure they are stored in an airtight container.
Can I freeze this recipe?
Yes, you can freeze the truffles for longer storage. Simply place them in a freezer-safe container or bag, and they’ll keep well for up to three months.
What can I substitute for one ingredient?
If you’re looking to replace the cocoa powder, you could use carob powder for a different flavor profile. Just keep in mind that this will change the taste of the truffles slightly.
Why didn’t my recipe turn out as expected?
Common issues usually arise from using dried dates or not blending the dates long enough to achieve a sticky consistency. Ensure the dates are fresh and combine until the mixture is smooth for the best results.
Final Thoughts
Making Chocolate Date Truffles is a simple yet rewarding experience. The ease of preparation and the rich, satisfying taste combine to bring a little sweetness into your everyday routine. Enjoy them straight from the fridge or share them with family and friends. There’s comfort in creating these delightful treats, knowing they’ll fit perfectly into any moment, whether alone or with loved ones.

Chocolate Date Truffles
Ingredients
Main Ingredients
- 1 cup Medjool dates, pitted Fresh and moist dates for best results.
- 1/4 cup cocoa powder Adds rich chocolate flavor.
- 1/2 cup nuts (optional) Adds crunch and nutty flavor.
- 1/4 cup coconut flakes (optional) For rolling the truffles.
- 1 teaspoon vanilla extract (optional) Enhances flavor.
Instructions
Preparation
- Pit the Medjool dates and ensure they are fresh and moist.
- Place the pitted dates in a food processor and process until a sticky mixture forms.
- Add cocoa powder to the mixture and pulse until fully incorporated and uniform.
- If using, add nuts and pulse a few times to incorporate.
- Taste the mixture and add vanilla extract if desired for extra flavor.
- Shape the mixture into small balls, approximately 1 inch in diameter.
- Roll the truffles in coconut flakes or cocoa powder if desired.
- Place the truffles on a parchment-lined baking sheet and chill in the refrigerator for about 30 minutes.


