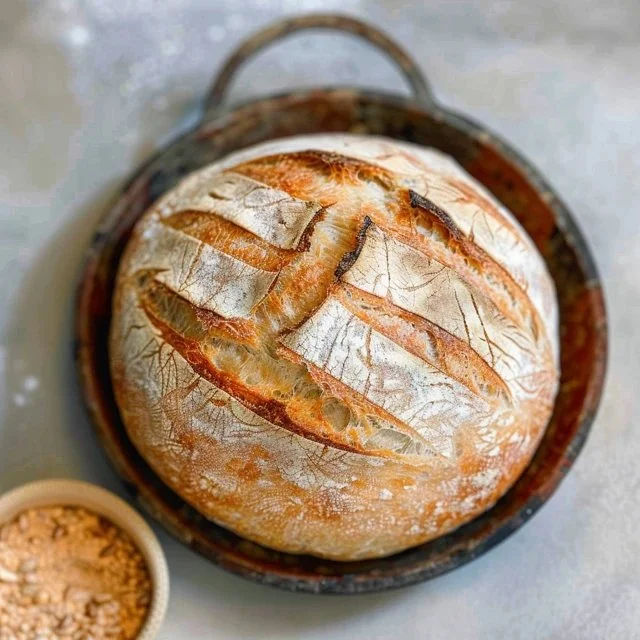
Making bread can feel like a rite of passage in the kitchen, and this beginner-friendly sourdough bread recipe invites you to take that step with ease. It’s a comforting loaf that’s perfect for any occasion, whether it’s a weeknight dinner, a weekend brunch, or a quiet afternoon snack. The simple combination of flour, water, salt, and a sourdough starter results in a delightful bread that you can share with your loved ones or enjoy all by yourself. Gather your ingredients and let’s get started on this satisfying journey.
Why You’ll Love This Beginner’s Sourdough Bread Recipe
This beginner’s sourdough bread recipe offers both ease and reliability, making it a great addition to your cooking repertoire. With a balanced flavor and a comforting texture, it can elevate simple meals or serve as a delightful snack on its own. Its practical everyday value ensures that you can bake, share, or enjoy this bread in various situations without much fuss, making it a go-to for many.
Kitchen Tools You’ll Need
- Mixing bowl
- Kitchen scale
- Dough scraper
- Baking sheet or loaf pan
- Clean kitchen towel
Ingredients
- 475 grams all-purpose flour (3 1/2 cups, for structure and texture)
- 100 grams active sourdough starter (1/2 cup, for leavening and flavor)
- 325 grams water (1 1/3 cups, for moisture)
- 10 grams salt (2 teaspoons, for flavor enhancement)

How to Make Beginner’s Sourdough Bread Recipe
Step 1. In a large mixing bowl, combine the 475 grams of all-purpose flour with 10 grams of salt. Mix them together until well combined; this ensures that the salt is evenly distributed throughout the flour. Using your hands or a spoon will help break up any clumps of salt and flour. This step creates the base for your bread, setting the stage for the rest of the ingredients to come together effortlessly.
Step 2. Add the 100 grams of active sourdough starter to the bowl with the flour and salt mixture. Follow this by pouring in the 325 grams of water. Use your hands or a wooden spoon to mix everything together until all the flour is incorporated. The mixture will be somewhat sticky and shaggy at this point. It’s important to ensure no dry bits of flour remain. This process allows the flour to absorb the water and starter, creating a cohesive dough.
Step 3. Once the dough comes together, allow it to rest for about 30 minutes. This resting, or autolyse phase, gives the flour time to fully hydrate and start developing gluten. After the rest, the dough should look slightly smoother and more cohesive, indicating that the flour has absorbed the moisture well. The development of gluten at this stage sets the foundation for the bread’s eventual rise and texture.
Step 4. After the resting period, it’s time to knead the dough. Turn it out onto a lightly floured surface and knead it for about 8-10 minutes, stretching and folding the dough. As you knead, you’ll notice it becoming less sticky and more elastic. Pay attention to the texture; when it’s ready, the dough should be smooth and slightly tacky, but now sticking less to your hands. This kneading helps strengthen the gluten and improve the bread’s structure.
Step 5. Transfer the kneaded dough back to the mixing bowl and cover it with a clean kitchen towel. This allows for bulk fermentation, where the dough will rise for several hours or until it has doubled in size. During this time, you might notice bubbles forming on the surface, indicating that fermentation is happening. This is crucial for developing flavor and texture in your bread.
Step 6. After the dough has doubled in size, gently deflate it by pressing down while still in the bowl. Turn it out onto a lightly floured surface and shape it into a round loaf. Use your hands to fold the edges toward the center, creating surface tension on the exterior. The goal here is to form a smooth ball that will help your loaf hold its shape during the final rise.
Step 7. Place the shaped dough seam-side down on a parchment-lined baking sheet or into a loaf pan. Cover it again with the kitchen towel, allowing it to rise for another 30-60 minutes. During this final proof, the dough will puff up and develop in size. Keep an eye out for visual expansion; it should almost double but not quite reach the surface of the cloth covering it.
Step 8. Preheat your oven. This will ensure that once your loaf is ready to go in, the heat is perfect for baking. Make sure the oven is hot enough to create that initial burst of steam that is crucial for a good rise. However, this recipe does not specify a temperature, so a safe general range would be around 450°F.
Step 9. Once the dough has proofed, it’s time to bake. Place the loaf in the preheated oven. As the bread bakes, you’ll notice the wonderful aroma fill your kitchen. It’s a sign that the crust is forming and the interior is cooking. Watch for a well-browned crust that often indicates the loaf is done.
Step 10. After baking, carefully remove the loaf from the oven and let it cool on a wire rack. Placing it on a rack allows air to circulate around the bread, preventing it from becoming soggy on the bottom. Let it cool completely before slicing to ensure the crumb sets properly. The wait might feel long, but it encourages the best texture.

Serving Suggestions
This sourdough bread can shine in various everyday situations. Enjoy slices toasted for breakfast, slathered with butter or jam. It also makes for a delightful sandwich base for lunch, pairing well with any deli meats and cheeses. Consider serving it alongside soups or salads for a family meal. Leftover bread can be stored and transformed into croutons or French toast, bringing warmth and satisfaction to any meal.
Pro Tips for Best Results
- Ensure your sourdough starter is active before beginning; it should be bubbly and have risen in size within a few hours of feeding.
- Monitor the dough during the bulk fermentation phase; the environment should be warm but not hot for optimal yeast activity.
- Use a light dusting of flour to prevent sticking, but avoid adding too much to maintain the desired dough consistency.
- Keep the final proof covered with a towel to prevent the surface from drying out and developing a crust before baking.
- If your oven has a steam feature, use it for the first part of baking to enhance crust texture.
- Allow the loaf to cool completely to ensure proper slicing and texture.
Common Mistakes to Avoid
- Using an inactive sourdough starter: If your starter isn’t bubbly, the bread won’t rise properly. Always feed it ahead of time and let it become active before use.
- Skipping the resting period: Jumping straight into kneading without letting the dough rest can hinder gluten development. Be patient; the autolyse increases elasticity.
- Under-kneading the dough: Dough that hasn’t been kneaded enough may not rise well and will result in a dense loaf. Watch for a smooth, elastic texture as a cue.
- Not allowing enough time for fermentation: Rushing the rising times can lead to flat bread. Allow sufficient time to develop flavor and structure properly.
- Cutting the loaf too soon: Slicing before the bread has cooled fully can result in a gummy texture. Wait for it to cool on a wire rack before cutting.
- Incorrect oven temperature: Baking at the wrong temperature interferes with proper crust formation. Check your oven calibration and adjust if necessary.
Variations & Substitutions
For a slight twist, consider adding herbs or seeds to the dough for flavor and texture. Adjustments to hydration, such as adding small amounts of whole wheat flour, can change the loaf’s character while maintaining the recipe’s integrity. These small changes can enhance your sourdough without complicating the process.
Storage & Reheating
Store your sourdough bread at room temperature in a cloth bag or wrapped lightly in plastic to maintain moisture. If you need to refrigerate it, keep it well-wrapped to prevent drying out. For longer storage, consider freezing the bread. Slice it before freezing for easy access. To reheat, pop slices in a toaster or warm the whole loaf in a 350°F oven for a few minutes to restore freshness and texture.
Frequently Asked Questions
Can I make this recipe ahead of time?
Yes, you can prepare the dough and let it rise in the refrigerator overnight. It can enhance flavor. Just allow extra time for it to come to room temperature before baking the next day.
How long does it last in the fridge?
Sourdough bread can typically last about a week in the refrigerator when stored properly in a bag or wrapped up. To keep it fresh, try to consume it within this timeframe.
Can I freeze this recipe?
Yes, you can freeze both whole loaves and slices. Make sure they are cooled completely, then wrap well in plastic and place in an airtight bag to avoid freezer burn.
What can I substitute for one ingredient?
To keep the recipe straightforward, all ingredients play a vital role. If necessary, adjust the type of flour, but be wary that altering the flour may affect water absorption and flavor.
Why didn’t my recipe turn out as expected?
Common issues include an inactive starter, insufficient fermentation time, or incorrect oven temperature. Double-check these factors for a better outcome next time.
Final Thoughts
Making sourdough bread can be a rewarding experience filled with lessons and delicious results. As you take the time to mix, knead, and wait, you’re creating something not just for nourishment but also for enjoyment. Each loaf reflects care and attention, leading to comfort in every bite. Enjoy the process and the simple satisfaction that comes with baking bread at home.

Beginner’s Sourdough Bread
Ingredients
For the bread
- 475 grams all-purpose flour For structure and texture
- 100 grams active sourdough starter For leavening and flavor
- 325 grams water For moisture
- 10 grams salt For flavor enhancement
Instructions
Preparation
- In a large mixing bowl, combine the 475 grams of all-purpose flour with 10 grams of salt. Mix them together until well combined.
- Add the 100 grams of active sourdough starter to the bowl with the flour and salt mixture. Pour in the 325 grams of water and mix everything until all the flour is incorporated.
- Allow the dough to rest for about 30 minutes to hydrate and start developing gluten.
- Knead the dough on a lightly floured surface for about 8-10 minutes, until it becomes smooth and slightly tacky.
Fermentation
- Transfer the kneaded dough back to the mixing bowl and cover with a clean towel. Let it rise for several hours or until it has doubled in size.
- Once doubled, gently deflate the dough and shape it into a round loaf.
- Place the shaped dough seam-side down on a parchment-lined baking sheet or in a loaf pan. Cover and let it rise for another 30-60 minutes.
Baking
- Preheat the oven to around 450°F.
- Once proofed, bake the loaf in the preheated oven until well-browned.
- After baking, remove the loaf from the oven and let it cool on a wire rack.


