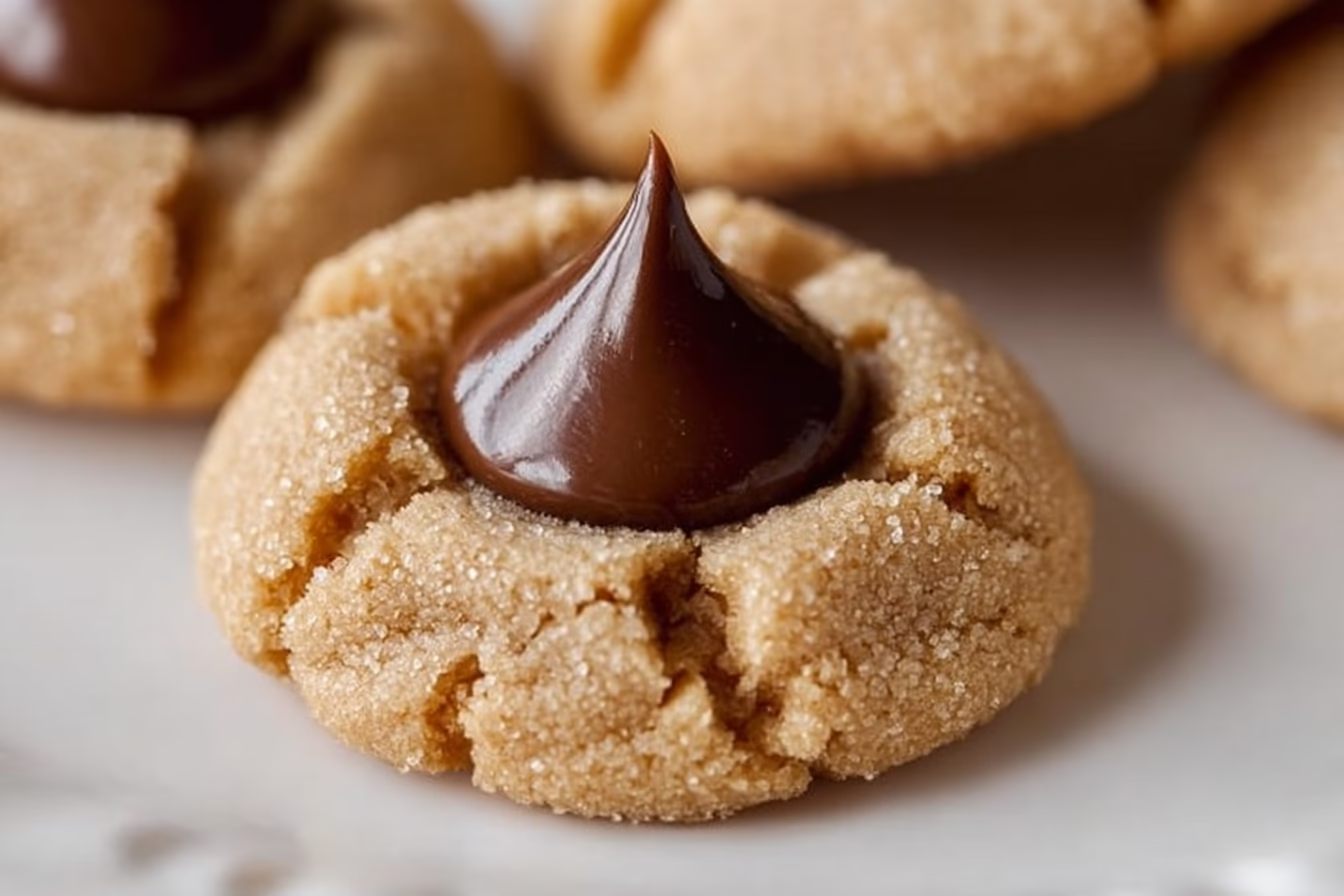
There’s something incredibly satisfying about making cookies from scratch. These Classic Peanut Butter Blossoms are a delightful option for just about any occasion—whether it’s a busy weeknight, a relaxing weekend afternoon, or a gathering with friends and family. Their comforting texture and rich flavor make them a beloved treat. Plus, they’re simple enough to whip up on a whim. Join me in creating these timeless cookies that bring cozy warmth to our everyday moments.
Why You’ll Love This Recipe Classic Peanut Butter Blossoms
This recipe is all about ease and reliability, making it the go-to choice for busy lives. The balanced flavor of creamy peanut butter and gentle sweetness creates a comforting treat that’s perfect for casual snacking or special gatherings. With Classic Peanut Butter Blossoms, you’ll find a delightful experience that fits smoothly into your routine, offering delicious cookies without the fuss.
Kitchen Tools You’ll Need
- Mixing bowls
- Baking sheets
- Parchment paper (optional)
- Measuring cups and spoons
- Electric mixer (optional, but helpful)
- Cookie scoop or spoon
Ingredients
- 1 3/4 cup All-Purpose Flour (provides structure)
- 1 tsp Baking Soda (helps cookies rise)
- 1/2 tsp Salt (enhances flavor)
- 1/2 cup Creamy Peanut Butter (adds richness and flavor)
- 1/2 cup Unsalted Butter, room temperature (creates a tender texture)
- 1/2 cup Granulated Sugar (sweetens and contributes to texture)
- 1/2 cup Light Brown Sugar, lightly packed (adds moisture and depth of flavor)
- 1 Large Egg (binds ingredients together)
- 2 tbsp Milk (adds moisture)
- 1 tsp Vanilla Extract (boosts overall flavor)
- 1/2 cup Granulated Sugar, additional amount for coating cookies (creates a sweet crust)
- 11 oz Bag of Hershey Kisses (provides a sweet chocolate center)

How to Make Classic Peanut Butter Blossoms
Step 1. Start by preheating your oven to 350°F (no need to guess; set it to the right temperature for baking). As the oven warms up, grab a mixing bowl and whisk together the all-purpose flour, baking soda, and salt. Mixing these dry ingredients ensures that the baking soda disperses evenly and that the salt enhances the overall flavor. Set this bowl aside for later.
Step 2. In a separate bowl, cream together the creamy peanut butter, unsalted butter, granulated sugar, and light brown sugar until the mixture is light and fluffy. Use an electric mixer if you have one, as it can make this step easier. The goal is to create a smooth and soft mixture, which helps form the right texture for your cookies.
Step 3. Beat in the large egg, milk, and vanilla extract until everything is well combined and smooth. This mixture should have a creamy consistency, and adding the egg will help bind the ingredients together, while the milk and vanilla contribute to the overall flavor and moisture.
Step 4. Gradually, mix in the dry ingredients from the first bowl. Combine them until just incorporated. Be careful not to overmix, as this can lead to tougher cookies. When you see no flour streaks, you know it’s ready. The batter will be thick but smooth.
Step 5. Scoop out tablespoon-sized balls of dough and roll them in your hands to form smooth balls. Keep an eye on the size; uniform cookies ensure even baking. Then, roll each piece in the additional granulated sugar to coat before placing them on your prepared baking sheets. This adds a touch of sweetness to the exterior.
Step 6. Bake the cookies in your preheated oven for about 10 to 12 minutes, or until they are lightly browned around the edges. You want to watch for a slight puffing and set appearance—these cues tell you they’re nearly done.
Step 7. As soon as the cookies come out of the oven, place a Hershey Kiss on top of each cookie while they’re still warm. The heat will slightly melt the chocolate, adhering it nicely to the cookie. Allowing them to cool slightly on the baking sheet before transferring them will make the task easier and neater.
Step 8. Transfer the cookies to wire racks to cool completely. This cooling process is essential, as it allows the cookies to firm up and maintain their shape. Enjoy the lovely aroma wafting through your kitchen as they cool.
Serving Suggestions
These Classic Peanut Butter Blossoms are versatile and can be enjoyed in many ways. They make for a delightful breakfast treat with a cup of coffee or tea. They’re also perfect as a mid-afternoon snack, offering a satisfying pick-me-up. Bring them to family meals or gatherings, and they’re sure to disappear quickly. If you have leftovers, they’re just as enjoyable for dessert later—though they may not last long enough to require storage.
Pro Tips for Best Results
- Ensure your butter is at room temperature for easier creaming, which results in a better texture.
- Use a cookie scoop to keep cookie sizes consistent, leading to even baking.
- Allow the cookies to cool on the sheet for a few minutes before transferring; they’ll hold their shape better.
- For an extra touch, try sprinkling a little sea salt on top of the chocolate after placing the Hershey Kisses.
- If your kitchen is particularly warm, consider chilling the dough for about 30 minutes before baking.
Common Mistakes to Avoid
- Overmixing the Dough: This can lead to tough cookies. Mix only until incorporated to keep a light texture.
- Not Measuring Flour Correctly: Too much can dry out the cookies. Use the spoon-and-level method for accuracy.
- Using Cold Butter: It’s important for the butter to be at room temperature to achieve the right texture during creaming.
- Baking at the Wrong Temperature: An inaccurate oven temperature can affect the cookies’ rise and texture. Invest in an oven thermometer if needed.
- Skipping the Cooling Step: Cutting cookies too soon can make them fall apart. Let them sit for a few minutes on the baking sheet first.
- Not Rolling the Dough Balls Uniformly: Uneven sizes can cause inconsistent baking. Aim for the same size for all cookies to ensure even results.
Variations & Substitutions
If you’re looking to mix things up, consider adding a handful of chopped nuts for extra crunch or using dark chocolate Kisses instead of the classic ones for a rich twist. You can also drizzle melted chocolate over cooled cookies for a fancier presentation. If preferred, try making them with crunchy peanut butter for a different texture.
Storage & Reheating
Store the cookies at room temperature in an airtight container. They should stay fresh for about a week. For longer storage, you can keep them in the refrigerator for up to two weeks. If you choose to freeze them, layer parchment paper between cookies in a freezer-safe container; they’ll hold their taste and texture for up to three months. To enjoy, simply allow them to thaw at room temperature or warm them briefly in the oven to refresh their texture.
Nutrition Information
- Calories: 150
- Total Fat: 7g
- Saturated Fat: 3g
- Carbohydrates: 21g
- Fiber: 1g
- Sugar: 10g
- Protein: 2g
- Sodium: 130mg
Frequently Asked Questions
Can I make this recipe ahead of time?
Yes, you can prepare the dough ahead of time and store it in the refrigerator for up to a day or freeze it for future use. Just allow the dough to sit at room temperature for a bit before baking.
How long does it last in the fridge?
These cookies can last about a week when stored in the refrigerator in an airtight container. Make sure to separate layers with parchment paper to prevent sticking.
Can I freeze this recipe?
Absolutely. You can freeze both the dough and the baked cookies. Baked cookies will maintain quality for about three months. Just remember to wrap them tightly and use freezer-safe containers.
What can I substitute for one ingredient?
If you need to substitute an ingredient, you can use natural peanut butter instead of creamy for a chunkier texture, or even almond butter for a different flavor profile.
Why didn’t my recipe turn out as expected?
There could be many reasons, like incorrect measurements or overmixing. Pay attention to ingredient conditions and follow the steps closely for the best results.
Final Thoughts
Making Classic Peanut Butter Blossoms is a comforting experience that fits seamlessly into daily life. The process is straightforward, and the outcome rewards you with delicious cookies that are sure to bring smiles. As you enjoy these treats, know that simple home-cooked recipes like these hold a special place in our hearts and kitchens, inviting warmth and joy to every moment.

Classic Peanut Butter Blossoms
Ingredients
Dry Ingredients
- 1 3/4 cup All-Purpose Flour provides structure
- 1 tsp Baking Soda helps cookies rise
- 1/2 tsp Salt enhances flavor
Wet Ingredients
- 1/2 cup Creamy Peanut Butter adds richness and flavor
- 1/2 cup Unsalted Butter, room temperature creates a tender texture
- 1/2 cup Granulated Sugar sweetens and contributes to texture
- 1/2 cup Light Brown Sugar, lightly packed adds moisture and depth of flavor
- 1 Large Egg binds ingredients together
- 2 tbsp Milk adds moisture
- 1 tsp Vanilla Extract boosts overall flavor
Coating and Filling
- 1/2 cup Granulated Sugar, additional amount for coating cookies creates a sweet crust
- 11 oz Bag of Hershey Kisses provides a sweet chocolate center
Instructions
Preparation
- Preheat your oven to 350°F.
- In a mixing bowl, whisk together the all-purpose flour, baking soda, and salt. Set aside.
- In a separate bowl, cream together the creamy peanut butter, unsalted butter, granulated sugar, and light brown sugar until light and fluffy.
- Beat in the egg, milk, and vanilla extract until smooth.
- Gradually mix in the dry ingredients until just incorporated.
- Scoop tablespoon-sized balls of dough, roll in hands, and then roll in additional sugar to coat.
Baking
- Place dough balls on prepared baking sheets and bake for 10 to 12 minutes until lightly browned.
- Immediately place a Hershey Kiss on each cookie as they come out of the oven.
- Allow to cool slightly on the baking sheet, then transfer to wire racks to cool completely.