
Easy Homemade Gluten-Free Cheesecake Brownies
These Easy Homemade Gluten-Free Cheesecake Brownies are a delightful treat that brings together the richness of chocolate brownies and the creamy texture of cheesecake. They are perfect for any occasion, whether it’s a family gathering, a festive celebration, or simply a cozy night in. The dual layers provide a balanced flavor that both kids and adults will appreciate. Plus, they’re easy to make, allowing anyone to enjoy baking without the fuss. These brownies will satisfy that sweet tooth while being gluten-free, making them a wonderful option for those with dietary restrictions.
Why You’ll Love This Recipe
This recipe is appealing for its ease and reliable outcomes. With straightforward steps, you can create a comforting dessert that feels indulgent yet remains practical for everyday occasions. The blend of creamy cheesecake and fudgy brownie offers balanced flavors that can be enjoyed at any time, making these Easy Homemade Gluten-Free Cheesecake Brownies a staple in your dessert repertoire.
Kitchen Tools You’ll Need
- Mixing bowls
- Electric mixer
- Baking pan
- Spatula
- Measuring cups and spoons
Ingredients
- 2 8oz. packages of cream cheese (full-fat brick-style for the best flavor)
- 2/3 cup white sugar (adds sweetness)
- 2 eggs (helps bind ingredients)
- Optional: chocolate chips (adds texture and flavor)
- 1 cup butter (2 sticks, brings moisture)
- 2 cups white sugar (for the brownie base)
- 4 eggs (for structure)
- 1/4 tsp salt (enhances flavor)
- 1 cup cocoa (for rich chocolate flavor)
- 1 cup all-purpose gluten-free flour (or regular flour for structure)
- Optional: chopped walnuts (adds crunch and flavor)
How to Make Easy Homemade Gluten-Free Cheesecake Brownies
Step 1. Begin by preheating your oven to 350°F. Greasing or lining a suitable baking pan is essential to ensure your brownies don’t stick. Choose a pan that is of appropriate size, typically an 8×8 or 9×9-inch will work best. This step is critical as it prepares your baking environment for even cooking and easy release later.
Step 2. In a mixing bowl, combine the cream cheese and 2/3 cup of white sugar. Use an electric mixer to blend these together until smooth and creamy. Keep an eye on the mixture, ensuring there are no lumps. This step creates the cheesecake layer that will provide a delicious contrast to the chocolate brownie below.
Step 3. Next, add two eggs to the cream cheese mixture and continue to mix until fully incorporated. The eggs help to create a rich, creamy texture in the cheesecake layer while binding the ingredients together. Once the mixture is smooth, set it aside.
Step 4. In a separate bowl, melt 1 cup of butter. Let it cool slightly, then combine with 2 cups of white sugar. Mixing them together should result in a homogeneous mixture that has a glossy appearance, indicating that the sugars are adequately incorporated with the butter.
Step 5. Incorporate four eggs into the butter-sugar mixture one at a time, mixing thoroughly after each addition. This will ensure that your brownie base is moist and fluffy. Watch for a smooth batter; this signals that the eggs are well combined before moving on to the dry ingredients.
Step 6. In the same bowl, add 1 cup of cocoa and 1 cup of gluten-free flour. Be sure to sprinkle in 1/4 teaspoon of salt, as well. Gently fold these dry ingredients into the wet mix until just combined. Avoid overmixing; this helps maintain a tender brownie texture that is essential for the perfect bake.
Step 7. Pour about half of the brownie batter into the prepared pan, spreading it out evenly across the bottom. Ensure that the layer is uniform so that it bakes evenly. This step forms the foundation for the cheesecake layer that you will add next.
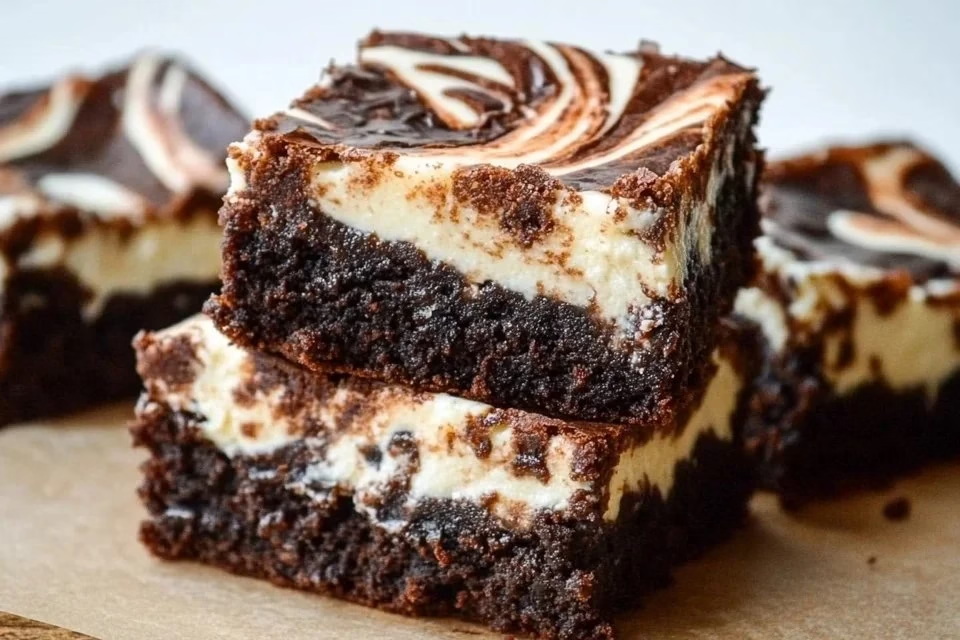
Step 8. Gently dollop the cheesecake mixture over the brownie layer. Use a spatula to spread it out evenly, ensuring that you leave some brownie batter visible at the edges. This creates a beautiful visual appeal and helps with the balance of flavors.
Step 9. Finally, add the remaining brownie batter on top of the cheesecake layer, distributing it evenly. You can use a knife or spatula to swirl the two layers together slightly if you wish. This creates a marbled effect that enhances both the appearance and flavor of the brownies.
Step 10. Bake in the preheated oven for approximately 30-35 minutes, or until a toothpick inserted into the center comes out clean or with a few moist crumbs. Watch closely during the last few minutes, as baking times can vary based on your oven. Once done, remove the pan from the oven and allow it to cool completely before slicing.
Serving Suggestions
These Easy Homemade Gluten-Free Cheesecake Brownies are versatile and can be enjoyed as a delightful dessert after dinner or as a sweet snack during the day. They are perfect for serving at family gatherings or potlucks, as their rich flavors appeal to a crowd. You can serve them plain, dusted with powdered sugar, or add a dollop of whipped cream on top. Leftovers can be stored for later, making them a convenient treat that is worth savoring throughout the week.
Pro Tips for Best Results
- Make sure your cream cheese is at room temperature for easy blending without lumps.
- Don’t overmix the brownie batter to keep the texture tender.
- If using optional chocolate chips or walnuts, fold them in gently at the end to avoid breaking them up.
- Allow the brownies to cool completely for clean cuts and to enhance the texture.
- Store brownies in an airtight container for the best freshness.
Common Mistakes to Avoid
- Using cold cream cheese: Cold cream cheese is difficult to blend, causing lumps in the cheesecake layer. Always let it reach room temperature for a smooth texture.
- Skipping the salt: Omitting salt can dull the flavors of the brownies and cheesecake. Always include it to elevate the overall taste of your dessert.
- Overmixing the batter: Overmixing can lead to a tough texture in your brownies. Mix just until combined for the best results.
- Not preheating your oven: Baking in an unheated oven can result in uneven cooking. Always preheat to ensure consistent baking temperatures.
- Opening the oven door too soon: Opening the oven door too early can cause the brownies to sink. Wait until they are nearly done before checking for doneness.
- Not cooling before slicing: Cutting into warm brownies will result in messy portions. Allow them to cool completely for clean edges and a better presentation.
Variations & Substitutions
For those looking to mix things up, consider adding a swirl of peanut butter or caramel on top before baking. You can also experiment with flavors by adding a teaspoon of vanilla extract to the cheesecake layer for an added depth of flavor. If desired, swap out chocolate chips for white chocolate or butterscotch chips for a different taste experience.
Storage & Reheating
Store the brownies at room temperature in an airtight container for up to three days. If you need a longer shelf life, refrigerate them for up to a week. They can also be frozen for up to three months; just wrap them securely in plastic wrap and aluminum foil. For the best texture when reheating, place them in the microwave for a few seconds to warm them up slightly, ensuring they don’t dry out.
Nutrition Information
Nutrition values are estimates and may vary based on ingredients used.
Frequently Asked Questions
Can I make this recipe ahead of time?
Yes, these brownies can be made a day or two in advance. Just store them in an airtight container at room temperature or in the refrigerator. This allows the flavors to meld together, enhancing the taste.
How long does it last in the fridge?
In the refrigerator, these brownies will stay fresh for up to one week when stored properly in an airtight container. Be sure to keep them well-sealed to maintain their texture.
Can I freeze this recipe?
Yes, they can be frozen for up to three months. Wrap the brownies tightly in plastic wrap and then in aluminum foil to prevent freezer burn. Thaw them in the refrigerator or at room temperature before serving.
What can I substitute for one ingredient?
If you need to make substitutions, you can use a dairy-free cream cheese alternative or a plant-based butter for a dairy-free version. This will still give you a delicious result.
Why didn’t my recipe turn out as expected?
There could be various reasons, such as incorrect oven temperature, ingredient mismeasurements, or overmixing. Always ensure accuracy in measurements and follow the instructions carefully for the best outcome.
Final Thoughts
Making these Easy Homemade Gluten-Free Cheesecake Brownies offers a rewarding experience, from preparing to savoring each bite. This recipe strikes the perfect balance between rich chocolate and creamy cheesecake, creating a delightful dessert that fits into everyday life. Whether for family gatherings or quiet evenings, these brownies promise warmth and satisfaction in every piece. Enjoy the process and, most importantly, the delicious results that follow.
Easy Homemade Gluten-Free Cheesecake Brownies
Ingredients
For the Cheesecake Layer
- 2 packages 8oz. packages of cream cheese (full-fat brick-style) Best flavor
- 2/3 cup white sugar Adds sweetness
- 2 pieces eggs Helps bind ingredients
For the Brownie Layer
- 1 cup butter 2 sticks, brings moisture
- 2 cups white sugar For the brownie base
- 4 pieces eggs For structure
- 1/4 tsp salt Enhances flavor
- 1 cup cocoa For rich chocolate flavor
- 1 cup all-purpose gluten-free flour Or regular flour for structure
- Optional: chocolate chips Adds texture and flavor
- Optional: chopped walnuts Adds crunch and flavor
Instructions
Preparation
- Preheat your oven to 350°F and grease or line a suitable baking pan (8x8 or 9x9 inches).
- In a mixing bowl, combine the cream cheese and 2/3 cup of white sugar and blend until smooth with an electric mixer.
- Add 2 eggs to the cream cheese mixture and mix until fully incorporated. Set aside.
Making the Brownie Batter
- Melt 1 cup of butter and let it cool slightly, then combine with 2 cups of white sugar until glossy.
- Add 4 eggs to the butter-sugar mixture one at a time, mixing thoroughly after each addition.
- In the same bowl, add 1 cup of cocoa, 1 cup of gluten-free flour, and 1/4 tsp of salt. Gently fold the dry ingredients into the wet mix until just combined.
Layering and Baking
- Pour half of the brownie batter into the prepared pan, spreading it out evenly.
- Dollop the cheesecake mixture over the brownie layer and spread evenly.
- Add the remaining brownie batter on top, distributing evenly. Swirl slightly if desired.
- Bake in the preheated oven for approximately 30-35 minutes or until a toothpick comes out clean or with a few moist crumbs.
- Cool completely before slicing.


