
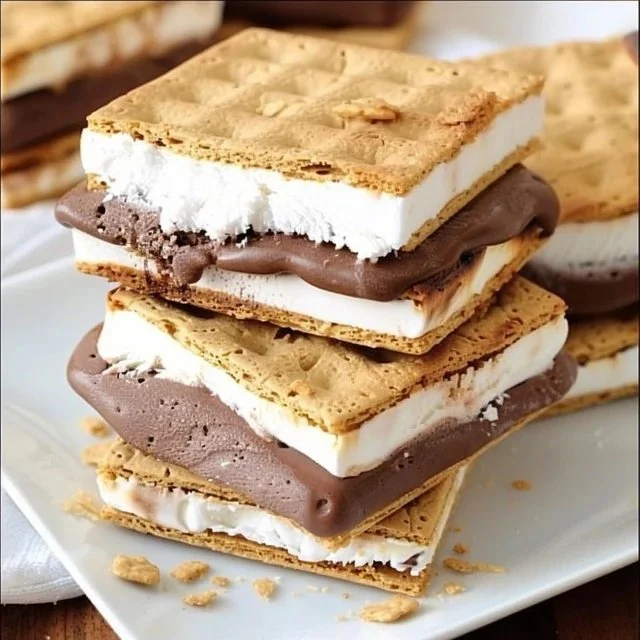
There’s something wonderfully simple about enjoying a cool treat like this one, especially on a warm evening or during a weekend gathering. The layers of flavor come together easily, creating a comforting balance of sweet chocolate pudding, rich cream cheese, and fluffy marshmallow. Whether you’re making this during a quiet moment at home or to serve a group, it’s a delightful experience that offers both familiarity and fun. Let’s dive into making these Frozen S’mores.
Why You’ll Love This Frozen Strawberry Cream Cake
This recipe stands out for its ease and reliability, making it a go-to for quick desserts. The comforting combination of chocolate and marshmallow creates a balanced flavor profile that pleases many. With its practical everyday value, you’ll appreciate how it satisfies sweet tooth cravings while being simple enough for any occasion.
Kitchen Tools You’ll Need
- Mixing bowl
- Whisk
- Spatula
- 9×9-inch baking dish or comparable size
Ingredients
- 1 (5.9-ounce) box instant chocolate pudding (for a creamy base)
- 2 ½ cups whole milk (provides moisture and creaminess)
- 2 ½ cups Cool Whip, defrosted and divided (adds lightness and sweetness)
- 12 graham crackers, broken in half and divided (for crunch and support)
- 5 ounces cream cheese, at room temperature (contributes richness and texture)
- 7 ounces marshmallow creme (for sweetness and a fluffy texture)
- Pinch of salt (enhances overall flavor)

How to Make Frozen Strawberry Cream Cake
Step 1. In a mixing bowl, combine the instant chocolate pudding and whole milk. Use a whisk to blend them until the mixture thickens, which takes about two minutes. You’re looking for a smooth, lump-free consistency. The pudding mix will absorb the milk and create a thick base for your layers.
Step 2. Once the pudding is ready, fold in 1 ½ cups of the defrosted Cool Whip. Use a spatula to gently combine them until the mixture is evenly incorporated. This step is important to achieve a light and airy texture. The combined mixture should appear creamy and slightly fluffy.
Step 3. Next, take half of the broken graham crackers and layer them at the bottom of your baking dish. This base supports the creamy layers above and adds both texture and flavor. Make sure to cover the bottom evenly for a stable foundation.
Step 4. Spoon half of the chocolate pudding mixture over the graham cracker layer in the baking dish. Spread it evenly, ensuring good coverage across the crackers. You want to create a smooth layer that sets the stage for the other components.
Step 5. In another bowl, mix together the cream cheese, marshmallow creme, and a pinch of salt until fully combined. The cream cheese should be soft and blend easily with the marshmallow, resulting in a smooth filling. This mixture will bring a rich sweetness that balances nicely with the chocolate.
Step 6. Carefully spread the cream cheese and marshmallow mixture over the pudding layer in the baking dish. Use a spatula to smooth it out evenly. This layer adds a great contrasting flavor and texture that you’ll enjoy in each bite.
Step 7. Add another layer of the remaining broken graham crackers on top of the cream cheese mixture. This second layer reinforces the structure of the dessert and adds a satisfying crunch. Lay them evenly to create a balanced texture throughout.
Step 8. Finish by spreading the remaining chocolate pudding mixture over the graham cracker layer. Ensure it is smooth and even, which will provide a nice finish to the dessert. This top layer seals in all the flavors beneath.
Step 9. Finally, dollop the remaining 1 cup of Cool Whip on top of the pudding and carefully spread it across the surface. This will create a light, fluffy topping that complements the richness below. Be gentle to keep it airy and appealing visually.
Step 10. Cover the dish with plastic wrap and place it in the freezer. Allow it to freeze until set, which generally takes about four hours or until firm. This step is crucial for the texture, ensuring a delightful frozen treat when served.

Serving Suggestions
These Frozen S’mores make for a delightful dessert any time you want something sweet. They work perfectly as a fun breakfast treat or an after-dinner snack. Enjoy them at family meals, where the dessert can be a highlight. They also store well for later, making them a convenient option for busy days. If you have leftovers, bringing them to a gathering can be a hit, as they’re simple to slice and serve.
Pro Tips for Best Results
- Use room-temperature cream cheese for easier blending with the marshmallow creme.
- Be gentle when folding in the Cool Whip to maintain its light texture.
- Ensure the pudding is thickened before layering to prevent watery layers.
- For the best flavor, use full-fat cream cheese for richness.
- Allow ample time for freezing to ensure it sets properly.
- Feel free to double the recipe for larger gatherings.
Common Mistakes to Avoid
- Not mixing the pudding thoroughly: If not mixed well, the pudding may stay lumpy and not thicken properly. Always whisk until completely smooth for a nice texture.
- Using cold cream cheese: Cold cream cheese is difficult to blend smoothly and may result in lumps. Always soften it to room temperature before mixing.
- Skipping the cooling phase: If the dessert isn’t allowed to freeze adequately, the layers may not hold together well when served. Provide sufficient time in the freezer for best results.
- Adding too much Cool Whip at once: If you add too much at once, it can deflate easily. Fold it in gradually to maintain fluffiness.
- Not evenly distributing layers: Uneven layers can lead to a cascading effect when served. Aim for uniform layers for an attractive presentation.
- Cutting before fully frozen: If you slice the dessert too early, it could become messy and lose its shape. Wait until it’s frozen solid for clean cuts.
Variations & Substitutions
You can easily customize this recipe. For a different flavor, try using vanilla pudding instead of chocolate. If you want a nutty twist, incorporate finely chopped nuts between layers. For added sweetness, consider drizzling some chocolate syrup on top before serving. You could also replace graham crackers with other crunchy cookies if desired. These options can give your Frozen S’mores a personal touch without changing the core recipe.
Storage & Reheating
These Frozen S’mores should be stored in the freezer for long-lasting freshness. They can be kept in the refrigerator for a day or two, but they are best enjoyed frozen. If you have any leftovers, ensure that they are tightly covered to prevent freezer burn. Avoid reheating, as this treat is intended to be enjoyed cold and the texture may suffer if thawed and reset.
Frequently Asked Questions
Can I make this recipe ahead of time?
Yes, this dessert is perfect for preparing ahead of time. You can make it a day or two in advance, allowing it to set properly in the freezer before serving.
How long does it last in the fridge?
If stored in the refrigerator, it will keep well for about two to three days. However, it tends to be best when stored in the freezer.
Can I freeze this recipe?
Absolutely! Freezing is essential for this recipe so that it achieves that perfect frozen texture. It can be stored in the freezer for up to a month if covered tightly.
What can I substitute for one ingredient?
If you need to replace the graham crackers, consider using any crunchy cookies, like vanilla wafers, for a different flavor profile while still providing the same texture.
Why didn’t my recipe turn out as expected?
Common issues can arise from not mixing ingredients thoroughly or not allowing enough freezing time. Ensure you follow each step carefully for the best outcome.
Final Thoughts
Making Frozen S’mores is a straightforward process that can bring a little joy into your kitchen routine. With simple layers and delightful flavors, each bite reflects the comfort of classic ingredients like chocolate and marshmallow. Enjoying this treat, whether alone or with others, offers a little pause in your day to savor something sweet and satisfying.

Frozen S’mores
Ingredients
For the pudding base
- 1 box instant chocolate pudding (5.9 ounces) For a creamy base
- 2.5 cups whole milk Provides moisture and creaminess
- 2.5 cups Cool Whip, defrosted and divided Adds lightness and sweetness
For the layers
- 12 pieces graham crackers, broken in half and divided For crunch and support
- 5 ounces cream cheese, at room temperature Contributes richness and texture
- 7 ounces marshmallow creme For sweetness and a fluffy texture
- 1 pinch salt Enhances overall flavor
Instructions
Preparation
- In a mixing bowl, combine the instant chocolate pudding and whole milk. Use a whisk to blend until the mixture thickens, about two minutes.
- Fold in 1 ½ cups of the defrosted Cool Whip until evenly combined.
- Layer half of the broken graham crackers at the bottom of a 9x9-inch baking dish.
- Spread half of the chocolate pudding mixture over the graham cracker layer.
- Mix together cream cheese, marshmallow creme, and a pinch of salt until smooth.
- Spread the cream cheese and marshmallow mixture over the pudding layer.
- Add the remaining broken graham crackers on top.
- Spread the remaining chocolate pudding mixture over the graham cracker layer.
- Dollop the remaining 1 cup of Cool Whip on top and spread it gently.
- Cover with plastic wrap and freeze until set, about four hours.


