A no-bake dessert can be just the ticket for days when you want something sweet without a lot of fuss. These individual cheesecake cups take advantage of creamy textures and bright pineapple sweetness, making them perfect for various occasions. You might enjoy them on a quiet evening at home, serve them at a weekend gathering, or even prepare them for a family weeknight treat. Their simplicity and comforting flavor make them a go-to choice anytime. Let’s dive into this delightful recipe.
Why You’ll Love This Hawaiian Pineapple Cheesecake Cups Easy No Bake Dessert
You’ll appreciate the ease and reliability of these Hawaiian Pineapple Cheesecake Cups (Easy No Bake Dessert). They offer a comforting balance of sweet and tangy flavors, thanks to the cream cheese and pineapple. This recipe is practical for everyday moments, from quick snacks to a delightful finish to family meals, ensuring you have a delicious dessert no matter the occasion.
Kitchen Tools You’ll Need
- Mixing bowls
- Whisk or electric mixer
- Spoon or spatula
- Measuring cups and spoons
- Serving cups or ramekins
Ingredients
- 1 cup graham cracker crumbs (for a crumbly texture)
- ¼ cup butter, melted (adds moisture and richness)
- 1 tablespoon granulated sugar (sweetens the crust)
- 1 8-ounce block cream cheese, softened (provides a creamy base)
- ½ cup heavy cream (adds richness and lightness)
- ½ cup plain Greek yogurt (for tang and creaminess)
- ¼ cup granulated sugar (sweetens the filling)
- 1 teaspoon pure vanilla extract (enhances flavor)
- 8 ounces canned pineapple, crushed or finely diced and drained (adds fruitiness and moisture)
- Extra pineapple slices to garnish (for decoration)
- Maraschino cherries to garnish (adds a sweet touch)
 1")
How to Make Hawaiian Pineapple Cheesecake Cups Easy No Bake Dessert
Step 1. Start by preparing the crust. In a mixing bowl, combine the graham cracker crumbs, melted butter, and one tablespoon of granulated sugar. Mix thoroughly until the crumbs are evenly coated with the butter and the mixture resembles wet sand. This step is complete when you can press the mixture together, and it holds its shape.
Step 2. Next, take your prepared crust mixture and evenly distribute it into serving cups or ramekins. Press the crust down firmly with a spoon to create a compact and even layer at the bottom of each cup. This will help maintain a sturdy base for the cheesecake filling. The crust should appear smooth and well-formed once you’ve pressed it down.
Step 3. In a separate mixing bowl, beat the softened cream cheese until it is smooth and creamy, using a whisk or electric mixer. This will make it easier to combine with the other ingredients later. Look for a completely lump-free consistency before moving on to the next step.
Step 4. Add the heavy cream and Greek yogurt to the bowl with the cream cheese. Beat the mixture until it’s smooth and well-combined. This should create a light and airy texture that will contribute to the creaminess of the cheesecake while ensuring it doesn’t feel too heavy.
Step 5. Gradually mix in the granulated sugar and pure vanilla extract. Continue beating the mixture until everything is combined and smooth. You want this filling to be soft and creamy while also sweetened appropriately, with the vanilla enhancing the overall flavor.
Step 6. Finally, fold in the drained crushed or finely diced pineapple pieces. Use a spatula to gently combine the fruit with the cream cheese mixture, ensuring an even distribution without overmixing. The mixture should be creamy with small chunks of pineapple peeking through, ready to bring a delicious tropical flavor to each bite.
Step 7. Spoon the cheesecake filling into each cup on top of the crust layer, distributing it evenly. Smooth the tops gently with a spatula for an inviting appearance. The filling should be heaped slightly above the edge of the crust, ready for a bit of garnish once set.
Step 8. Refrigerate the cups for at least four hours or until the filling has set. This cooling time helps the flavors meld and the texture firm up, making each bite satisfying. The dessert should feel firm yet creamy when it’s ready to serve.
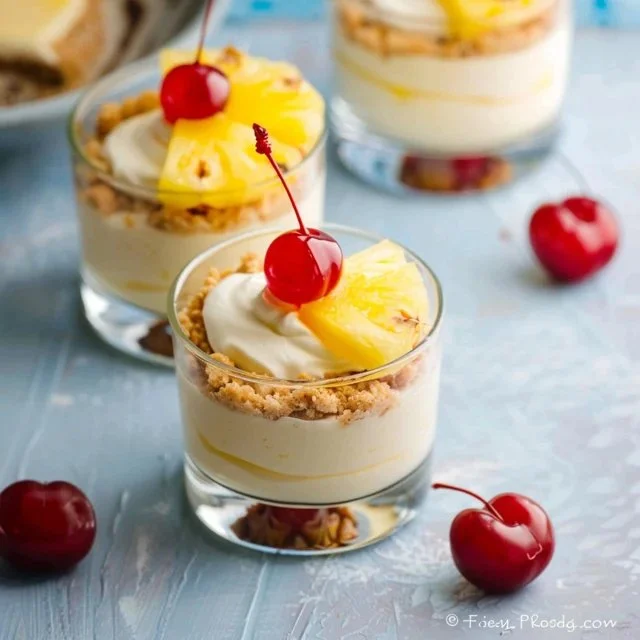
Step 9. Before serving, garnish each cup with a slice of pineapple and a Maraschino cherry on top for a fun pop of color. This final touch enhances the visual appeal and adds a hint of extra sweetness, making each cup look as delightful as it tastes.
 2")
Serving Suggestions
These Hawaiian Pineapple Cheesecake Cups work well as a sweet breakfast or a midday snack, providing a refreshing burst of flavor. They make a lovely dessert for family dinners, and leftovers can be enjoyed anytime the craving strikes. Keep them on hand for an easy treat after meals or as an afternoon pick-me-up. Their individual servings also make them ideal for sharing at gatherings, allowing guests to enjoy their own delightful portion without any fuss.
Pro Tips for Best Results
- Allow cream cheese to soften thoroughly for easy blending.
- Make sure to fully drain the canned pineapple to avoid excess moisture diluting the filling.
- Chill the cups covered to maintain freshness and prevent them from absorbing other odors in the fridge.
- Use freshly crushed graham crackers for a more textured crust if you prefer.
- Adjust sugar levels based on personal taste, especially if you like a less sweet filling.
Common Mistakes to Avoid
- Using cold cream cheese: If the cream cheese isn’t softened, the filling can be lumpy. Make sure it’s at room temperature for a smooth texture.
- Not draining the pineapple properly: Extra moisture can make the filling runny and affect the consistency. Ensure it’s well-drained before adding.
- Overmixing the filling: Overmixing can cause the filling to become too airy or lose its creaminess. Mix just until combined and smooth.
- Skipping the chilling step: Not allowing the cups to chill may result in a filling that’s too soft. Chilling helps set the dessert properly.
- Not pressing the crust firmly enough: A crumbly base can make the dessert difficult to serve. Press the crust firmly to ensure it holds together.
- Using the wrong serving containers: Using containers that are too small may overflow with filling. Opt for cups or ramekins that can hold the mixture comfortably.
Variations & Substitutions
You can try using different flavors of yogurt, such as coconut or vanilla, for a subtle flavor twist. For added texture, consider folding in some crushed nuts or toasted coconut along with the pineapple. If you’re looking to lighten things up, replacing heavy cream with a lower-fat option, such as whipped topping, can work well.
Storage & Reheating
Store the Hawaiian Pineapple Cheesecake Cups covered in the refrigerator for up to three days. They can also be placed in an airtight container for freshness. Freezing is not recommended, as the texture of the filling may change when thawed. For best texture and flavor, simply enjoy them cold straight from the fridge.
Nutrition Information
Calories: 320
Total Fat: 22g
Saturated Fat: 13g
Carbohydrates: 28g
Fiber: 1g
Sugar: 16g
Protein: 4g
Sodium: 200mg
Frequently Asked Questions
Can I make this recipe ahead of time?
Yes, these cheesecake cups can be made a day or two in advance. Just be sure to store them covered in the refrigerator to keep them fresh.
How long does it last in the fridge?
They typically last for about three days when stored properly in the refrigerator. After that, the texture may start to change.
Can I freeze this recipe?
Freezing is not advisable due to the creamy texture, which could be impacted. It’s best to enjoy them freshly refrigerated for optimal taste.
What can I substitute for one ingredient?
If you don’t have Greek yogurt, you can use sour cream as a substitute. It will still provide that creamy texture and tangy flavor.
Why didn’t my recipe turn out as expected?
Common issues usually stem from ingredient temperature or not allowing enough chill time. Ensuring room temperature ingredients and adequate chilling can help achieve the best results.
Final Thoughts
Making these Hawaiian Pineapple Cheesecake Cups offers a delightful combination of flavors and textures without the need for baking. Each individual serving is a perfect balance of creamy, sweet, and refreshing, making them a treat suitable for many occasions. Enjoy the light, tropical flavors, and the comfort that comes from a homemade dessert. This simple recipe is sure to become a favorite in your home.
 3")
Hawaiian Pineapple Cheesecake Cups
Ingredients
For the crust
- 1 cup graham cracker crumbs for a crumbly texture
- ¼ cup butter, melted adds moisture and richness
- 1 tablespoon granulated sugar sweetens the crust
For the filling
- 1 8-ounce block cream cheese, softened provides a creamy base
- ½ cup heavy cream adds richness and lightness
- ½ cup plain Greek yogurt for tang and creaminess
- ¼ cup granulated sugar sweetens the filling
- 1 teaspoon pure vanilla extract enhances flavor
- 8 ounces canned pineapple, crushed or finely diced and drained adds fruitiness and moisture
- as needed extra pineapple slices to garnish
- as needed Maraschino cherries to garnish
Instructions
Preparation
- In a mixing bowl, combine the graham cracker crumbs, melted butter, and granulated sugar. Mix until the crumbs resemble wet sand.
- Evenly distribute the crust mixture into serving cups or ramekins and press down to create a compact base.
- In a separate bowl, beat the softened cream cheese until smooth and creamy.
- Add heavy cream and Greek yogurt to the cream cheese, beating until smooth.
- Gradually mix in the granulated sugar and vanilla extract until well combined and smooth.
- Fold in the drained pineapple gently until evenly mixed.
Assembly
- Spoon the cheesecake filling into each cup over the crust layer, smoothing the tops.
- Refrigerate for at least four hours or until set.
- Before serving, garnish with a slice of pineapple and a Maraschino cherry.


