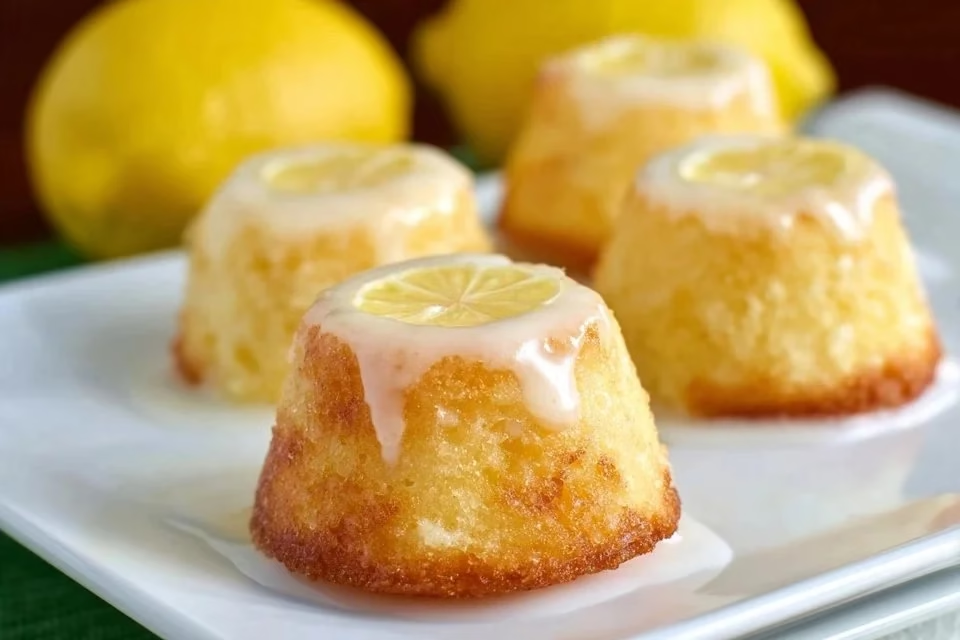
There’s something comforting about baking, especially when it leads to a sweet treat like mini lemon drop cakes. These cakes are perfect for a quiet evening at home or for sharing with loved ones during a weekend gathering. Easy to whip up and enjoyable at any time, their light texture complements their bright lemon flavor beautifully. The process is straightforward, allowing for a relaxed cooking experience. Let’s dive into the recipe and bring a bit of sweetness into your day.
Why You’ll Love This Lemon Bars Recipe
These mini lemon drop cakes offer ease and reliability in their preparation, making them a fantastic choice for any home cook. Their delightful balance of flavors brings comfort, while their light texture makes them suitable for various occasions. This recipe combines all the practical elements of home baking, ensuring they are a cherished addition to your dessert rotation.
Kitchen Tools You’ll Need
- Mixing bowls
- Whisk
- Measuring cups
- Baking pan
- Cooling rack
Ingredients
- 1 cup all purpose flour (structural base)
- 1 cup sugar (adds sweetness and moisture)
- ½ tsp salt (enhances flavor)
- ½ tsp baking soda (helps with leavening)
- ½ cup butter (adds richness and moisture)
- ½ cup water (hydrates the batter)
- ¼ cup sour cream (contributes to moisture and tang)
- 1 whole egg (provides structure and richness)
- 1 Tbsp fresh lemon zest (adds bright flavor)
- 1 Tbsp fresh lemon juice (provides acidity for balance)
- 1 ½ cups powdered sugar (base for glaze sweetness)
- 1 tsp fresh lemon zest (for glaze flavor)
- 1 Tbsp melted butter (adds richness to glaze)
- 2 Tbsp fresh lemon juice (for glaze acidity)
- 2 Tbsp milk (dilutes glaze for spreading)

How to Make Lemon Bars Recipe
Step 1. Begin by preheating your oven. This initial step is important for creating an evenly baked cake. Grease your baking pan to ensure the cakes release easily once they are baked. Keep an eye on the greasing process, ensuring you cover all areas to prevent sticking.
Step 2. In a mixing bowl, combine the all-purpose flour, sugar, salt, and baking soda. Whisk these dry ingredients together until they are evenly blended. This step is essential as it helps to avoid clumps and ensures a consistent texture throughout the cake.
Step 3. In a separate bowl, melt the butter and then add in the water, sour cream, and egg. Stir the mixture until all of the wet ingredients are fully combined. Look for a smooth consistency, ensuring the butter is well integrated for a moist cake texture.
Step 4. Gradually incorporate the wet mixture into the dry ingredients while mixing gently. This technique helps to prevent overmixing, which can lead to dense cakes. Keep stirring until just combined; it’s okay if there are a few small lumps.
Step 5. Add in the fresh lemon zest and lemon juice to the batter. Fold them in gently to ensure an even distribution of flavor. You should notice a fresh aroma coming through as you mix, signaling that the citrus is well combined into the batter.
Step 6. Pour the batter into the prepared baking pan, smoothing it out with a spatula for even cooking. Spread it evenly to avoid uneven baking. Visual cues like a smooth surface provide reassurance that you’re preparing for the next baking step properly.
Step 7. Bake the cakes until they are golden and a toothpick inserted in the center comes out clean. These visual indicators are key to ensuring the cakes are not underbaked. Once done, remove them from the oven and let them cool in the pan briefly before transferring to a cooling rack.
Step 8. While the cakes cool, prepare the glaze by sifting the powdered sugar into a bowl. Add in the melted butter, lemon zest, lemon juice, and milk. Whisk until smooth, adjusting the protein content as necessary by adding more milk if needed for your desired glaze consistency.
Step 9. Once the cakes are completely cooled, drizzle the glaze over the tops, allowing it to pool slightly on the sides. The glaze should have a smooth, shiny appearance as it covers the cakes, adding a delightful finish and enhancing the flavor.
Step 10. Allow the glaze to set for a few moments before serving. This small resting time helps the glaze to firm up slightly. You can then slice or serve the cakes as desired, enjoying the fresh lemon flavor.

Serving Suggestions
These mini lemon drop cakes are versatile and can be enjoyed at any time of the day. Serve them for breakfast alongside tea or coffee for a delightful start to your morning. They also make lovely snacks throughout the day, offering a light sweetness that fits perfectly in between meals. Feel free to share them during family meals or celebrations. Leftovers, if you have any, are even great the next day, retaining their flavor and moist texture.
Pro Tips for Best Results
- Ensure your butter is melted but not too hot, as it can affect the batter’s temperature.
- Be gentle when mixing to avoid overworking the flour, which can lead to tough cakes.
- Use a toothpick to check for doneness, ensuring it comes out clean for perfectly baked cakes.
- Allow the cakes to cool completely before glazing to prevent melting.
- Store leftovers in an airtight container to maintain freshness.
- For added lemon flavor, consider adjusting the lemon juice in the glaze to your taste.
Common Mistakes to Avoid
- Overmixing the batter: This can lead to a dense texture. Mix just until combined for light cakes.
- Using cold ingredients: Cold eggs or butter can affect consistency. Allow them to come to room temperature for better mixing.
- Skipping the zest: This adds essential flavor. Always include fresh zest for brightness.
- Not checking doneness: Relying solely on time may lead to overbaking. Use a toothpick to check centers.
- Not letting the cakes cool properly: Glazing warm cakes can cause the glaze to melt. Ensure they cool completely before adding.
- Poor storage: Leaving out cakes uncovered can cause them to dry out. Store in an airtight container for freshness.
Variations & Substitutions
Consider adding poppy seeds for a unique crunch and additional texture. You can also swap the fresh lemon for lime or orange zest and juice, providing a different citrus flair. For a touch of sweetness, mix in a few berries to the batter before baking. Each variation keeps the spirit of the recipe while allowing you to customize it to your preference.
Storage & Reheating
Store mini lemon drop cakes in an airtight container at room temperature for up to two days while maintaining their moisture. If you wish to keep them longer, refrigerate them for up to a week. For any cakes stored in the freezer, wrap them well in plastic wrap, then foil, for up to three months. To reheat, a quick warming in a microwave on low power works well, helping preserve their soft texture.
Frequently Asked Questions
Can I make this recipe ahead of time?
Yes, you can prepare these mini lemon drop cakes ahead of time. Bake and store them at room temperature for up to two days or refrigerate them for up to a week. Glaze them just before serving for the best texture.
How long does it last in the fridge?
When stored in an airtight container, these cakes can last in the refrigerator for about a week. Ensure they are fully cooled before storing to maintain their moisture and texture.
Can I freeze this recipe?
Absolutely! These mini lemon drop cakes freeze well. Just wrap them tightly in plastic wrap and then in foil. They can be stored in the freezer for up to three months. Thaw them in the fridge before serving.
What can I substitute for one ingredient?
If you need to substitute an ingredient, you can replace sour cream with plain yogurt in equal amounts. The yogurt will provide a similar moisture content and tangy flavor to the cake.
Why didn’t my recipe turn out as expected?
Common issues include not measuring ingredients accurately or overmixing the batter. Taking care to follow the steps closely and check for doneness with a toothpick can help ensure successful results.
Final Thoughts
Making mini lemon drop cakes is a relaxing endeavor that fills your kitchen with warm, inviting aromas. Their delightful lemon flavor and tender texture are sure to brighten up your days. Enjoying these cakes, whether on their own or shared with friends, reinforces the simple joy of home baking. This recipe is a reliable way to bring comfort and sweetness to your table.

Mini Lemon Drop Cakes
Ingredients
Cake Ingredients
- 1 cup all purpose flour Structural base
- 1 cup sugar Adds sweetness and moisture
- ½ tsp salt Enhances flavor
- ½ tsp baking soda Helps with leavening
- ½ cup butter Adds richness and moisture, melted
- ½ cup water Hydrates the batter
- ¼ cup sour cream Contributes to moisture and tang
- 1 whole egg Provides structure and richness
- 1 Tbsp fresh lemon zest Adds bright flavor to the cake
- 1 Tbsp fresh lemon juice Provides acidity for balance
Glaze Ingredients
- 1 ½ cups powdered sugar Base for glaze sweetness
- 1 tsp fresh lemon zest For glaze flavor
- 1 Tbsp melted butter Adds richness to glaze
- 2 Tbsp fresh lemon juice For glaze acidity
- 2 Tbsp milk Dilutes glaze for spreading
Instructions
Preparation
- Preheat your oven and grease your baking pan thoroughly to prevent sticking.
- In a mixing bowl, combine the all-purpose flour, sugar, salt, and baking soda, whisking until evenly blended.
- In a separate bowl, melt the butter and add the water, sour cream, and egg, stirring until fully combined.
- Gradually incorporate the wet mixture into the dry ingredients while mixing gently until just combined, taking care not to overmix.
- Fold in the fresh lemon zest and lemon juice gently for even flavor distribution.
- Pour the batter into the prepared baking pan and smooth it out for even cooking.
Baking
- Bake the cakes until golden and a toothpick inserted in the center comes out clean, about 20-25 minutes.
- Allow the cakes to cool in the pan briefly before transferring them to a cooling rack.
Glazing
- While the cakes cool, sift the powdered sugar into a bowl and mix in the melted butter, lemon zest, lemon juice, and milk, whisking until smooth.
- Once the cakes have cooled completely, drizzle the glaze over them and allow it to set for a moment before serving.