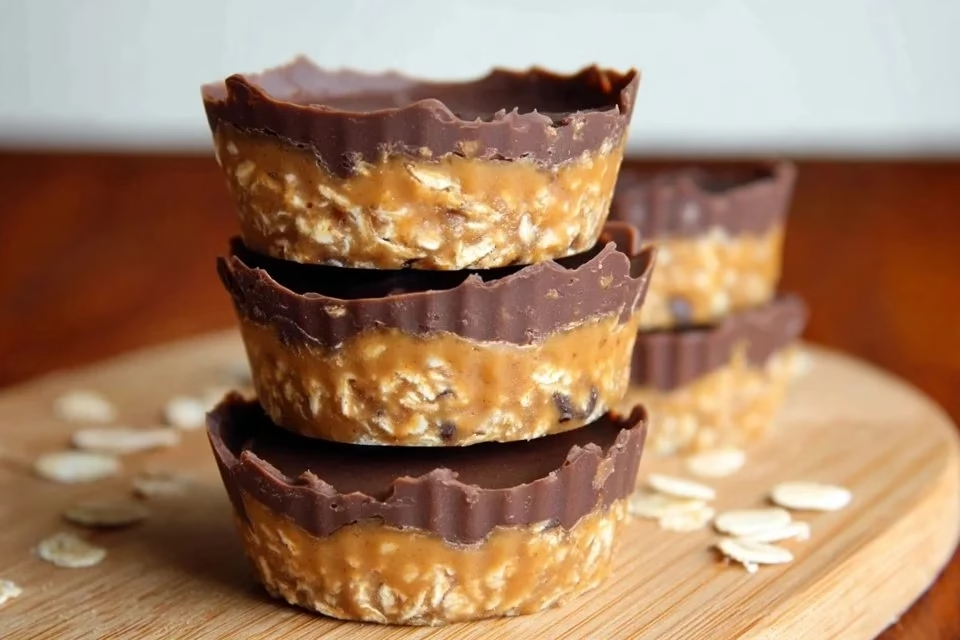
No Bake Peanut Butter Oat Cups are an easy, wholesome treat that captures the comforting flavors of peanut butter and oats. Perfect for weeknights, quiet moments, or casual gatherings, these cups require no baking, making them a practical choice for any home cook. Versatile and satisfying, they fit seamlessly into everyday life with minimal effort. With each bite, you can enjoy the blend of flavors while appreciating how simple these treats are to make. Let’s get started.
Why You’ll Love This No Bake Peanut Butter Oat Cups recipe healthy
This recipe provides ease and reliability, making it an ideal choice for a quick dessert or snack. The balanced flavors of peanut butter and chocolate create a comforting experience that everyone loves. No Bake Peanut Butter Oat Cups are a practical addition to your recipe collection, perfect for busy weeknights or spontaneous gatherings without compromising taste or quality.
Kitchen Tools You’ll Need
- Mixing bowl
- Measuring cups
- Spatula
- Baking dish or pan
Ingredients
- 1.5 cups peanut butter (rich, creamy texture)
- 1.5 cups rolled oats, processed finely to make oat flour (adds structure)
- 1/4 cup maple syrup (provides moisture and sweetness)
- 1 cup chocolate chips (offers sweetness and flavor)
- 1 tsp coconut oil (optional, adds moisture)
How to Make No Bake Peanut Butter Oat Cups
Step 1. Begin by preparing a mixing bowl. Simply add the peanut butter to the bowl, ensuring it’s at room temperature for easy mixing. This will create a smooth, creamy base for your oat cups. Mix it well by stirring until it becomes slightly softer and easier to blend with other ingredients. When it’s well blended, you’ll notice a creamy consistency.
Step 2. Next, add the finely processed rolled oats to the bowl with the peanut butter. Stir them in thoroughly, ensuring they’re well combined with the peanut butter. The oat flour will help bind the mixture together. Watch for a consistent texture as you mix, and ensure there are no dry clumps remaining. This step should result in a thick, moldable dough.
Step 3. Now it’s time to incorporate the maple syrup into the mixture. Pour it in gradually while mixing to ensure even sweetness throughout. The syrup adds both flavor and moisture, keeping the cups soft and enjoyable. As you mix, pay attention to achieving a sticky dough that holds together well. It’s complete when everything is combined.
Step 4. If you’re using coconut oil, gently melt it in a small dish. Once melted, add the coconut oil to the mixture in the bowl and stir until evenly distributed. This step is optional but brings a richer flavor and helps the mixture stay moist. If it’s well mixed, the dough should have a slight shine and be smooth.
Step 5. After all ingredients are combined, fold in the chocolate chips gently. Make sure they’re evenly distributed without crushing them. The chips will provide pockets of sweetness in every cup. You should be careful during this step to maintain the integrity of the chocolate chips, ensuring they remain whole and provide bursts of flavor.
Step 6. Prepare your baking dish or pan by lining it with parchment paper or simply greasing it. Once ready, transfer the mixture into the dish, pressing it firmly into an even layer. This ensures that the cups will hold their shape once set. Make sure to press down evenly, paying attention to the corners and edges, to form a compact layer.
Step 7. Place the pan in the refrigerator to chill for at least two hours. This chilling time allows the mixture to firm up and hold its shape. After the wait, take a moment to check if the mixture is set by lightly pressing on it. It should be firm but still slightly soft to the touch, making it easy to cut into cups.
Step 8. After chilling, remove the pan from the refrigerator and slice the set mixture into squares or bars, depending on your preference. Use a sharp knife for clean edges and to ensure the chocolate chips remain intact. As you cut, look for defined lines to create uniform pieces that are easy to grab and enjoy.
Serving Suggestions
No Bake Peanut Butter Oat Cups are perfect for breakfast on the go or as a satisfying snack any time of day. Serve them alongside a cup of yogurt or piece of fruit for a light meal. They also make great energy boosters during family outings or as a sweet treat for kids. Enjoy leftovers as a quick pick-me-up during busy afternoons or as a delightful addition to afternoon coffee breaks.
Pro Tips for Best Results
- Ensure your peanut butter is creamy for easy blending.
- Use rolled oats processed into fine flour for the best texture.
- Allow ample chilling time to ensure cups hold together well.
- Press the mixture firmly into the pan for well-formed cups.
- Experiment with different types or combinations of chocolate chips.
- Store in an airtight container to maintain freshness.
Common Mistakes to Avoid
- Not using creamy peanut butter: If you use chunky peanut butter, the texture will be inconsistent, making it difficult to bind the mixture. Opt for creamy peanut butter for the best results.
- Not processing the oats finely enough: Using whole rolled oats affects the texture and structure of the cups. Ensure oats are finely processed to form a smooth oat flour for a well-combined mixture.
- Skipping the chilling time: Not allowing the mixture to chill results in cups that won’t hold their shape. Be patient and let them set fully in the fridge to achieve the desired consistency.
- Overmixing after adding chocolate chips: This can break up the chocolate and alter the texture of the cups. Gently fold them in to keep them whole and maintain that delicious chocolatey goodness.
- Using too much syrup or fat: Excess moisture can result in the cups being too sticky or difficult to cut. Measure accurately and add only what’s needed to maintain the right balance of texture.
- Not lining the pan: Failing to line the baking dish can make it difficult to remove the oat cups cleanly. Use parchment paper or grease the dish well for easy removal.
Variations & Substitutions
Consider adding a pinch of salt for enhanced flavor or mixing in nuts or seeds for added crunch. For a hint of richness, you can use dark chocolate chips instead of regular ones. If you want a sweeter treat, try incorporating a few tablespoons of shredded coconut or dried fruit.
Storage & Reheating
Store No Bake Peanut Butter Oat Cups at room temperature for a day, or keep them in the refrigerator to extend freshness for up to a week. For longer storage, you can freeze them. Just make sure to wrap them well in plastic wrap or foil to prevent freezer burn. When ready to enjoy, thaw them in the refrigerator or at room temperature; they won’t need reheating.
Frequently Asked Questions
Can I make this recipe ahead of time?
Yes, these oat cups are ideal for making in advance. They can be prepared a few days ahead of when you plan to serve them. Just store them in the refrigerator for maximum freshness.
How long does it last in the fridge?
When stored properly in an airtight container, No Bake Peanut Butter Oat Cups can last for up to a week in the refrigerator. Enjoy them at your leisure within this time frame for the best quality.
Can I freeze this recipe?
Absolutely, you can freeze these oat cups for longer storage. Once fully set, wrap each piece in plastic wrap or foil before placing them in a freezer-safe bag. They will keep for about three months in the freezer.
What can I substitute for one ingredient?
If you don’t have maple syrup, you can substitute it with honey for similar sweetness and moisture. Just keep in mind that the flavor will vary slightly depending on the sweetener used.
Why didn’t my recipe turn out as expected?
If the cups did not hold their shape, it could be due to insufficient chilling time or too much moisture from the ingredients. Make sure to measure accurately and allow enough time for the mixture to firm up in the fridge.
Final Thoughts
Making No Bake Peanut Butter Oat Cups is a simple yet rewarding experience that results in a delightful treat anyone can enjoy. With their comforting flavors and ease of preparation, they are perfect for satisfying any craving. Embrace the practicality of this recipe, knowing you’ll always have a tasty snack on hand.

No Bake Peanut Butter Oat Cups
Ingredients
Main Ingredients
- 1.5 cups peanut butter rich, creamy texture
- 1.5 cups rolled oats, processed finely adds structure
- 1/4 cup maple syrup provides moisture and sweetness
- 1 cup chocolate chips offers sweetness and flavor
- 1 tsp coconut oil optional, adds moisture
Instructions
Preparation
- Add the peanut butter to a mixing bowl at room temperature, stirring until smooth and creamy.
- Mix in the finely processed rolled oats thoroughly until there are no dry clumps.
- Gradually pour in the maple syrup while mixing, achieving a sticky dough.
- If using, melt the coconut oil and stir it into the mixture until evenly distributed.
- Gently fold in the chocolate chips, ensuring they remain whole.
- Line a baking dish with parchment paper or grease it, then transfer and press the mixture into an even layer.
- Refrigerate for at least 2 hours until firm.
- Slice the chilled mixture into squares or bars for serving.


