After a busy day, there’s something comforting about a dessert that combines two favorites—brownies and cheesecake. This recipe for brownies offers a rich chocolate experience with a creamy cheesecake swirl that makes it a delightful treat. Whether it’s for a casual weeknight dessert, a gathering with friends, or a quiet moment relaxing at home, these brownies provide a satisfying balance of flavors and textures. The preparation is simple, allowing you to enjoy homemade sweetness without overwhelming effort. Let’s dive into the recipe together.
Why You’ll Love This Gluten Free Chocolate Cheesecake Brownies
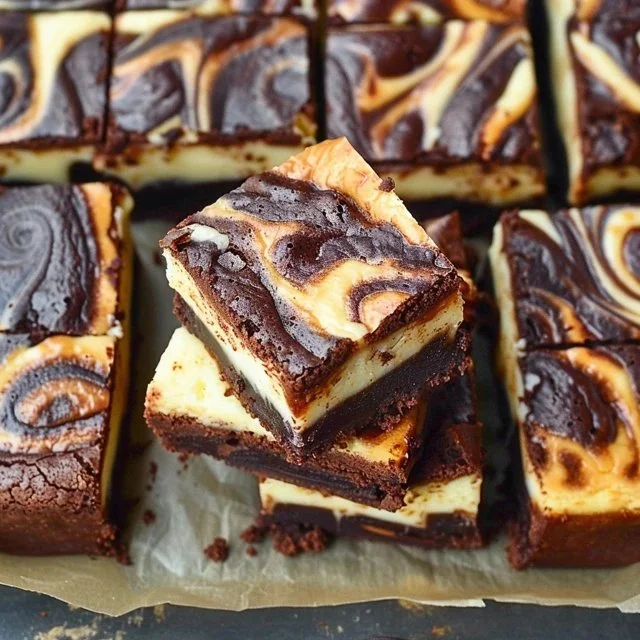
These brownies are not only easy to make but also deliver a comforting blend of chocolate and creamy cheesecake. Their rich flavor and fudgy texture make them a wonderful treat for any day of the week. The combination of each layer creates a delightful balance of taste, ensuring that these gluten free chocolate cheesecake brownies are a practical addition to your recipe rotation.
Kitchen Tools You’ll Need
- Mixing bowls
- Whisk
- Rubber spatula
- 9×9 inch baking pan
- Electric mixer (optional)
- Measuring cups and spoons
Ingredients
- 10 tablespoons butter or dairy free butter (adds richness)
- ½ cup dark chocolate chips or semi-sweet chocolate chips (provides sweetness and chocolate flavor)
- 2 large eggs (helps with structure and moisture)
- ¾ cup cane sugar (adds sweetness)
- ¼ cup brown sugar, packed (enhances moisture and flavor)
- 1 teaspoon vanilla (adds depth of flavor)
- ½ cup gluten free all purpose flour with xanthan gum (gives structure)
- ¼ teaspoon baking powder (provides leavening)
- ½ teaspoon salt (balances sweetness)
- 1 tablespoon cocoa powder (100% cacao) (intensifies chocolate flavor)
- 1 8 oz bar cream cheese or dairy free cream cheese (creates creaminess)
- ¼ cup sugar (adds sweetness to the cheesecake layer)
- 1 large egg (binds cheesecake ingredients)
- 3 tablespoons milk or dairy-free milk (adds moisture)
- ¾ teaspoon vanilla (enhances flavor of the cheesecake)

How to Make Gluten Free Chocolate Cheesecake Brownies
Step 1. Start by preheating your oven to the desired temperature. While the oven warms, prepare your baking pan by greasing it lightly to ensure easy removal of the brownies later.
Step 2. Next, melt the butter in a microwave-safe bowl or over low heat on the stove. Once melted, add the chocolate chips. Stir them together until the chocolate chips are fully melted and the mixture is smooth, creating a rich, glossy consistency.
Step 3. In a separate bowl, whisk together the eggs, cane sugar, and brown sugar until well combined. You’ll notice the mixture will become lighter in color and slightly thickened as you blend in the sugars with the eggs.
Step 4. Pour the melted chocolate and butter mixture into the egg and sugar blend, mixing well to incorporate. The warmth from the chocolate will help everything come together into a silky batter.
Step 5. Gently fold in the gluten free all purpose flour, baking powder, salt, and cocoa powder. Stir carefully, watching for flour clumps, until everything is just combined and the batter is smooth but not over-mixed.
Step 6. Spread the brownie batter evenly into the prepared pan, smoothing the top with a spatula for a nice, even layer. This creates the base for your delectable brownies.
Step 7. In another bowl, beat the cream cheese and sugar together until smooth and creamy. Adding the cream cheese at this stage ensures a luscious cheesecakey layer.
Step 8. Incorporate the large egg, milk, and vanilla into the cream cheese mixture. Blend until it is completely smooth and well combined, which will give you a nice, pourable filling.
Step 9. Pour the cream cheese mixture evenly over the brownie batter, using a spatula to gently spread it if needed. A little bit of patting and coaxing will help the cream cheese layer to sit nicely on top.
Step 10. To create a marbled effect, use a toothpick or a knife to swirl the cream cheese layer into the brownie batter below. You’re aiming for a marbled pattern here, which adds a visual appeal to your brownies while maintaining their individual layers.
Step 11. Once the marbling is to your liking, place the pan in the preheated oven. Bake until just set, watching for the center to be slightly soft but not overly jiggly, indicating they are done without becoming dry.
Step 12. Remove the pan from the oven and allow the brownies to cool in the pan for at least 15 minutes before cutting. This cooling time helps them firm up, making it easier to slice into neat squares.

Serving Suggestions
These gluten free chocolate cheesecake brownies are a versatile treat that works well for many occasions. They make for a delightful breakfast, or a sweet snack during the day. They’re also a fantastic addition to family meals, served warm with a scoop of ice cream or a dollop of whipped cream. Leftover brownies can be enjoyed throughout the week, either at room temperature or slightly warmed, making them a practical dessert to have on hand.
Pro Tips for Best Results
- Be sure to measure your ingredients accurately for the best texture.
- Mixing the batter gently will help maintain a fudgy consistency.
- Allow the brownies to cool completely before cutting to prevent them from crumbling.
- Use good quality chocolate for a richer flavor.
- If you like a stronger chocolate flavor, you might increase the cocoa powder slightly.
- Swirl the cheesecake carefully to achieve a pleasing marbled effect without fully blending the layers.
Common Mistakes to Avoid
- Overmixing the Batter: This can lead to tougher brownies. Mix until just combined for the best texture.
- Underbaking or Overbaking: If they are too soft, they might fall apart; too baked and they’ll be dry. Look for a slightly soft center for fudgy results.
- Skipping the Cooling Time: Cutting the brownies too early can lead to messy pieces. Allowing them to cool helps them set.
- Using Cold Ingredients: Make sure your eggs and cream cheese are at room temperature for a smoother batter.
- Not Greasing the Pan: If the pan is not prepared, the brownies may stick, making them difficult to remove. A little grease or parchment paper helps.
- Ignoring Ingredient Substitutions: Not adjusting for dairy-free or gluten-free options can yield mixed results if not done carefully.
Variations & Substitutions
You can mix things up by incorporating nuts for added crunch or different chocolate chips for varied flavor. Swapping in a flavored extract like almond can provide an interesting twist to the cheesecake layer. If you enjoy a bit of fruit, consider adding in chocolate-covered strawberries or raspberries on top before baking for added freshness.
Storage & Reheating
Store at room temperature for 1-2 days in an airtight container. For longer storage, keep them in the refrigerator for about a week. If you want to freeze the brownies, wrap them tightly in plastic wrap and then in foil. They can be reheated in the microwave for a few seconds to warm the layers back up while still maintaining their texture.
Frequently Asked Questions
Can I make this recipe ahead of time?
Yes, these brownies can be made ahead. Once cooled, store them in an airtight container. They maintain their flavor and texture well for a few days, making them convenient for planned gatherings or unexpected cravings.
How long does it last in the fridge?
They typically last about one week in the refrigerator. Just be sure to keep them in an airtight container to maintain their freshness.
Can I freeze this recipe?
Yes, these brownies freeze well. Wrap them tightly before placing them in a freezer bag. They can be stored for up to three months. Allow them to thaw in the fridge or at room temperature when you’re ready to enjoy.
What can I substitute for one ingredient?
If you need to substitute, you can swap the regular butter for a dairy-free butter alternative if keeping it dairy-free is essential. Just ensure all other ingredients match your dietary needs.
Why didn’t my recipe turn out as expected?
There might be several reasons, such as mismeasuring ingredients, not baking long enough, or overlooking the cooling time. Following the steps carefully should help achieve a satisfying result.
Final Thoughts
Making these gluten free chocolate cheesecake brownies can be a simple yet rewarding experience. They blend the richness of chocolate with the smooth, creamy texture of cheesecake, creating a treat that is perfect for any occasion. Enjoying them, whether warm from the oven or slightly chilled, offers a comforting end to your day. Embrace this recipe as a reliable go-to for satisfying your sweet tooth.

Gluten Free Chocolate Cheesecake Brownies
Ingredients
Brownie Base
- 10 tablespoons butter or dairy free butter adds richness
- ½ cup dark chocolate chips or semi-sweet chocolate chips provides sweetness and chocolate flavor
- 2 large eggs helps with structure and moisture
- ¾ cup cane sugar adds sweetness
- ¼ cup brown sugar, packed enhances moisture and flavor
- 1 teaspoon vanilla adds depth of flavor
- ½ cup gluten free all purpose flour with xanthan gum gives structure
- ¼ teaspoon baking powder provides leavening
- ½ teaspoon salt balances sweetness
- 1 tablespoon cocoa powder (100% cacao) intensifies chocolate flavor
Cheesecake Layer
- 1 8 oz bar cream cheese or dairy free cream cheese creates creaminess
- ¼ cup sugar adds sweetness to the cheesecake layer
- 1 large egg binds cheesecake ingredients
- 3 tablespoons milk or dairy-free milk adds moisture
- ¾ teaspoon vanilla enhances flavor of the cheesecake
Instructions
Preparation
- Start by preheating your oven to the desired temperature. While the oven warms, prepare your baking pan by greasing it lightly to ensure easy removal of the brownies later.
- Melt the butter in a microwave-safe bowl or over low heat on the stove. Once melted, add the chocolate chips and stir until fully melted and smooth.
- In a separate bowl, whisk together the eggs, cane sugar, and brown sugar until well combined. The mixture will become lighter and slightly thickened.
- Pour the melted chocolate and butter mixture into the egg and sugar blend, mixing well to incorporate into a silky batter.
- Gently fold in the gluten free all purpose flour, baking powder, salt, and cocoa powder until just combined and smooth.
- Spread the brownie batter evenly into the prepared pan.
- In another bowl, beat the cream cheese and sugar together until smooth. Incorporate the large egg, milk, and vanilla, blending until smooth.
- Pour the cream cheese mixture evenly over the brownie batter, spreading gently if needed.
- Use a toothpick or knife to swirl the cream cheese layer into the brownie batter.
- Bake in the preheated oven until just set, about 30 minutes.
- Allow the brownies to cool in the pan for at least 15 minutes before cutting.


